Showing posts with label TenSecond Studio. Show all posts

Monday, November 11, 2013

Gelli Prints and Metal Roses

I had a very creative weekend as it seemed everyone and my mother in law celebrated birthdays!!

Okay.  That is a slight exaggeration, but I cranked out 3 cards in one weekend.  And if you have visited this blog much in the past, you know that makes up more creativity than I usually manage in a month!!

I, of course, will only share one card today!! I am going to take advantage of having a "stash" of work to share over the next week or so!! hehe

While I was on the creative endeavor to make my father in law a birthday card a couple of weeks ago, (the card that actually came to be can be seen here ) I actually started out with the idea for a Gelli Print on the sticky side of a self laminating sheet.

Allow me to digress.  Making Gelli Prints on packing tape or the sticky side of a self laminating sheet is probably one of my most favorite Gelli Print techniques.  While I love the "unknown" outcomes with the more traditional methods of making monoprints with the Gelli Plate, I really, really REALLY like the process of planning out what what direction my print will take.

I might have a little issue with control.  Or just letting my art F....L...O....W....

ANYHOOS!!  I made this wonderful turquoise and copper print a couple of weeks ago and for the life of me, could NOT figure out how "finish" the card without taking away from the print.

Sometimes, walking away is the best way to complete a creative project.

So, I started with the background.......


Gelli print made with some turquoise and brown acrylic paint (stash) brayered over the TCW's Mini Gears stencil. Copper Pearl Ex was then applied on the "clear" area of the print. 

And rediscovered my love of working with metal.......


Roses were die cut from Ten Second Studios Dark Chocolate Metal with Spellbinders/Donna Salazar's Rose Creation dies.  The leaves are from Spellbinder's Foliage and the flourish is an old Sizzix die.   

Finished with  a little extra wire and bling ! Who needs a sentiment?! Not this card!!

I will admit that this card ended up being more than what I had envisioned.  But I thoroughly enjoyed working with the metal sheets again and have vowed to pull out that medium more often in the future!!

'Till next time..............


Monday, December 10, 2012

Chocolate Rose

OOOOO!! I'm doing good!  I have managed to get another card done today before the month has past, LOL!!

Seriously, I do consider this an accomplishment, considering my incredibly overbooked calendar!!

I needed to make a dear friend a birthday card.  I had an inspiration piece in my mind and thought I had mapped out exactly how the card was going to look.

Does anyone else experience the artistic curve ball of having your perfectly thought out idea totally fail? I actually experience this creative detour more often than not. And while I usually don't mind this creative detour, I happened to have just a teeny tiny time crunch staring me in the face.

As in I was down to a total of about 45 minutes to come up with Plan B, get into the shower, get somewhat presentable and head out the door.


I stuck with my color inspiration and desire to use metal.  I had to forgo the original focal point idea (had to do with various swirls and such) and went with Plan B to go to my basic card layout of late with a flower focal point.  

Sigh.  Sometimes you just have to stick with the tried and true!

Basic details:  Metal is from TenSecond Studios in Dark Chocolate and Peacock.  I cut a strip of the Peacock and scored with my Scor-Buddy.  Adhered to the card with Scor-tape.  The rose was die cut with Donna Salazar's/Spellbinders Create a Rose.  Embossed with Spellbinder's M-bossabilities Ornamental Iron.  Sanded off the raised portion to expose the aluminium.  The same steps that can be see in this Black Metal Rose post.    The swirls and leaves were die cut from more of the Dark Chocolate Metal using Spellbinder's Doodle Parts and the leaves from the Create a Rose set.  The rose was adhered together with a hot glue gun for time's sake.   The sentiment stamped and I called her "good enough"!

This is the last week of school before the Christmas break.  I have about a million things that need to be completed but am hoping to get at least a half dozen completed, LOL!! 

'Till then................


Thursday, December 6, 2012

Black Metal Rose

Howdy Strangers!! Oh wait!  It's me that has been missing for a while!!

 I was all set to apologize for my absence, but then I realized that I would be apologizing for the fact that I have been busy with family happenings that have trumped creating.

And to be honest, I'm working on NOT feeling guilty or feel that I need to apologize for that.  I sooo admire those who are busy with family, jobs and life happenings, yet are still able to create several times a week.

Nope.  That's not me.

But!  You didn't drop by to hear me ramble about my weird guilt trips!

This week the high school boys are gearing up to ask out dates for the Winter Banquet.  Oldest kiddo is going to ask a classmate who shares his preference for 80's rock and metal music.  When he asked other friends to find out her favorite flower, she replied she likes "black roses.  A single black rose".  

Now, I don't know if she was being silly, but a black rose she will be getting!!

A black metal rose, that is.  


I have made roses out of metal before, using die cuts.  But I wanted a larger rose than what my available dies  were going to allow me to make.  I went online and found this template that I felt would work perfectly.  

I printed off the template onto regular copy paper.  I then traced  the templates with a Teflon refiner (you can use a stylus also) onto the metal by layering a thin mat, the metal and copy paper.


After tracing and cutting out the different pieces, I ran each layer through my Big Shot with Spellbinders M-Bossabilities Ornamental Iron.  


I then used a burnishing block to sand off the raised portions to expose the silver aluminium.


Usually, when making roses, you glue the petals of the larger layers into a cone shape.  Since I was wanting to adhere the rose onto a "stem" (a bamboo skewer wrapped in more of the black metal), I skipped that step. Using a hot glue gun, **Warning** Hot glue on metal gets HOT!  Be careful when handling!! I built up from the center out, wrapping and gluing each layer as I went.  Sorry there are no pictures of this step.  My hands were a tad bit occupied trying to maneuver the metal over the hot glue without leaving too much skin!! 


I wish you could see the texture and layers better!! Trying to photograph shiny metal at night is a bit beyond my photography skills at this time! LOL!!  The layers and texture add an elegance, yet still edgy, look to this "black rose".  

Basic supplies:  Rose Template from Ellinee.com.  Metal, mat, burnishing block (sanding block) and Teflon refiner:   Ten Second Studios Rock Star Black.  Embossing folders:  Spellbinders M-bossabilities Ornamental Iron and Cuttlebug Swiss dots.  

Well, that's it for me today!  I need to clean up this mess and start thinking about a couple of other projects that I would like to get done by this weekend!  

'Till then.....


Wednesday, April 25, 2012

Inspired By

TODAY IS THE DAY!  The BIG reveal of the project you have all been anxiously awaiting! Just go with my disillusions here! hehe.   The E-team is starting a new series that I think we will all enjoy and hopefully grow from!

This new blog hop is featuring our own personal journals as we embark on a journal that is
INSPIRED BY WORDS.

Visit each E-Team blog participant and leave a comment between today, April 25 to Sunday, April 29th for the chance to win a $25 eP gift certificate.  Winner's will be announced on the eP blog, Monday, April 30. PLUS!!  Join the E-Team in our journal adventure and post your journal cover on the eP blog by May 4th and we will pick 2 people to join us next month for the next journal adventure!!

ME!

I'm really excited about this new series!  I have been wanting to do an art journal for a while, but just never jump off the ledge. Add my love of inspirational words and this series has become the icing on the cake!  I'm so glad the Daisy snuck up behind me, and shoved! LOL!

I decided to make my own journal book instead of buying one.  My thought is that this will allow me to add what ever type of base paper or medium I would like to work with for that particular entry.  And I can add as many pages as I can fit my binding rings around! haha.  For my journal cover, I wanted to combine a couple of my favorite mediums; paint, metal and most recently, Ice Resin.  I started with a couple of Zutter book covers and painted a base coat of TenSecond Studios Verday paint in Bronze.  

Tips:  shake the paint well before applying.  The Verday paint is an acrylic paint that has actual metal particles in it.  You want to make sure that those particles get dispersed from settling on the bottom of the bottle.  

After letting the base coat dry for a couple of hours, I took a rough sea sponge and lightly dabbed more VerDay Bronze paint randomly onto the cover.  Immediately, while the paint was still wet, I misted with the VerDay Patina.  I put my Verday Patina into a cheap, fine mist bottle (like "hairspray" bottle), found  in the area where travel sized accessories are at Target.  
Let the Verday chemically react with the paint overnight.


After drying, I felt that I had gotten a bit heavy handed with the sponging/VerDay and had too much patina. I then just took my course sea sponge again, dipped it into a bit more VerDay Bronze paint, dabbed off on a paper towel and "dry" sponged randomly on the top of the covers to add more copper

Here is a picture, deliberately angled so that you can see all the wonderful metallic bronze shine


I have to say, I hated to cover up all this wonderful patina!!  LOL!  But cover it up I did!  Here is the cover to my journal.


I die cut various layers from the Tattered Floral die and from Spellbinders Carnation Creations from TenSecond Studio's Barn Red metal. I ran some of the flower layers through the Big Shot with an embossing folder and some layers I just hand doodled squiggle lines and others I used a decorative wheel tool on the metal to make patterns.  I then intensified the color with some alcohol inks 


I then shaped the flowers and applied a thin layer of Ice Resin to both sides of the individual layers using a small paint brush.  I recommend wearing gloves for this step.  It gets rather messy and you will get Ice Resin on your hands while trying to paint both sides of the petals.  I left a small portion of the bottom of the flowers unpainted so that I could set them down on my craft sheet to dry.  I was hoping that the Ice Resin would harden the metal enough that the flower petals would be more stable and would not bend as easily.  The Ice Resin DID help stabilize the metal.  I'm thinking that if I were to add another layer, it would make the metal really solid.   After letting the Ice Resin cure for a couple of days, I glued the layers together with Beacon's Glass, Metal and More Permanent Glue.  This is the first time I have used this glue and I was pleased at how relatively quick it set. I would highly recommend using it in a well ventilated room though! It has a bit of a strong odor!

The leaves were die cut using a combination of Spellbinders Carnations Creations and Foliage from TSS's Peacock metal.  


Here is my tutorial , with a video link for making flowers out of metal.  

And a close up of my "first" journal entry.  


The journal entry was typed on the computer, then each word cut out and sponged with Distress Vintage Photo ink.  I cut off a flap from a cardboard box, saturated it with water and peeled off the smooth layer of cardboard, revealing the rough layer underneath.  Distress Stain in Picket Fence was randomly applied.  The words were then attached using glue dots.  

The final touch was adding some swirling bling from Want2Scrap.  

I also finished the inside of the cover. 


I like to think that the TOTALLY different look is reflective of what I hope to accomplish with this journal.  No preconceived ideas.  No limits.  Just go for it.

I first covered the inside with Claudine's gesso.  I didn't really worry too much about how thick the coverage was.  Since I was totally impatient, I heat dried the gesso with my heat gun.  I then dropped random spatters of alcohol ink onto the gesso and hit them with a blast of canned air, dispersing the inks.  A light mist of Tattered Angels Glimmer Mist Tuscan Sun  was added on top.  After drying, I stamped the sentiment from Wendy Vecchi's I Am My Art set, using Archival Jet Black Ink.  Tip:  I would HIGHLY recommend that you do the inside of the cover before completing all the dimensional work on the outside.  It would make getting a clean, crisp stamped image soooo much easier and you will be able to avoid having to go over the stamped image with a black Sharpie.  Just sayin'.  

I'm really excited about this new adventure!  I hope that you will check out all the other E-Team's journal cover's and be inspired to join us!!


Monday, April 16, 2012

It's a VerDay

I have continued to work on my new project, but while waiting for parts and pieces to dry from various mediums, I decided to play around with some new VerDay paint and patina from TenSecond Studios.

I think I may have a new obsession.

This paint is an acrylic paint that actually have metal particles in it that will react chemically with the VerDay, giving you a wonderful patina, without having to do layers of faux painting. 

Did I mention that I may be slightly in love with this stuff?  Good.  Because I'm looking at everything in my house trying to decide what I'll be painting next. 

I started with a off white, faux rusted cross that I have had for a while.  I have a collection of crosses on the wall over my couch and this cross never fit in.  I bought it with the intention of painting it, but just never got around to it. 


I began by painting a base coat of the Copper VerDay paint.  After letting it dry for a couple of hours, I used a rough sea sponge to lightly dab sections of the cross with more paint.  While the paint was still wet, I misted with the VerDay

Then the hard part.  Walking away for 6-8 hours and just letting it react.  Once the waiting was over I lightly dry brushed more copper paint over the raised portions to highlight the edges.


click on the picture to enlarge

Did this not turn out fabulous?!!  Ok, I really should have waited to take a picture when the sun was up to show how awesome this turned out, but I was sooo excited that I couldn't wait!!  This even got the Toad's seal of approval without asking what he thought. 

It's looking like it is going to be a beautiful day here.  I'm going to take advantage of the lovely morning and head out for a long walk with the neglected pooch before I start my day of running errands all over So. Cal.

Before I leave, here is another sneak peek of the upcoming project


Did I mention that I'm obsessed?!! hehe

'Till next time.............enjoy the day and explore some creativity!

Sunday, February 19, 2012

Measuring Life

Hey People!  I'm excited to be posting today as a guest designer for the CAS challenge on SCS!  Today's challenge is to use stitching or faux stitching in our projects.

Now, it just so happens that I'm deathly allergic to sewing (my aplogies to my Home Ec teacher, Ms. D.).  While I can sew on a button, It will usually take me several months to get that chore done.  So, rather than keep everyone waiting, I went with the faux stitching!


  The Toad thinks I failed this challenge as I added embellishments. Personally, while I liked the card with just the sentiment panel, I felt that the flowers added bit of needed color. 

The card base is 4 1/4" x 5 1/2" Pure Luxury Ivory.  The sentiment panel is also Pure Luxury Ivory that I distressed the edges and inked first with Distress Antique Linen, then along the edges with Distress Vintage Photo.  The sentiment is from TenSecondStudios stamp set Life, which was stamped with Distress Gathered Twigs.  I just randomly poked holes along the edges with a needle and faux stitched with a SU Creamy Caramel marker.

The rolled roses were die cut with Spellbinders scalloped circles out of My Mind's Eye Madison Avenue.  I free cut the spiral and inked the edges with Distress Victorian Velvet before rolling the roses.  The leaves are Sizzix's Branch with Leaves die and were cut out of Basic Grey's Sweet Threads. 

A shout out to the weekly CAS DT gals for allowing me to be a guest designer this week!! Thanks girls!!

Well, I'm one of the unlucky ones who had to go to work today, but I hope that you get an extra day of creating!  'Till next time................look for moments that take your breath away today!!

Wednesday, February 8, 2012

Tooting My Own Horn (but I added a tutorial!!)

Hey People! Hope your week has started out well!  The Oldest Kiddo's JV basketball team (which is coached by the Toad) had back to back games on Monday and Tuesday but walked away undefeated in league! WooHoo!!  Last night's game was an away game and the boys convinced the Toad that they should stop and eat on the way home to celebrate.  So, I'm a tad late this morning getting this post up!!

Back in August I was asked by Papercraft Inspirations Magazine if I would consider being a contributor for their Masterclass article in issue 95 (January issue).  Let's just say I'm amazed I was able to type Yes, thank you! with all my hootin' and hollerin!!


I actually had TWO cards published in this issue.  Today I'm going to share the Thinking of You card that was highlighted for the technique, versus the entire card.


Supplies Used:  Paper Gina K's Pure Luxury Ivory.  Basic Grey's 6x6 Sweet Threads. Stamps:  Hero Arts Stitched Frame. Inks:  Distress Ink Gathered Twigs.  Accessories:  TenSecond Studios Kiss Me Pink and Poison Ivy metal, mat set, Teflon refiner and decorative wheel.

And as an added bonus, the step by step!!


                                Using Stazon Ink, stamp your image onto the front side of the metal

Place the stamped metal face up on the acrylic mat and trace around the image with the Teflon refiner.  You could also use a stylus.


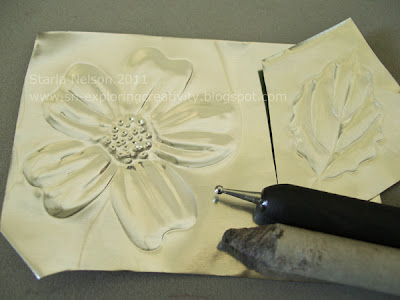
Place the metal stamped side down on the thin acrylic mat.  Use a paper stump and stylus (or ball and cup tool) to puff out the image

Still on the thin acrylic mat, use a decorative wheel to add detail


Use the pointed tip Teflon refiner to add "scribbles" between the petal lines

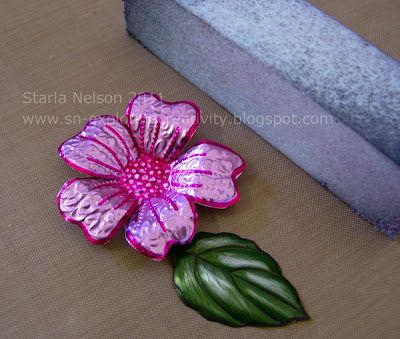
Cut out the flower and leaves (which were done the same up through step #3).  Using a sanding block (aka a burnishing block) lightly sand off some of the raised portions on the leaf to give highlights.  You could also sand the flower petals to highlight the "scribbles", but I wanted a more subtle texture, so I chose not to sand the flower.

Stamp stitched frame onto decorative paper.  Stamp sentiment onto scrap piece of Ivory card stock and distress edges with scissors or distressing tool.  Ink edges with Distress Gathered Twigs.  Adhere flower and leaves with strong glue dots, Humungo sticky tape or hot glue.

  A few notes on the flower:  I cut out two layers, but the bottom layer I did not add the decorative scribbles or lines.  I liked the look of the contrast between the layers.  You can gently form the petal leaves with your fingers to give shape to the flower. 

When adhering metal to metal, I like to use E6000 glue, Humungo Killer adhesive (link above) or a hot glue  gun.  I find that these work best for keeping the metal on metal adhered.  For adhering metal to paper, strong glue dots or the Humungo sticky tape work fine. 

That's it for me today!  I'll be back in a day or so with the SECOND card that was published!! (insert cheesy grin here_________).

'Till then..................

Friday, January 20, 2012

Getting the Faux on..........

Hey People!  The E-Team is starting the New Year with a New Series:  Getting Your Faux On!! 


Of course, it wouldn't be an E-Team hop with out some goodies!!  All you have to do is leave a comment on each Team member's blog for a chance to win one of  THREE $25 eP gift vouchers!  You will have from today, Friday, January 20 until Sunday, January 22 to leave a comment.  Winners will be announced late Monday, January 23 on the eP blog.

E-Team Members
Me!

The lovely Wendy Vecchi posted a fabulous faux technique, Faux Crazed Porcelain, on her blog a while back, using Glue n Seal and Rock Candy Crackle Paint.  Our fearless leader, Daisy, challenged the E-Team to use this technique and see what we could come up with to inspire you to give it a try!!   

I did a lot of experimenting with this technique.  Let me first share my project, then I'll share some tips on what I discovered.

Let's just ignore the fact that I put my cage on base at an angle.  Yes, it really bothers me, as I was wanting it to be straight!  The bent "bars" would be my failed attempt trying to correct the angle of placement after the fact.  Obviously, sometimes you just have to let those little mishaps go. sigh.

I decided to make a decor item or wall hanging.  The base is a piece of foam board that was cut to 6x6".  Two layers of Pure Luxury Ivory card stock the bottom layer is slightly larger than 6x6") were distressed and form the base.  All the decorative papers come from My Mind's Eye 6x6 pad Madison Avenue.  The fall seasonal Distress Ink Gathered Twigs was used to add distressing along the edges of the papers.  The cage was die cut from Ten Second Studios Dark Chocolate metal. It's difficult to tell from the picture, but the cage was bent to form a 3D effect off the base.   The butterflies were punched using a MS butterfly punch and Alterations  movers and shakers  Mini Butterflies. The Clearly for Art modeling film was used to add dimension to the butterflies. 


Other accessories used were Old Lace Glimmer Mist (on the base design paper and the Fleur de Lis "lace", made with the Spellbinder's die), 1/2 back self adhesive pearls (from my stash) and the decorative pearl swirls, also from my stash.  The sentiment tag is just a scrap of Ivory card stock, distressed with Gathered Twigs ink that I wrote the saying on. 

NOW for the faux porcelain!!  One of the surfaces for this technique that I tested was the Clearly for Art modeling film.  I brushed a thin coat of Glue n Seal onto the film and after that had dried, I coated again with the Rock Candy Crackle Paint. I die cut the flower pieces with the Tattered Floral die and then used the reinker for Distress Ink Spun Sugar to color the  flower.  I just dropped several pools of ink onto the film and used a paper towel to rub it into the cracks and wipe off the excess.  The color and technique seemed to hold well, even with the heating of the film to mold the flower petals. 

The center of the flower was made with a Viva Pearl Pen in Cream.  I colored it with Copic markers to match the flower. 

The leaves were done the same way, only I used a transparency sheet from Office Depot for my base. 


Let me share some tips/tricks with you that I learned while exploring this technique.

Surfaces:  This technique works on a variety of "slick" surfaces.  I tested it on glass, transparency and Clearly for Art modeling film.  You MUST use the Glue n Seal (or perhaps Elmer's Glue) for a base for the crackle paint to adhere too.  Otherwise, the crackle paint will rub off!!  A thicker layer of crackle paint will yield larger cracks, but I have found it takes a VERY thick layer to get large cracks.  You can speed up the drying process with your heat gun once you notice the cracks appearing.  Just beware that if you happen to hit a thicker pocket of paint, it may bubble with the heat gun.  It can sometimes result in a different texture than the rest of the cracks.  I'm not sure if that is from the paint or perhaps the glue bubbling. 

I also tried this technique on Ten Second Studio's metal, using the same methodology. While the technique works on the metal, I found that the cracks were sooo fine, that they were difficult to see with the shine of the metal. And I'm still experimenting as to what type of inks I could use to highlight the cracks more. I really wanted LARGE cracking on the metal versus the fine cracking that I was getting more often than not. So far, I have found that it takes a VERY, VERY thick coat to crack large on the metal, but that is not consistent. I also tried to speed up the drying process of the paint, once cracking was noticed, with my heat gun, but it seems to have a reaction with the glue/paint/metal and results in a change in color of the metal. I will be experimenting more with this technique and metal and will let you know what I come up with at a later date!!

Coloring:  Surprisingly, Distress Stains and the Distress ReInkers seem to color the faux porcelain without rubbing off.  I found that I could get a second layer of color on if I allowed the first layer of color to dry.  I still need to test permanent inks to see how those will color.  The mottling effect of darker Alcohol inks tended to obscure the detail of the cracks since the ink will adhere to the smooth surface under the cracks.  The lighter color of inks look FAB!

Other:  I also tried using the glue as a base for other crackle paint on these same surfaces.  Worked well, but you obviously don't get the transparency as you do with the Rock Candy crackle paint. 

 Tip:  If you by chance find that your crackle paint has dried up, mix in some water.  It doesn't seem to affect the crackling compound of the paint.  DO NOT  use a glaze to thin the paint.  That, DOES seem to affect the crackling!!  Also, Linda L, had a great suggestion to store your paints and Distress Stains upside down to help prevent air from getting into the jars and bottles.   Just tip the paint jars upright for a minute or so, before using them, and the paint will drip off the brush back into the jar.

I hope that you found this technique inspiring and will give it a try! 

'Till next time.................explore a new technique or experiment, with a twist, using an old favorite technique!!
 

Sunday, November 6, 2011

Just a Blue Note

Hey People!  It would seem that fall has finally hit our little neck of the woods.  It's dreary out, raining and rather cold for this part of California! haha

I thought I would share a card that I made that wasn't chosen for another project. 


I spent my ENTIRE morning trying to figure out how to make a slide show video of the steps to make this card using Photoshop elements.  Got a video made, but the slides were all blurry!  I need to figure out what size settings to use for videos!  After much frustration, I resorted to using Picassa.  Much more user friendly, I must say. 

So, here is a picture video of the process.  Be kind...remember I have spent all day trying to get this to work and am beyond frustrated with technology at this point, LOL!! 


I'm off to watch the oldest Kiddo play in the season's first basketball scrimage.  The NBA may be on lockout, but the school season is soon to start!!

Till next time.............remember that trying something new may be frustrating (grrrrr on technology) but it keeps you on the path of exploring something new!

Saturday, September 3, 2011

Glitter on my Skull

Hey People!  I hope you are taking the time for some creativity over this long holiday weekend!  As for myself, I get to reminisce how I was in actual labor with the Youngest Kiddo.  Yes, the Labor Day jokes get over used every year!

Staying true to my procrastinating nature, I am just now finishing his card.  But, hey!!  In my defense, I was called into work every day this past week, which makes my mojo go into hiding.  Aaaannnd!! I did get the card done before the family party this evening! WhooHoo!! Bonus points for me! LOL!!

I usually have some idea as to what type of card I want to create for my kids on each milestone birthday.  This time around, I REALLY struggled.  I don't know why.  I just couldn't come up with anything.  Maybe it is my sub conscience way of trying to avoid the fact that my kiddos are bulldozing towards adulthood.

I finally decided to make a card based on one of his favorite things:  Skulls.  I have NOOOOO idea where he got that fascination (wink).  For those of you new to my blog~~I just so happen to like skulls.  And skeletons.  And no, I do not think that they are evil, satanic or morbid.  I think I found them incredibly fascinating while in Anatomy and many years later, I am still drawn to them. 

ANYHOOS!  I digress!  I have had TenSecond Studios Day of the Dead mold in my stash just waiting for me to buckle down and use it in a project.   Combine that with the inspiration from a project that Cheryl did for CHA last year, this is what I came up with:

Can I just say that I would have to use two of the hardest elements to photograph in this project; glitter and metal!!

I started by using a 3 3/4" x 5" piece  Rock Star Black metal with the Day of the Dead mold.  After embossing and detailing the image, I sanded off the raised sections with my sanding block.  I then used Glossy Accents to glue the various sugar coating glitters from Doodlebug Designs and Art Glitter into the recessed areas.  Because I was lazy, I chose not to fill the back of the image with Spackle or embossing paste.  I think that the way this particular image is created, I don't need to worry about the raised areas getting smashed down.  I then used Humungo Sticky Tape to adhere the image to a 4 1/4" x 5 1/2" top folding piece of White Pure Luxury card stock.  Tip:  though the metal is very light weight, you do want a stronger card base to keep the card from buckling under the weight.

And here is the inspiration piece that Cheryl made

Pretty cool, huh?!

I haven't forgotten that I still need to post my ideas and projects using Claudine Hellmuth's paints and canvas.  I just need to try and remove some of the glitter that would be in every nook and cranny of my office (and me).    Till then..................


Wednesday, August 17, 2011

Stamping and Metal

Hey People!  Can you believe it is Wednesday already?!  The family has been running around getting the last details ready for the kiddos to start school tomorrow.  I would swear that we just got out for the summer just days ago!!
Have another tutorial to share with you today!  Beate, from Splitcoaststampers, asked me to do another Wednesday tutorial using metal.  Now, what is seen in the tutorial is NOT my original idea.  It is just my version of a very common technique!  Because I am lazy, I am not going to do the step by step here.  I'm going to send you to the home page of Splitcoaststampers for the link.  I will share the picture of the project and the youtube link here though!!


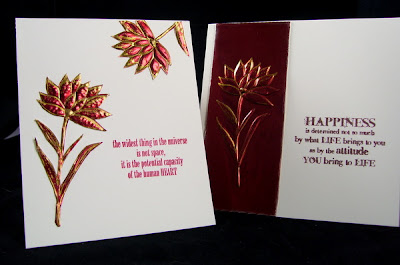
I used my stamped images two different ways today.  Both cards followed the stamping and metal instructions the same.  For my first card, I just cut out the stamped images after the backing paste had dried and I used them as metal embellishments for my card.  The second card keeps the stamped image on the metal panel. 

Here is the video of the technique


Ok.  Seriously.  I must have ticked off the technology gods sometime recently.  NOW Splitcoaststampers is also down, so I can't link to their site! 

What type of offering do you think the technology gods like?  Insert a looong, heavy sigh here_______.

Supplies:  Both cards use Pure Luxury Ivory cardstock as the base.  Both cards use Wendy Vecchi's Be Happy, Make Art stamp set.  Stazon Metallic Gold was used on TenSecond Studios Barn Red metal

If you are not inspired to emboss your image, just stamping on the metal is a fabulous look too!  I especially like the metallic Stazon on top of the metal.  Very rich looking!

I hope this inspires you to try combining your stamps and metal.  'Till then..............explore some type of creativity today!!