Showing posts with label Tattered Angels Glimmer Mist. Show all posts

Saturday, August 9, 2014

LOOK!! More Butterflies!!

Hello there!!  It's been a bit longer than I had planned between posts, despite the fact that I actually have a couple of cards that I have made and need to share.  Ahhhh!! The joys of being busy!! 

After my last card, it would appear that I had a rough time branching out from the butterfly genre.  I needed another teen card for a young lady mere days following the panic creating for the last birthday celebrations. Those creations can be found here and here, for those of you who may wish to refresh your memories or get a gander for the first time.  

I usually try to create cards that are not overly "girly" for the fairer peeps of my boys, as I would rather they not be embarrassed to give the cards.  

Not to mention that if one is going to embarrass their children, one should be able to see them squirm, am I right?!!

Despite my best efforts this card turned out to be a bit more "girly" than I was aiming for. BUT!! I used the last of my scraps from the papers made for the previous two cards and I got the card done fairly quickly, which in itself, is rather a miracle.


I apologize for the poor lighting of this card.  I took the pictures just before leaving to take the youngest kiddo to the party and didn't have time to download to make sure I had something presentable. You will just have to use some of your creativity to "lighten" the card to a brighter shade!!

As I said, the making of this was fairly simple.  I dug through my hoard and found a box of Glimmer Mist Masks and spritzed with a combination of light pink shades of Glimmer Mists. 

Would someone PLEASE let me know why I even own PINK Glimmer Mists?!!! It is driving me crazy as to why I would have purchased these colors!! But, apparently, I'm using them, so maybe I'm more of a "pink" type of gal than I want to acknowledge! 

The butterflies were die cut using a Tim Holtz die and a Martha Steward punch.  A bit of bling for the bodies.  Stamped the sentiment, adhered the butterflies with rolled glue dots down the center of their bodies so that the wings could be bent and popped up for "flight".  The front panel was cut slightly smaller than the card base and popped up with some dimensionals.

Easy peasy.  

I promise that my next couple of cards will NOT have butterflies, LOL!! In fact, I'd say they are at the opposite end of that spectrum!  

'Till next time................................

Monday, July 28, 2014

Winged Birthday Wishes

Hey there!! Today I thought I would share the second card I made using the same background technique I shared in my last post  but in a different way.  If you followed the link to the video of the technique  you will recall that it was recommended to use water color paper for the background. Call me a rebel a curious soul, but I wanted to see how the technique looked on different papers.  I used a heavier paper, (sorry, I think it was from Walmart.  I no longer have the info on it as it was a NEED STURDY PAPER NOW purchase and I was willy nilly in throwing away the information), along with the water color paper to compare the outcomes.

Recommendations are a good thing.  I liked the outcome of the technique better on the water color paper.  Much crisper image, but if you are looking for a more "water colored" or slightly more imperfect image, try it on card stock.  I'd be interested to see how the images compare from heavier weight to lighter weight card stock too.

Anyhoos!! I decided to use the results from the card stock paper with some punches.


I wanted a very light background paper as the butterflies added quite a bit of pattern on their own.  Again, the card size is a bit larger, 5x5.5" (?).  And I have NO IDEA what retired paper pack I used from my stash on this card as I had pulled out just about every pad I own trying to find a subtle background that wouldn't  distract from the butterflies.  Geesh.  I'm really slipping.  Obviously I'm not pushing any specific products, LOL!! I'm quickly becoming the antithesis of a design team member!!  I DO know that the punches are a combination of Tim Holtz, Martha Stewart and retired Spellbinders.  And the sentiment is retired SU.  Inks are the same as the last card: 
Distress Paints in Fired Brick, Spiced Marmalade and Wild Honey.  A mixture of Glimmer Mist Pearl and Luminarte Radiant Rain Pearl Blue. Embossing folder Sizzix Tropical Paisley.

I tried to get a photo of the shimmer on these winged wishes, but I couldn't capture the subtle shimmer. 

More shimmer to come!!

'Till next time.........................I hope you have a fabulous and creative week!! 


Sunday, July 20, 2014

Using my Inspiration Boards

How many of you utilize Pinterest?  I LOVE, love, LOVE Pinterest! It is a smorgasbord of unending inspiration and ideas.

And, believe it or not, I actually make recipes from ideas pinned and use my inspiration boards for ideas when creating.  Now if I would actually use the organization and cleaning pins!! snort!!

This past week, I have had to make a total of FOUR  cards in a span of a couple of days.

Four cards.  In a span of a couple of days.  People, I haven't created four cards in a MONTH in a very, veryveryvery long time!!

I needed two cards for office birthdays that we were celebrating the same day at an office lunch.  And, I got asked to make the cards the day before the lunch.   Of course, my creative mojo decided it wanted a vacation.  My Pinterest Inspiration board to the rescue!!

Basically, I took the easy way out and CASEd (copy and stole shared everything) of this fabulous card by beesmom on Splitcoaststampers. , but I had to do it with a twist as I couldn't find a die large enough to cut a frame to fit the  enlarged card size needed for all the office to sign and hold the gift certificates.

And I had a slight problem cutting down on the background!! I REALLY liked it! LOL!!


I wish you could see the shimmer on the background.  Very slight, but eye catching in person! I popped up the main images with dimensional tape to add an extra pop.

Details:  Cards size.  I honestly don't remember. I believe the base was 5"x 5.5".  Distress Paints in Fired Brick, Spiced Marmalade and Wild Honey.  A mixture of Glimmer Mist Pearl and Luminarte Radiant Rain Pearl Blue. Embossing folder Sizzix Tropical Paisley.  Dies: Tim Holtz's Garden Greens, Sizzix Bird w/Leaves and Flower.

The technique video that I used for the background can be found here.

I will share the second card I made using this same technique but in a totally different way in a few days! 

Until then................use those inspiration pictures and create!

Thursday, April 3, 2014

Flashback Thursday

Notice how the newest craze on FB is to post flashback photos on Thursday?  Today, I'm posting a birthday card that flashes back in using an oooold SU stamp set, Time Well Spent.

Actually, this card uses some old SU card stock colors also.

And the combination gives a retro, bright, 60's-early 70's look.

I'm just rocking the flashbacks today!!


The pink paper is either SU's Pink Passion or Pixie Pink. Who knows? I never labeled my paper colors and I actually had to look at my SU inks to get the possibilities.  The orange is Only Orange.  

I needed a card for a classmate of  Youngest Kiddo.  This particular girl is new to the class this year and I really don't know much about her personality to give me a clue as to what style of card I should go with. 

 This card took life with the determination to figure out how to use ink sprays (in this case, Tattered Angel's Glimmer Mist in Tuscan Sun and S.W.A.K.) besides just spritzing for general overall glimmer.  I taped down the honeycomb stencil from Heidi Swapp and tried to keep from being too heavy handed or too close with the spraying.  Then I dug through my paper stash and tried to find papers that matched the Glimmer Mists.  

Just a side note.  I am beyond curious as to why I even own a pink colored Glimmer Mist.  It is a well known fact that I am not a "pink" type of gal.  I cannot recall why I would have purchased such a color.  I must have needed it for a specific project. Who knows?!!

I then stamped the flower image from Time Well Spent three times using Memento Tuxedo Black ink.  I colored with Copics and cut each layer out and adhered with dimensional tape.  A epoxy dome was place over the center and bling added for extra pop.  The sentiment is also from an old retired SU set; It's Your Birthday.  I used the same Glimmer Mists on the sentiment flags to tone down the intensity of the colors just a bit.  A bit of a clear mist was then spritzed over the flower to tie it all together.


A bit brighter and much more "girly" than I usually make for my boys to give to their female friends, but, in this case, the Youngest Kiddo didn't flinch (much) when he saw it.  

Now to see what I can come up with for yet another female classmate's birthday this weekend!!


Friday, November 29, 2013

Birthday Vine

Hello there Peoples!!  I hope you had a wonderful Day of Thanksgiving yesterday!! I actually spread out Thanksgiving over the past week.  Youngest Kiddo and I went back to Colorado and spent 4 days with family.  Got home late Monday night, and have been trying to play catch up since!!

I missed my chance to say "Thanks" to those of you who stop in, browse and comment. But, I believe it is never too late to say "Thanks" so please know that I appreciate each and every one of you who do take the time from your busy schedules to visit this little ol' blog!!

Today's card is the last of the cards I made a few weekends back.  I'd like to say that I got out of my stuck in a rut, stuck in a rut layout, but alas!  I'm afraid that this layout is just a CAS (clean and simple) version of cards One and Two!!


Details:  card base is Gina K's Pure Luxury Ivory, 5.5" square.  Design Paper is My Mind's Eye Madison Avenue that was sponged along the edges with Distress Ink in Vintage Photo.  The flourish is Sizzix Flourish 2, that was die cut from SU Chocolate Chip and spritzed with various Glimmer Mists (sorry, it was a grab and spray type of thing and I forgot to note which ones I grabbed and sprayed!!).  The little flower petals were punched from an old SU punch (has 3 little flowers on in).  I sponged slightly in the middle with a Q-tip with Distress Ink Warm Lipstick and shaped with a stylus and mouse pad.  The little 1/2 self adhesive pearls are from my stash. The sentiment is from SU's retired stamp set It's Your Birthday and was stamped in Memento Rich Cocoa. 

That's about it for me today!! I have the goal of starting to put out my Christmas decorations this weekend and need to do some preparation cleaning first!!

'Till next time.............................


Friday, November 9, 2012

Vintage Rose

October 30.  Uhhh.  It would seem that I feel off the edge of the earth for a little bit!

In reality, while I haven't been crafting, I have been creating.

For the Annual Fall Fair:
250oz of homemade caramel.
150oz of Apple Pumpkin Spice dip.
Two pans of brownies, and 100 dipped S'mores marshmallows.

Before I even recovered from that tornado that hit my kitchen, I became "General Mom" and went into over drive, barking orders to the troops, aka The Toad and Kiddo's, to get a layer off the house to host a part for  the Oldest Kiddo's class that got changed to our house at the last minute.

This week, I TOTALLY went the opposite direction of being productive.

Unless you count the four books that I have finished since Sunday afternoon.  Which, for me personally, was a wonderful escape.

But I have warned myself that the mini book vacation is now over.  Time to snap myself back to reality.

My first reality check came in the form of a needed birthday card for my mother in law.  Whose birthday was actually on Tuesday, but will be celebrated tonight.

So, being the Queen of Procrastination, I waited until today to start thinking about it.

While the card took a bit of a different turn than I had originally started out with, I'm happy with the end results.  The card is kicked up a notch from CAS (clean and simple) but not too BAM! Does anyone besides me remember Emeril's cooking show?!


One of my goals this past year has been to use the vast amount of supplies that I already have, versus buying anything new.  I did break down a couple of months ago and bought Donna Salazar's Rose Creations, but justified the purchase with the knowledge that it was TWO YEARS ago released and has been on my wish list since!! 

Basic Details:  Card base is Pure Luxury Ivory (Gina K).  Designer paper is K&Company (oooold, from my stash), Spellbinder dies used for all the die cutting.  Stamp is from SU's retired It's Your Birthday. Tattered Angel's Glimmer mist in Vanilla Bean gives a slight shimmer to the rose.  Rose edges were sponged in Distress ink Victorian Velvet.  Leaves were sponged with Distress Peeled Paint while still in the die.  Bottom corners rounded with 1/2" corner rounder. 


'Till next time................remember to take time to explore some type of creativity, whether it be something that you create or the creative works of others!


Sunday, August 19, 2012

Rock Star

It would seem that my creativity is on an extended vacation. It has happened in the past so I know the duration of it's absence can vary from a few days to several months.  I'm a bit fearful that this round might be leaning towards the latter!

Unfortunately, the call to create reared it's ugly head despite the fact that notification was given that creativity is currently not available.  The Youngest Kiddo was invited to a classmates birthday party later this afternoon (Yes, I know.  Once again, I am trying to create with no mojo at the last minute!). I will also admit, that due to the severe lack of creativity, I once again considered buying a card.

And I wouldn't have felt any guilt.

But, I didn't.  All because of artistic ego.

You see, Youngest Kiddo has been attending this classmate's birthday parties for several years.  And every year I have made the birthday card that reflected the birthday theme for that year (as indicated by the homemade invitation and excited verbal updates by the birthday kiddo).  Last year, the creative mother told me that she always looks for the Youngest Kiddo's card because she knows it is homemade with the theme so she SAVES the card in her son's scrapbook.

Talk about pressure!

I'm not sure that this year's card meets the expectations that I have now exaggerated to myself.  I like the design concept in theory, but not sure the final outcome is what I had hoped for. It's close, just not quite there.

I recommend clicking on the photo for a larger view.  On my computer, the larger view IS in focus!


But, I'm not tweeking it.  This is the SECOND card made as the first had the misfortune of having the re positional stamp fall off the stamp block on the very last image being stamped, resulting in a wonderful blur of ink.  **Helpful tip:  if you are using a re positional stamp multiple times and cleaning the ink between each stamped image, I HIGHLY recommend that you check to make sure that the moisture from the cleaning did not loosen the bond of stamp to block.  Just sayin'. 

Basic creative (ha!) details:  Base: Gina K's Pure Luxury white, top fold.  Stamps are also from Gina K/Tami Mayberry Live Life Loud.  Distress Ink in Broken China and Peeled Paint were randomly applied to the stamp to create the mottled/tie die look.  The same inks were used to create the Wrinkle Free distress background, misted with Tattered Angel's Glimmer Mist Pearl.  The sentiment (same stamp set) was stamped with Distress Ink Gathered Twigs.  The sentiment was die cut and embossed with Spellbinders Label 12 and sponged along the edge with Broken China distress ink.  The sentiment was adhered using dimensionals.

That's about it for me today!  I'm trying to get motivated to tackle going through my craft area and PURGING, since creativity is out of town. I just finished the kitchen purge and am hoping that motivation doesn't decide to take a vacation too!!

'Till next time..................


Thursday, May 31, 2012

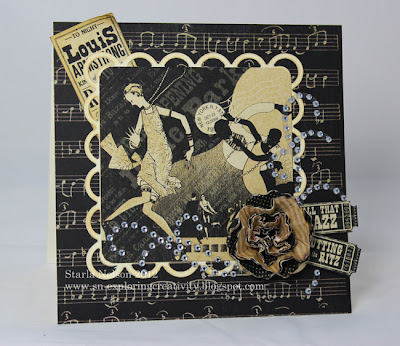
Jazzy Birthday

I had just picked up the Oldest Kiddo early from school on Wednesday, as he did not have to take his last final. He had maintained a high enough grade again this last quarter for that extra little perk from that particular teacher. Yes, that is a mother bragging!  As he was loading up all the "junk" from his now clean locker, I heard that lovely "DING", indicating that I had a text message.

From work.

It would seem that the front office gal and I had forgotten that the office was going to be celebrating the new gal's  birthday on Thursday.

Did I mention that we were the ones who were in charge of getting the present and card?!!

Now, being the Queen of Procrastination, I normally would have gone home and hemmed and hawed over a layout all evening and then jammed to get something put together right before I had to walk out the door to the lunch.  BUT!  No such luxury this time!  I had to book it home and bust out a card so that I could drop it by the office, before it closed for the day, as my Thursday is booked with the job of accompanying four boys to Disneyland for the day.  

It was about then that Mojo took one look at my panicked face and RAN.

Sigh.  So, now I'm having to produce a card, in a very short amount of time, for a person I've only worked with a couple of times, with NO MOJO.

Thank goodness for the world wide web!!  I pulled out some Graphic45 papers and went to their DT gallery to get some ideas.  This card from Gloria Stengel was my inspiration.  Here is my version of her incredible card.

 
click on photo for larger view

Card Basics:  Base is 5 1/2" square of Pure Luxury Ivory.  All the design paper is from Graphic 45's Curtain Call.  Spellbinder's Lacey Squares was used behind the main image and  Peony dies  were used for the flower.  Accessories:  Distress Antique Linen was sponged on the Lacey square and the Louis Armstrong "announcement" and Pearl Glimmer Mist on the flower.  The bling was from my "left over" stash.

I really have no idea if this is the new gal's  "style", but I rather like how it turned out despite no Mojo and thinking time! Thank you Gloria Stengel!  

One more day to get through before summer vacation begins!  YES!!

'Till next time....................... remember that there is inspiration everywhere, just make sure you give credit, where credit is due!!


Wednesday, May 23, 2012

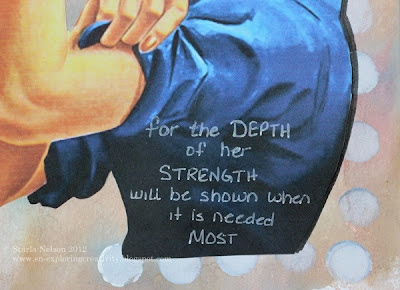
A Woman's Strength

Whew!

Today is another blog hop with the E-Team and special guests!!  I didn't originally think that I would be able to participate, but while on the drive home from work last night, creativity hit me over the head and I left dishes in the sink so that I could join in on the E-Team's Inspired By Words, part 2!


Before I show you my page inspired by this quote, let me give you the details for a chance to win an eP gift certificate
  • Visit each E-Team blog participant PLUS the guest bloggers to leave a comment for the chance to win a $25 eP GC. Comments can be left from May 23-May 28th. Two random winners from the blog hop will be chosen. GC winners posted May 29th on the eP blog.  

    Join the E-Team in our journal adventure and post your journal cover on the eP blog. We are going to pick 2 people to join us next month for another journalism adventure.  You have until Sunday, June 3rd, to upload your  journal page inspired by this month's inspiration quote. We'll pick and announce the next E-Team guest blogger Fri, Jun 8th on the eP blog. 
    Daisy/eP Blog
    Broni
    Micki
    Sherry
    Me!
    Guest Melody Schwartz
    Guest Marjie Kemper

    Here is my page.  I paraphrased the inspiration quote as I felt it fit better with my main image.


    Basic details on the makings of this:  I started with my version of the Wrinkle Free Distress technique. I smooshed (technical term) randomly Distress Inks in Fired Brick, Faded Jeans and Tea Dye onto my craft mat and misted heavily with Tattered Angels Glimmer Mist in Vanilla Breeze and Antique Brass.  I then placed my paper in the wet ink and ran my hands on the back to spread out the wet ink to all the edges.  


    Using a finger sponge dauber, I applied Claudine Hellmuth's blank canvas paint randomly over the background.  Since I grabbed a finger dauber that is usually used for blue inks, the dots have a blue tint.  

    The image was found on the Internet and cut out and taped onto the background.  The letters were written with a combination of Copic markers, Faber-Castell PITT artist pens and an inkssentials opaque pen.  

    I personally am dedicating this to my sister!! Love ya!

    Hope you will join the journaling adventure!  I look forward to seeing your take on this inspiring quote!

    'Till next time

Friday, January 20, 2012

Getting the Faux on..........

Hey People!  The E-Team is starting the New Year with a New Series:  Getting Your Faux On!! 


Of course, it wouldn't be an E-Team hop with out some goodies!!  All you have to do is leave a comment on each Team member's blog for a chance to win one of  THREE $25 eP gift vouchers!  You will have from today, Friday, January 20 until Sunday, January 22 to leave a comment.  Winners will be announced late Monday, January 23 on the eP blog.

E-Team Members
Me!

The lovely Wendy Vecchi posted a fabulous faux technique, Faux Crazed Porcelain, on her blog a while back, using Glue n Seal and Rock Candy Crackle Paint.  Our fearless leader, Daisy, challenged the E-Team to use this technique and see what we could come up with to inspire you to give it a try!!   

I did a lot of experimenting with this technique.  Let me first share my project, then I'll share some tips on what I discovered.

Let's just ignore the fact that I put my cage on base at an angle.  Yes, it really bothers me, as I was wanting it to be straight!  The bent "bars" would be my failed attempt trying to correct the angle of placement after the fact.  Obviously, sometimes you just have to let those little mishaps go. sigh.

I decided to make a decor item or wall hanging.  The base is a piece of foam board that was cut to 6x6".  Two layers of Pure Luxury Ivory card stock the bottom layer is slightly larger than 6x6") were distressed and form the base.  All the decorative papers come from My Mind's Eye 6x6 pad Madison Avenue.  The fall seasonal Distress Ink Gathered Twigs was used to add distressing along the edges of the papers.  The cage was die cut from Ten Second Studios Dark Chocolate metal. It's difficult to tell from the picture, but the cage was bent to form a 3D effect off the base.   The butterflies were punched using a MS butterfly punch and Alterations  movers and shakers  Mini Butterflies. The Clearly for Art modeling film was used to add dimension to the butterflies. 


Other accessories used were Old Lace Glimmer Mist (on the base design paper and the Fleur de Lis "lace", made with the Spellbinder's die), 1/2 back self adhesive pearls (from my stash) and the decorative pearl swirls, also from my stash.  The sentiment tag is just a scrap of Ivory card stock, distressed with Gathered Twigs ink that I wrote the saying on. 

NOW for the faux porcelain!!  One of the surfaces for this technique that I tested was the Clearly for Art modeling film.  I brushed a thin coat of Glue n Seal onto the film and after that had dried, I coated again with the Rock Candy Crackle Paint. I die cut the flower pieces with the Tattered Floral die and then used the reinker for Distress Ink Spun Sugar to color the  flower.  I just dropped several pools of ink onto the film and used a paper towel to rub it into the cracks and wipe off the excess.  The color and technique seemed to hold well, even with the heating of the film to mold the flower petals. 

The center of the flower was made with a Viva Pearl Pen in Cream.  I colored it with Copic markers to match the flower. 

The leaves were done the same way, only I used a transparency sheet from Office Depot for my base. 


Let me share some tips/tricks with you that I learned while exploring this technique.

Surfaces:  This technique works on a variety of "slick" surfaces.  I tested it on glass, transparency and Clearly for Art modeling film.  You MUST use the Glue n Seal (or perhaps Elmer's Glue) for a base for the crackle paint to adhere too.  Otherwise, the crackle paint will rub off!!  A thicker layer of crackle paint will yield larger cracks, but I have found it takes a VERY thick layer to get large cracks.  You can speed up the drying process with your heat gun once you notice the cracks appearing.  Just beware that if you happen to hit a thicker pocket of paint, it may bubble with the heat gun.  It can sometimes result in a different texture than the rest of the cracks.  I'm not sure if that is from the paint or perhaps the glue bubbling. 

I also tried this technique on Ten Second Studio's metal, using the same methodology. While the technique works on the metal, I found that the cracks were sooo fine, that they were difficult to see with the shine of the metal. And I'm still experimenting as to what type of inks I could use to highlight the cracks more. I really wanted LARGE cracking on the metal versus the fine cracking that I was getting more often than not. So far, I have found that it takes a VERY, VERY thick coat to crack large on the metal, but that is not consistent. I also tried to speed up the drying process of the paint, once cracking was noticed, with my heat gun, but it seems to have a reaction with the glue/paint/metal and results in a change in color of the metal. I will be experimenting more with this technique and metal and will let you know what I come up with at a later date!!

Coloring:  Surprisingly, Distress Stains and the Distress ReInkers seem to color the faux porcelain without rubbing off.  I found that I could get a second layer of color on if I allowed the first layer of color to dry.  I still need to test permanent inks to see how those will color.  The mottling effect of darker Alcohol inks tended to obscure the detail of the cracks since the ink will adhere to the smooth surface under the cracks.  The lighter color of inks look FAB!

Other:  I also tried using the glue as a base for other crackle paint on these same surfaces.  Worked well, but you obviously don't get the transparency as you do with the Rock Candy crackle paint. 

 Tip:  If you by chance find that your crackle paint has dried up, mix in some water.  It doesn't seem to affect the crackling compound of the paint.  DO NOT  use a glaze to thin the paint.  That, DOES seem to affect the crackling!!  Also, Linda L, had a great suggestion to store your paints and Distress Stains upside down to help prevent air from getting into the jars and bottles.   Just tip the paint jars upright for a minute or so, before using them, and the paint will drip off the brush back into the jar.

I hope that you found this technique inspiring and will give it a try! 

'Till next time.................explore a new technique or experiment, with a twist, using an old favorite technique!!
 

Friday, October 14, 2011

Thankful

Hey People!!  It's time for another hop with the E-Team!!  We are continuing with out Seasonal theme by  show casing our Thanks with any type of project except a card!!


And what would a ride with the E-Team be without some wonderful goodies?! Leave a comment on the participating team member blogs and be entered at the chance to win one of THREE (3) $20 gift vouches to the eP store!! 

But!  That's not all!! Make sure you also leave a comment on the eP blog for Daisy, as I hear rumors that a random winner will be chosen from those comments to win a surprise box of goodies!!

The E-Team
and
Latrice and Micki are sitting out this hop.  You can visit them and let them know how much they were missed!

When I think of things or words that are synonymous with Thanks, several thoughts come immediately to mind:   Fall, Family, The Toad, The Kiddos.  I chose to focus on the fall theme and my kiddos for this project.


It would seem that somebody, who shall remain nameless, forgot to read the fine print about using a "Tag or ATC" in the project!! oops!!


I am very thankful that while my boys are three years apart in age, they get along well (90% of the time) and are truly friends.  I decided to make a wall hanging from a photo that was taken on a family hike this past spring.  I LOVE photos of my kids from behind!  They are totally in their own world, unaware of the camera.  There is no obnoxious posing, goofy faces or rolling of the eyes when I ask for another "decent" picture attempt!!

I first altered the photo in Photoshop Elements using the sepia effect.  I then printed the photo out on Claudine Hellmuth's sticky back canvasYes!  This canvas works wonderfully in your printer!  And trust me, if it goes through my finicky printer, it will work in yours!  The leaves were made with the Wrinkle Free Distress technique, version Me.  I smooshed some Distress Ink in Spiced Marmalade, Fired Brick and Peeled Paint onto my craft sheet and misted heavily with a combination of Tattered Angel's Glimmer Mist in Tuscan Sun and Meadow Green.  I then layed Pure Luxury Ivory card stock in the beaded ink.  Falling Leaves were stamped on the paper with more Fired Brick or Peeled Paint and sponged along the edges.  I love the fine, almost lacy detail, of these stamps!  Alpha Parts, Ransom, letters were used to frame the photo.

close up of the canvas and detail of the leaves

To complete my wall hanging, I adhered the sticky canvas to black foam illustration board that I cut to size.  I then made my dimensional frame with some braided trim that has been in the garage for years!  I  dug out The Toad's miter box and cut  the trim to make a fitted frame.  Not perfect, but not bad for my first time at a mitered cut!!  I then painted the trim with Claudine's Charcoal Black studio paint.  Note:  this paint is soooo creamy!  I did not prime the wood at all and the paint covered it beautifully!  After the paint had dried (somewhat), I lightly sanded portions of the trim and added Distress Ink Vintage Photo to the sanded areas. 

after I edited the first photo, I decided that another leaf was needed in the bottom corner!

I was very pleased that this turned out!  I just need to decide where to hang it! 

I am also very thankful for the visits here and comments that you leave.  They really do inspire me!

'Till next time......................


Sunday, September 25, 2011

Trying to Rock Kraft

Are you sitting down?  Yes, I'm actually posting a new project today!!  I'm still fighting the lack of mojo, but seeing as I had yet to make the youngest kiddo's thank you cards for his b-day, it was time to grit my teeth and try to buckle down. I used the sketch challenge on SCS to launch myself off the cliff. 


I always admire those who can use Kraft card stock.  I have a really hard time getting it to "work" for me.  So, of course, just to add to the frustration of not having any mojo, I pulled out my pack of Kraft card stock.  HEY!  I figure if I'm going to go down in flames, I may as well do a good job of it! LOL!!

I started by smooshing Distress Inks Vintage Photo, Shabby Shutters and Tumbled Glass in a random way on my craft sheet.  I misted heavily with Tattered Angel's Glimmer Mist Pearl.  Then I layed a piece of Very Vanilla card stock in the beaded ink to make my Wrinkle Free Distress Background.  The "glare" on the last guitar panel is actually the glimmer mist!  I then stamped the guitar from Tami Mayberry's Live Life Loud set using the new Gathered Twigs Distress Ink.

Allow me to interrupt here:  Let me just say that this now my most favorite brown ink in the Distress Ink line!  It is the ink that was missing between Vintage Photo and Walnut Stain.  I am already panicking that there are no reinkers for the new seasonal Distress Inks. What am I going to do when this ink pad has reached it's saturation limit?!!  Hello, Ranger?  We NEED the reinkers.  This is the ink that MUST be added to the Distress Line.  Just sayin'.  Thank you for listening to little' ol' me.

Back to our previously scheduled post.

After stamping the guitars (I did mention that I LOVE the Gathered Twigs ink, right?!), I distressed the edges of the panels with my distressing tool and then inked the edges with Gathered Twigs ink.  The sentiment, from the same set, was stamped and two score lines added with my Scor-Buddy

This is a bit more involved than what I usually like to make for mass produced cards.  But, seeing as I only had to make 6 cards, it wasn't too bad on the time.  As far as the Kraft card stock~~not bad, not great, LOL!

That's it for me today!  Have a couple of other projects that I need to get crackalacin' on!  Till then..........

Saturday, August 20, 2011

Leapin' Lizards!

Happy Saturday People!

Yesterday, I realized (quite belatedly), the the youngest kiddo has a birthday party to attend TODAY.  Somehow, I got it in my head that it was next weekend.  Doesn't matter.  What matters is, I had to come up with a birthday card PRONTO.  Which is a scary thought when my mojo and I are just holding polite conversation with each other versus chatting like old friends.

But!  We managed to come up with this card, that was inspired by the picture of the birthday boy holding some reptile, on the invitation to join him at the local reptile store for his party.

So help me if my kid starts begging for another reptile.  Been there, done that.  I do NOT miss hearing crickets chirp at all hours of the night, nor do I miss finding the escapees throughout my house. 

Anyhoos!  I digress!  Here is the card that I came up with!


I bought this lizard stamp years ago at a little stamp store in Santa Fe, New Mexico.  I bought is purely for the fact that the wood mount has the imaged carved onto the block!  It is a showcase of craftsmanship!  I didn't care if I never used the stamp.  The carving is an incredible piece of art.


See what I mean?!  I can't imagine the time it took to carve this incredibly small detail!

I stamped the image with Memento Rich Coco onto a left over piece of paper that I had done my version of Wrinkle Free distress. This means, I have NO idea what particular distress inks were used.  Or what Glimmer Mists I used.  I think that Antique Brass was one as some of the shimmer looked brassy.  I then had to fussy cut the lizard.  It would seem that someone really didn't plan the angle of her stamping correctly!  shhhh.  I think that might have been mojo.  But, heaven knows!  I don't want to tick her off by mentioning it!

The lizard was then adhered to another Wrinkle Free sheet that was Pure Luxury white based.  The inks that I ended up using were Distress Frayed Burlap, Weathered Wood and a touch of Shabby Shutters.  I spritzed the ink with a combination of Tattered Angel's Glimmer Mist in Antique Brass and Patina.  I then roughly sponged around the edges with Distress Walnut Stain.  I then ran the background piece through the Big Shot with an old Fiskers Leather texture plate, to give a subtle texture and added dimension.  The lizard was attached with a combination of Scor-Tape and a Quickie Glue pen (for those little toes).  I used my Copics, B45, C1, C3, to add some more shading around the lizard to make him pop off the background a bit more.  The sentiment is from SU's, It's Your Birthday.  I did some masking to have the words layered versus in a straight line as the stamp is.  The whole shebang is attached to a Ivory Pure Luxury 5 1/2" square base. 

That's it for me today!  But!! Before I leave, I wanted to remind you all that you have until tomorrow, Sunday, August 21, to add your creation to to the Egg-cellent E-Team challenge! 


 You don't want to miss the chance at a $40 gift certificate to shop all the new goodies that Daisy has in the eP store!!

'Till then..........................


Friday, August 12, 2011

Egg-cellent Challenge

Hey People!  Today the E-Team is introducing a new challenge that will be open to YOU to participate in! 

Have you ever watched the Food Network show Chopped?  The premise is 4 cooks are given a basket of ingredients (some that you would NEVER think of using or combining) and are given 30 min to come up with an appetizing dish that uses the required ingredients.  After each challenge, the "chef" who does not meet the requirements is "chopped" from the competition, until only one winner is left.

Daisy has issued as similar challenge to the E-Team and YOU!  We are inviting you to join us in this new challenge!


It's an Egg-clectic Challenge!!


To enter, you must use the following 3 materials in your project. 

Any die from any manufacture of die cut machines
and an egg carton


Link your project to the eP blog any time beginning Friday, Aug 12 until Sunday, Aug 21st.  A challenge winner will be chosen and posted on the eP blog Monday, Aug 22nd.

Of course, there is still the chance for other goodies!  Just leave one comment, starting today, Friday, Aug 12 until Sunday, Aug 14, on the participating E-Team member blogs and two random winners will be chosen to win some of the new 6x6 paper pads that have arrived at eP PLUS some more surprises!  The winners will be posted on the eP blog on Monday, Aug 15. 


The E-Team
Me!
Linda L couldn't join us this week.  But make sure to stop by her blog and see what she has been creating!

Ok!  Onto my projects!  Yes, I created two projects, using the same layout and techniques, but one masculine and the other feminine. To be honest, I had grand (dis) illusions of creating something "outside the egg carton", but it would appear that my mojo and I could not agree on the trial attempts.  So, I decided to keep the frustration levle low and make it simple. 


I began by misting the lid of a cardboard egg carton with water so that I could pull off the top couple of layers, removing the writing.  I then heavily misted a portion with Tattered Angel's Tattered Leather Glimmer Mist and Antique Brass Glimmer Mist.  I used Spellbinder's Classic Diamonds Nestabilities to cut my shapes and then ran the diamonds through a Cuttlebug embossing folder.  Here is a close up that (kind of) shows the glimmer and texture a bit better (I hope!)


To make my background, I used my favorite technique of Wrinkle Free Distress, randomly wiping Distress Inks in Weathered Wood and Brushed Corduroy along my craft mat and misting with more Tattered Angel's Glimmer Mist again in Antique Brass.  I then laid a piece of SU's Textured Very Vanilla in the beaded up inks.  In real life, the glimmer makes a subtle shimmer, that is not too obvious to be used on masculine cards.  The edges were sponged with Brushed Corduroy and then I just swiped the very edge along my Walnut Stain ink pad.  The sentiment, from Tim Holtz's Just Thoughts, was stamped with Walnut Stain.  The entire panel was then matted on Basic Black card stock and adhered to a 5 1/2" square base of Pure Luxury Ivory. 

The die cut diamonds where then mounted on a piece of basic black card stock that was misted with Tattered Angel's Pearl Glimmer Mist.  A thin mat of the textured Very Vanilla behind that finishes off the strip. 


And for the girly version:


Exact same technique, Wrinkle Free Distress, for the background but this time  I used Distress Inks in Victorian Velvet, Scattered Straw and Wild Honey. The mists used to bead up the inks were Tattered Angel's Glimmer Mist in Tuscan Sun and Cherub Pink.  The sentiment is from the same set, Just Thoughts, and was stamped using Vintage Photo Distress Ink. 

I left the egg carton the original thickness with the writing on it for the butterflies (cut with the Mini Butterflies die).  The butterflies were again heavily misted with Tuscan Sun and Cherub Pink Glimmer Mists.  I customed colored the 1/2 back, self adhesive pearls with Copic marker


The green card stock is SU's Kiwi Kiss.  The panel under the butterflies was stamped with Versamark, using the large stamp from Wendy Vecchi's Art Colors Life set.  Another misting of Pearl Glimmer Mist was applied for a bit of shimmer.

Simple, yes.  But think about it, eggs are pretty simple too, but can be the focal of a recipe!  I think these egg carton embellishments add that extra element that makes this simple sketch pop!

I hope you will join along and play with this Egg-celant Challenge!  Here's the positive on joining...you might win some goodies for your effort without having to worry about getting CHOPPED!!  hehe


Saturday, July 16, 2011

Finally!!

I finally have Internet!  I don't know how long it will last, so I'm going to try and get my project up ASAP with not much chatter!


This weekend the E-Team was challenged to play with new product from Tattered Angels.  I personally, LOVE the glimmer mists and was very excited for the chance to play with the Chalk, Glam and Glimmer Glaze.

Quick details:  You have until July 17th to leave a comment on each of the team member blogs for a chance to win one of three prizes.  Two winners will be randomly selected from the E-Team blogs to win a $25 voucher from eclectic Paperie.  One winner will be randomly chosen from the eP blog to win new Tattered Angels mist assortment and some other goodies.  


ME!

One of my favorite techniques utilizing Tattered Angels Glimmer Mist is with the Wrinkle Free Distress technique.  I swipe my Distress Inks in a random pattern on my Craft Sheet, but! Instead of misting with water, I mist with the Glimmer Mist.  I love how it just gives a soft shimmer versus a "in your face" sparkle. 

This gave me the idea to use various Glimmer Mists on my craft sheet versus Distress Inks.  I randomly spritzed different Mists onto my sheet and then gave the overall puddles a misting of Glimmer Mist Pearl (my FAVORITE Glimmer mist!!).  I then layed my card stock in the puddles, repeating until I got the look I wanted.  The result was a mottled design paper with a soft shimmer.  IN LOVE!!  You'll be seeing this version of the Wrinkle Free Distress more often!!


The results: 


I actually went back and added more Hay Ride glimmer glam along the edges of the flower and leaves and to the wings of the butterfly after these photos. 
I wish I could get the shimmer to show in the photo, but with the Glossy Accents over the stamped image Time Flies (from Unity Stamp/Marah Johnson Itty Bitty line, with some selective masking to fit my project), it was hard to get an angle that didn't glare! All the papers used for the background, flower (created with the Chalkboard/Glimmer combo), leaves and butterfly are from the various papers I created with my combinations.

I  painted one of Wendy Vecchi's Art Part Pocket Watches with some acrylic Antique Gold. I then coated the frame heavily with Glimmer Mist Antique Brass. LOVELY!

Supplies:  Tattered Angels Glimmer Mists:  Antique Brass, Pantina, Pearl, Cranberry Zing, Tuscan Sun, Frost. Old Olive, Cherub Pink.  Chalkboard:  Apricot Nector Glam:  Hay Ride and Dirty Martini.  Paper:  Pure Luxury Stamps:  Time Flies from Unity Itty Bitty, Fabulous Flourishes.  Other:  Pocket Watch Art Parts, Chain, Glossy Accents, Spellbinders Posie, punches

Ended up chatting more than I thought! LOL! I'm going to get this posted before I can't!! 
Till then................