Showing posts with label Boys/masculine. Show all posts

Wednesday, August 27, 2014

A 5 Minute Card

Happy Wednesday!!  I've been trying to find the time to post since the weekend, but with the kiddo's now in school full time, time has been spent getting back into the groove of after school sport practices and then directing the focus on homework.

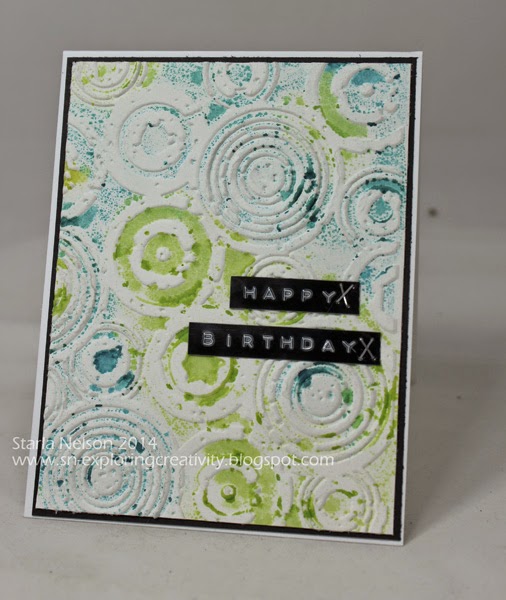
This card was literally a 5 minute card to put together.  Inspiration seemed to have left the building so when another teen boy card was needed at the last minute I went through the pile (quite sadly, that is a literal description) on my desk and came up with this rejected background that was made while I was playing with the stamping with embossing folders technique.   On this particular piece, I believe (ahem.  I am a TERRIBLE detail blogger lately!! I'm guessing here as to what I did!!) I used the Distress Stains again, but this time I actually ran the embossing folder through my Big Shot to emboss the image.  The stains seemed to dissipate, leaving a more blotchy, random look.  I grabbed the piece, trimmed and then using my "old style" label maker, punched out the sentiment and used the mini stapler to add a little extra to the simplicity of the piece.


For the LIFE OF ME, I cannot get a decent photo when I use this label maker!! I don't know if it is the shine of the tape, the shine and combination of the raised lettering, but my camera just can't seem to focus on the whole picture!  Apologies, but hopefully, you get the gist of the idea!!

A splash of color.  Embossed, raised background.  A simple sentiment/embellishment combination. A quick card but for a young teen who was probably more interested in the gift card inside.  Works for me!!  Maybe I should call this reality stamping, LOL!

A 5 minute card and a 5 minute post!!  Laundry and Back to School Night on the agenda now!!

'Till next time...................remember that some times rejections can lead to other opportunities!!


Thursday, April 17, 2014

Another Throwback Thursday

I pulled out all the throwback stops on this card.

Two, not one, but TWO old SU stamp sets.

Using inks and masking to create a scenic background. Remember when that technique was all the rage?!

And to complete the throwback?  I used old SU colored card stock in ?Summer Sun?  Does this color even exist in SU's color family anymore? Anyone?  Anyone? Bueller?

I did fail in making this card totally flashback by using Distress Inks vs SU retired inks.  Sorry. Distress Inks just blend soooo much nicer, in my humble opinion.


This card is for a young man who just turned 16.  He loves the mountains and hunting.  I thought that creating this scene was appropriate for the occasion. I must have been on target as he proclaimed "this card is so cool".

Card details:  Size 5.5" square.  
Papers:  Gina K pure luxury black and ivory (for the scene panel).  SU ?Summer Sun?
Inks:  Distress Inks in Ripe Persimmon, Black Soot, Mustard Seed, Spiced Marmalade, Fired Brick, Gathered Twig, Walnut Stain. Memento Tuxedo Black
Stamps: SU's Lovely as a Tree, Nature's Silhouette 


'Till next time..........


Saturday, November 2, 2013

Gelli Circles

Yesterday I was needing to make a card for a 13 y/o boy's birthday.  I had a very CAS (clean and simple) idea floating in my head and was certain that making the card would be quick and easy.

Don't you just hate when reality decides that you need to be brought back down to earth?!

First, I discovered that I didn't have the correct sized sentiment stamp for the visual impact that I was wanting to achieve.  Then I wasted  spent an absurd amount of time going through my stash of junk supplies trying to find something else that might make the original idea still a possibility. 

The good news: I "found" lots of supplies that I had forgotten I had and look forward to pulling them out and playing with them!

The bad news:  I own NO SUPPLIES to make teenage boy cards. 

Okay.  That was a lie.  But, keep in mind that I was on a time deadline to get the card done in just a short amount of time so that the Youngest Kiddo could give it to his friend after school let out. And Fridays are always half days.  Time was a tickin' !!!

I had just come to the conclusion that I had forgotten how to make cards, specifically cards for young teenage boys, when inspiration hit while thumbing through my file of "possibilities" (the file that I keep of technique prints that didn't make the cut for some project, but I liked enough to file for another day). 

Ahhhh!! I so love it when an idea comes together!!

I pulled out a bright "fall" colored Gelli Print and actually garnered up the nerve to cut it into circles using a variety of sizes of Spellbinders Classic Circles.


Then it was a matter of arranging, rearranging and just commit already! 


I debated on the sentiment for quite a while.  I REALLY  liked the card front without it and thought about just stamping the sentiment inside. But, somewhere I got this ridiculous notion that a card HAS to have a sentiment on the outside.  

I need to get over that.

Luckily, the different height of the circle layer on the base layer only caused a little blip with the stamping of the sentiment.  It rather annoys me, but I highly doubt that the birthday boy will even notice it!!

Geometric shapes with the slight patterns of a Gelli Print.  PERFECT combination for those cards needed for teen boys!! 

'Till next time.............. 

Sunday, October 20, 2013

Route 66

I must admit that if I were you Peeps, I'd be a TAD BIT AFRAID as to what the world is coming to, as it seems I am posting a mere week later than my last post. 

Be Afraid.  Be Very Afraid!! hehe

Well, in actuality, the world is continuing to spin on it's normal rotational axis.  I just needed to make a card for my FIL's birthday today!

Of course, my creative MoJo started in one direction and ended up completely turned around going in the opposite direction. 

I had this wonderful idea for another Gelli Print. After 3-4 attempts I got the look I was trying to achieve. 

Then, I was totally stumped.  LOVE the background.  I just can't figure out how to add any elements to it. So, I walked away from that gorgeous background and took the next exit on the creative road. 

It dawned on me last night that my FIL is 66.  And the light bulb went off in another creative room.  


The card is 5.5" square on a Chocolate Chip base. The hardest part of this whole "creative trip" was finding a map  that didn't have a million advertisements on it, since The Toad  refused to let me cut up one of his treasured maps.  I finally found a large enough section of an ad free portion of California and printed it off the computer.  I added Distress Vintage Photo and Walnut Stain ink to give it a more vintage look.  The stamp set used is from Stampers Anonymous Tim Holtz's Travel Ways.  I stamped the car with VersaMark ink and embossed with fine black embossing powder.  The Route 66 sign was stamped with Distress Fired Brick.  The Road Trip was stamped with Memento Tuxedo Black and sponged with a combination of Vintage Photo and Fired Brick.  Both the car and sign are adhered with dimensionals.  

*******

Now to figure out what to do with my Gelli Print.  I'm thinking it just might become a page in my "journey" creative journal!! Stay Tuned!!

'Till next time................enjoy where the journey takes you!


Sunday, October 13, 2013

Using Up My Gelli Print Scraps

Hey People!!  Amazing how quickly time flies! I can't believe it has been three weeks since I last posted. I don't know why that surprises me.  One would think that by now I'd realize that posting on a somewhat regular basis is sooo not going to happen!! LOL!  

Oldest Kiddo was invited to spend this long weekend at a friend's house to celebrate said friend's 16th birthday.  Originally, I had an idea that actually came to me while trying to fall asleep one night, but, as the creative karma would have it, I happened to see a scrap of the Gelli Print that I made for the eP Birthday Bash.  

So the dreamland idea went out the window (in favor of just getting the card done) and a somewhat quick card was made from the Gelli Print scrap.


Look familiar?!!  Yeah, I really didn't venture much from the journal cover made in the last post.  But, what can I say?!! I REALLY liked the look and it seemed perfect for a 16 y/o boy!!

Did I mention a "somewhat" quick card? 

The scrap piece of Gelli print did not have any of the black paint accents on it.  Since I had pulled the print using a self adhesive laminating sheet, which, is a slick surface, I had to do a bit of experimenting to see what medium would best "stick" to the slick surface.  I know I could have stamped with Stazon ink, but I confess, I was sooo afraid that I would mess up the stamping and ruin my one little scrap piece!! 

Mediums tried:  A very THICK layer of Wendy Vecchi's black embossing paste.  I was hoping to use a stencil I had for the numbers and it is made of a very thick plastic (more for hand lettering, not actual stenciling).  Then a THIN layer of the black embossing paste.

Then I tried Claudine Hellmuth's black paint.

And a basic sharpie.

The paint won.

I felt that the embossing paste was too easy to scrap off.  While I could scrap off the paint with my fingernail, it took a bit more work. And the sharpie just rubbed right off (which didn't really make sense, but maybe I didn't let it dry enough).

So, using the same TCW stencils as I did on the journal cover, I added some accents with black paint.  I could not find a die cut of numbers that fit the style of this card.  I tried to cut out my own layered numbers from paper, but I did not like the uneven lines I got with fussy cutting.  Finally, I dug through my stash of stuff and found some grunge paper elements. I painted the numbers with Claudine's black paint, smooshed them in a Versa Mark pad and embossed with fine black embossing powder.


That's it for me today!! I actually have another little "scrap" project in the works, so hopefully, I'll be back sooner than later!! And of course, there is still the dreamland idea!! 

'Till next time............have a fabulous and creative week!!


Saturday, August 24, 2013

Using Up Some of Those Hoarded Supplies

Helllllo!! Well, summer is officially over now as the Kiddo's started school this past week. Now, I get the pleasure of trying to figure out three different schedules again!! The sport practices are what throw me for a loop!! All three boys are involved in one or two different sports, so keeping track of who is where and when can get my head a spinnin', LOL!

I needed to come up with yet another masculine teenage birthday card this weekend.  Of course, MoJo decided to throw a little fit since I've neglected her for a while and decided not to cooperate when I needed her most! Go figure!! You would think that by now I'd realize that I am not one of those who can just turn on the "WOW" creative juices on a whim!! I need to keep that line dripping at all times or it takes a while to get the wheels turning again!!

I had a very vague idea floating in my head, but have to admit that the supplies (or lack of) dictated that I forge a different route.  While not the direction I would have preferred to go, given my last minute ahem! deadline and lack of MoJo, I'm thankful that I got a card made and used up a bit of of chipboard pieces that I have had in my stash forevah!!!

I started with some Pure Luxury card stock in Ivory, because much to my dismay, I discovered that I'm out of white!! YIKES!! I dripped a couple of drops of Distress Shabby Shutters and Tumbled Glass on my craft sheet and spritzed with water.


Using an old toothbrush I splattered the watered down ink on the front of my card.


I did a little sponging around the edges of the card with Distress Ink Vintage Photo.  I then decided to keep things simple and adhered some old DCWV chipboard embellishments and idea-ology alpha parts Ransom numbers that I swiped with Distress Paint in Picket Fence.


Not necessarily a WOW card, but it rated a "That's cool" from the Youngest Kiddo, so that must count for something!!

Now I just need to keep that trickle of ideas going!!

'Till next time.................hope you have a creative week!!

Wednesday, January 16, 2013

Round and Round...

.....the hands on the clock continue to fly! OH MY!!

The household is still adjusting to adding another teenager to the mix.  Funny, the Newest Kiddo drives himself to school, does his own laundry, makes his own lunches, but, yet, there is more time spent going grocery shopping, following up on school work, going grocery shopping, following up on whereabouts, going grocery shopping, following up with teacher's, going grocery shopping.

Not to mention more friends hanging out after school on Friday's.  Which is fun.  And noisy.

I still haven't gotten my crafting area set up.  I have SO MUCH JUNK  craft supplies that need to be gone through, purged, or boxed up to be given away. The thought is rather overwhelming, and so, I look for any little distraction to keep procrastinating facing the task full on.  I just keep picking at it instead.  Yes, continue to stay tuned.  I'm thinking big ol' blog candy boxes are going to be hitting the post office soon.  

And no crafting area means no creating.  BUT! Lucky, lucky you!  I have a card I made just prior to the Christmas holidays to share today.

It would appear that all teenage birthday celebrations are to be last minute. And since this particular celebration happened two days before I hosted Christmas Eve dinner for the family, quick, clean and simple were the only options for the makings of this card.


Basic details:  Top fold 4.25x5.5" Pure Luxury card base.  TenSecond Studios Peacock metal embossed with embossing folder.  Burnished off the color of the metal on the raised portions.  Adhered to base with TSS Humungo tape.  Stamped the sentiment from a retired SU set.  Slapped an iTunes gift card on the inside and sent the Oldest Kiddo off to the party!!

While this card was made for a teenage boy, switching out the metal color, maybe adding a little bling on the sentiment flag and wahla!! Teenage girl card!!

Okay. I am going to FORCE myself to face the pile of crap craft supplies for at least an hour.  

Or, maybe I'll go exercise, clean the kitchen, mop floors instead.

hehe

'Till next time...................

Sunday, October 14, 2012

Twisted Birthday

I don't know what the weather is like where you are, but here, it seems more like late spring than fall.  Earlier in the week we had a glimpse of fall weather.  Yesterday, it was cool in the morning, then got to a nice mid to upper 70 level.  Today is suppose to be in the upper 80's.

I'm talking 86 plus degrees.  I don't think that is fall weather!  I'm ready for cooler temps that call for hot chocolate and warm soup in the evening.

But, I'll take upper 80's over mid 40's any day! haha!!

Since I don't think you dropped by to chat about the weather, I'll get to the card I'm going to share.  I actually made this card last week.  I've been debating whether or not to share it since.

Do you ever put unreasonable pressure on yourself to produce "WOW, BEAUTIFUL, AMAZING" cards  for your blog posts?  There are so many wonderful designers out there who seem to churn out one amazing card after the other.  Their creativity never seems to dry up.

I am NOT one of those designers.  Seriously.  I'm not looking for "this is fabulous, I don't know what you are complaining about comments".  I am in a creative funk.  There is no "WOW" creative thoughts coming out of my noggin. I decided to share the card because this is real life.  "AMAZING, WOW, FABULOUS" does not always happen.  Sometimes, creativity is only SIMPLE. BASIC.  FITS THE NEED.

And that is perfectly OKAY.  I'm giving myself, and if you need it, a break from the sometimes unrealistic goals we set for ourselves.  SIMPLE. BASIC. FITS THE NEED.

 I needed to make another last minute birthday card for a friend of the Oldest Kiddo.
Question:  is it only my children's teenage friends that decided the day before that they want to have friends over to celebrate their birthdays?  I now keep a stack of Game Stop and iTune gift cards on hand for these last minute celebrations!!  Since the Great Creative Funk of 2012 is still in it's prime, I was at a complete loss as to what new and exciting way I could make a birthday card from the same themes of interest of the birthday kid has had over the past 3-4 years (that would be basketball, music or Xbox). I saw a clever fold on one of my blog cruises and tucked it away in the brain files for later use.


This is a Twisted card fold.  The tutorial on the making of this fold can be found here. Since the die cut basketball is almost 3 3/4" across, I had to adjust the size of my base cuts. I believe my base was 6 x 12".  I made a couple of stabs at getting the base the right size to fit to basketball and still fit the envelope.  And since it was over a week ago since making the card, my brain has totally forgotten what the final outcome was.  

Sigh.  

I think this would have looked better with some type of sentiment flag.  But then the front started to look crowded.  So I skipped it.  

A helpful hint for this card. Use double sided design paper. My design paper was single sided.  That meant that I had to use another sheet of paper and reverse the cuts to get the inside panels.  Since my brain is not functioning at a high level of creativity, this took some extra brain power to figure out! haha!

Basic details:  12x12 chocolate chip base.  Design paper from LSS that I have had in my stash forever.  Basketball die is from Quikutz and was made from Dusty Durango paper and sponged with either Close to Cocoa or Creamy Caramel.  I had the basketball die cut for a couple of years for yearly basketball season notes on classroom doors.  Recycling!!

Simple. Basic.  Got the job done.  Sometimes, that is all one can ask of oneself. 

'Till next time....


Sunday, September 30, 2012

A Trio of Thanks

Life continues to travel at warp speed around here.  Creativity has been along the lines of making Teenage Mutant Ninja Turtle costumes out of paper bags and 12 x 12 sheets of colored paper (for the "6 pack abs, shell and masks).  And the making of the belt, initial monogram and shirt stripes for Batman's sidekick, Robin.

And let's not forget the making of Hawkeye's (Advengers) forearm protector and arrows and what ever that thingamajig that holds the arrows on his back is called.  

All made by the request of Oldest Kiddo, who is the President of his class, so that his class could get as many as possible spirit  points on "Super Hero Day".

 I'm pretty much a sucker for my Kiddo's requests.

In the kitchen, I've been adapting and trying out some new vegetarian and even some vegan recipes, in the attempt to get the proclaimed carnivore males in my family to eat more veggies and adapt to a more healthy lifestyle attitude towards a plant based diet.  There have been some new recipes that have gotten the approval to be in the meal rotation.  And some recipes that need some "tweaking" to fit our taste bud's preferences.

And, of course, there are those recipes, that while they were edible, were deemed, "Thanks, but we can skip this one from now on". 

Notice how I haven't mentioned the creating of cards, paintings, mixed media projects?  Yeah.  Well, ummm.  It would seem that particular creativity is still basically non existent in my craft area.  The only showing I have is the CAS (clean and simple) Thank You cards that I HAD to make for the Youngest Kiddo's birthday.

Did I mention that said birthday was LAST MONTH?

Insert large, audible sigh here_____________________________.

I did notice a possible hint that Mojo may be thinking about moving home again.

Mind you, it was just a hint.  A little, tiny, teeny hint.  

I started with this very CAS card and was over all pleased with the layout, considering the lack of desire to create the cards in the first place.


I then mass produced all the required pieces and walked away to make dinner.  An Asparagus and red bell  pepper Quiche with a spaghetti squash "crust".  It made the rotation list.  Sorry, I digress.  When I came back to assemble the cards, I just happened to place my three pieces in such a way that I was inspired to make this version:


Then, I switched the order around and made version 3. 


All three versions together:

click on picture to enlarge

Which one is your favorite version?  Let me know! After your comments, I'll let you know which one the Toad voted on to finish the mass production of the thank yous.

Basic Details:  Card base is SU's Mellow Moss.  Flags are made from the last piece of dp that I found at my LSS and forgot to look at the company before slicing into strips.  Oooops.  The matting layer is faux.  I used a dark green Copic marker to outline each flag.  The sentiment is from Cuttlebug's Olivia alphabet.  

And is it just me, or does each and every one of these stinkin' photos looked blurry?!  Sigh.  I'm telling you, I don't even have the gumption to retake all the photos again.  Sorry folks.  I need to have a heart to heart talk to mojo and get back on track.  Or, at least parallel to the track!!

Ok! I'm off to finish unpacking from a weekend away with the Oldest Kiddo and his Cross Country team.  Tomorrow brings an all day field trip with Youngest Kiddo to see an exhibit on Cleopatra.  

Hmmm.  Wonder if mojo is hiding in Cleo's box of jewels?

'Till next time.....


Friday, September 7, 2012

Camouflage

Can you believe it?!  It's been less than a week (okay, I admit it, I'm scrapping the edge on that one!) AND! I'm posting again!!

Quick!  Someone grab the camera just in case pigs are flying!

ANYHOOS!  After surviving the traumatic ordeal of making a teenage GIRL card, I was able to get back into a more comfortable creative zone.  I needed to make a card for the youngest kiddo's birthday.

Now, while I am more at ease in making masculine cards, here is the reality check that I am dealing with lately; it would seem that my kiddo's and their friends are getting into a "rut" as to what their interests are.  When they were younger, each year was a different interest:  the latest action hero, DS (remember those?! snort), wild animals, race cars, Bionicles, etc.  Now, it is narrowed down to guitars/music, basketball, cross country with a bit of Air Soft thrown in for the oldest and basketball, Air Soft and Xbox for the youngest. Problem is, I have already made cards with those interests for a couple of years running now!  EEAAAKKK!  People!  There are only so many "YOU ROCK" cards one can make for the same kid!! LOL!

Since the Youngest Kiddo was receiving a new Air Soft gun for his birthday, I went with a "Commando/military" theme.  I pretty sure I still had some left over camouflage design paper left over from a previous project. Turned out I was sadly mistaken.  So, I pulled out a pale green paper, that I think might possibly be some old SU Mellow Moss, some Copic markers, a picture from the Internet of Camouflage patterns and made my own.

remember: you can always click on the picture for a larger view. 

Disclaimer:  IRL there did NOT appear to be all the streaks from the markers.  I keep staring at this picture, stare at the card, shake my head and just let out a sigh.  

The HARDEST part of this card is the dog tag.  I have had these dog tags in my stash for evah!!!  O...M...G!!! Pulled out the Stazon ink, found the Happy Birthday stamp in my forgotten stash of PTI (I only own a few sets from when PTI first started producing stamps...this is from the Borders and Corners, Rectangles set) and LITERALLY stamped the image AT LEAST  20 times before I got a half way decent impression.  I don't know if it was because I was trying to use a clear stamp and Stazon on the slick surface or what. I would either smudge the impression by slipping when putting pressure on the stamp or the stamp would stick, and I mean STICK to the tag and when gently pulled off, and would pull the ink off too, leaving a wonderful HUGE blotch, larger than the SMALL blotch I finally settled for!! I finally decided that this is a "worn out tag", applied the chain, strategically placed rolled glue dots to hold it in place and called the thing DONE!!  Originally, I had planned on stamping another tag with the Youngest Kiddo's initials and add it to the chain that he could then wear.  Uhhhh. NO.  After trying to get this ONE image stamped somewhat decently, I decided that this was IT!!  

Basic details:  Card base from SU's Chocolate Chip cut to 5.5" square.  Basic black mat.  Custom camouflage paper.  Tag, from stash.  Stamp: PTI (I don't know if they even sell this set anymore...it was THAT long ago I bought it!!)

That's about it for me today!! I actually made another card last weekend too!! I'll pop that up here in a day or so.  I'm dragging out the posts as long as I can, LOL! 

'Till then..............enjoy some creativity this weekend!!

Monday, May 28, 2012

Rockin' the Blues

Hey there People! Are you sitting down?  Yes, it's true!  I'm back with another post today!  Geesh! Is this the third post in 6 days?!  I highly recommend grabbing your cameras and heading outside.  Pigs are very likely flying right now!!
*****

Before I get to my card for today, I'd like to take this moment to thank all the men, women and families that have sacrificed so much for this country.  They are the ONLY reason we have the all these freedoms that we tend to take for granted. There are not enough words so I will stick to a simple THANKS for all that you have given to the rest of us. 

*****

This has been a crazy busy weekend for us!  In addition to the 90th birthday celebration, we also have the family celebration for the Oldest Kiddo, for which I am pretty much expected to make a card for!  His actual birthday is later this week, but bummer for him, it falls right smack dab in the middle of finals and then he has to help with graduation duties as an underclassman next weekend.  This just seemed like the better weekend to try and pull off the family party and we'll figure out a better time to plan a get together with his friends later.

This was actually a fairly quick card to put together once I came up with the idea. That was the kicker.  Coming up with the idea.  Making cards for teenage boys is very hard when their interests don't change much over the last couple of years!  I want the card to be relevant  , but not the same o, same o!!  I found my inspiration from this card of Susan's.  I liked the simplicity of only two colors and the grungy genre.   I think it took me maybe 10 minutes total, and that would include having to re stamp the entire card.  It would seem that somebody pulled a lazy stamper moment and did not stamp off or even pretend to clean the sentiment stamp the last time she used it.  This resulted in a completely different shade of color on the almost completed card.  


Basic details:  One layer card, top fold from Pure Luxury White.  Lightly inked the splatter stamp from SU's Extreme Elements with Distress Tumbled glass.  Stamped SU's Extreme Guitar with Distress Broken China and added a bit of shading with Copics.  The stars are from Extreme Elements stamped with Distress Peeled Paint.  The sentiment and the other grunge element is from Tami Mayberry's Live Life Loud set and were also stamped with Distress Peeled Paint. 

It would seem that I REALLY need to address the after effects of the creative tornado that has gone through this room over the last few weeks!  Mojo is finding it very hard to even think in this mess!  

'Till then, enjoy the simplicity of creating!!


Saturday, May 26, 2012

XCth Birthday

Ahhhh!!  A nice long weekend to sit back and relax!

Ok.  So the sitting back and relaxing is more of fantasy than reality this weekend, but, you can't blame a gal for dreaming!!

One of the events on the schedule for this weekend was the 90th birthday party for a long time client of the Toad.  This gentleman has just been giddy with the wish that his grandson and The Oldest Kiddo meet at this party as they share the same first name and both play basketball.

Reality was the boys met, shook hands, posed for a picture and that was about it.  The Oldest Kiddo actually ended up hanging out with another young man his age who has taken to the birthday gentleman and helps him with yard and home projects.

It worked out, not as the birthday gentleman might have imagined, but, it was good.

The Toad requested a birthday card for this gentleman, as that is supposedly what I do.  Make cards.

Did you know that making a milestone event card for someone you have never met personally is really rather difficult?!  The Toad's helpful insight was, "he was a principal for many, many years and used to play a lot of tennis".

OoooKaaaay!!  No problem!

When I get really stumped for card ideas, I usually head to SCS, click on the gallery link and then do a search for the theme of card I am mulling over and see what comes up.

BINGO!  I hit the jackpot with this particular search as I found the perfect vintage image for my project!  The image is a digital image from McMahon 5 Designs.  


I re-sized the image and altered it with a sepia tone in PSE.  Light sponging was done with Distress Brushed Corduroy.  The image was matted onto BoBunny's Time Piece collection, and then again, on the Roman Numeral design paper from the same line.  This was adhered to a base of Gina K's Pure Luxury Ivory, cut to 5 1/4" square.

The sentiment panel was cut and embossed using Spellbinder's Classic Circle dies.  While the paper was still in the die, light sponging was again done with Distress Ink in Brushed Corduroy.  I masked the retired Stampin'  Up sentiment, so that I could border the old scrapbook stickers I pulled from my stash that states what special birthday is being celebrated.  The sentiment was adhered using dimensionals.

Being true to my status of Queen of Procrastination, I was trying to snap off a quick picture before having to walk out the door!!  LOL!  

Now, I just need to find some inspiration for a birthday card for the Oldest Kiddo.  Vintage guitars?!  

'Till next time...............


Sunday, March 4, 2012

CAS--Military Style

Have you ever had one of those projects, while perfectly fine and acceptable, just doesn't tickle your fancy?  That would be this project.  I have spent most of the day debating whether or not to even post it.  But, obviously, posting won out.  Here's why:

1) While everyone "oooo's" and "ahhhh's" over the WOW cards/projects, not all projects are meant to be WOW projects.  Take, for instance, cards for 11 year old boys.  Let's be realistic here.  This is a card that is going to be lucky to survive 5 minutes after being opened.  The gift card will be snatched up and the card, if lucky, will be tossed onto a messy desk, only to be noticed again when said child is threatened with a life grounding from his Xbox if he does not clean his room to his mother's standard. 

2) There are days when the MoJo is just not up to par.  Par being what ever realistic or unrealistic level one has set.  Yet, much like the real world, sometimes MoJo just has to suck it up and still produce. 

3) The card had the Youngest Kiddo's approval.  And since he is the peer of the birthday boy, one has to accept that the card, (and MoJo) met to his level of Par.  And when it comes down to it, that is all that matters.

OK!  Enough rambling!  Here are the essential details needed for this card:  1) 11 year old BOY.  2) Birthday theme Call of Duty/Military. 

Creative musing while making this card.  Three stars---like a "Three star General".  Pearls, like buttons on a uniform.  CAS--like it or not, the military is precise, orderly and CAS. 

Card base:  Stampin' Up Chocolate Chip card stock cut to 5.5" square.   SU's Sahara Sand is lighter layer.  Cameo paper is a scrap from my stash. Pretty thin paper.  My guess is I found it at Michael's.  Stars were die cut and embossed with Spellbinder's Stars Five.  Sentiment is from Papertrey's Faux Ribbon set and was stamped with SU's Chocolate Chip ink.  Pearls are from Want2Scrap.


Template for gift card found here.
Blank strip on the base is where Youngest Kiddo can write his birthday message. 

The Youngest Kiddo came home with cupcakes in cameo liners.  Kudos to MoJo for remembering the cameo paper!!

Saturday, February 25, 2012

Inspired Thanks

Happy Saturday!  I hope that you are enjoying the weekend.  It is GORGEOUS weather here!!  I enjoyed an hour long walk this morning (with short sleeves!!) and have the windows open!  Ahhhh!! You can't beat Southern California weather this time of year!!

I needed to make a Thank You card for the Oldest Kiddo to give to his optometrist.  It would seem that said Kiddo threw his back pack one too many times and somehow smashed his glasses to smithereens, despite having them in the case. Well, his optometrist just so happens to be the father of one of Kiddo's classmates.  He graciously took the Kiddo's glasses into work with him and replaced the lenses, saving me a drive.

The Inspiration Challenge on SCS today was perfect to get the creative gears grinding.  Today's inspiration site was the Galleria Arts and Crafts in Calgary.  I found this Raku pottery plate as my inspiration


And here is the card that I came up with from this inspiration


Card base is (?) SU's Not Quite Navy and is 4 3/4" x 5 1/2" with the corners rounded on one side with my Zutter 1/2" corner rounder.  I embossed a piece of brushed copper card stock (from my stash) with Sizzix Texture Fade Sheet Music.

For the main image, I started with a piece of Pure Luxury Ivory card stock and made a masked for the "moon" out of scrap paper.  I then randomly squished (that would be the technical term) Encore metallic copper ink on the paper.  I then applied Distress Stain in Broken China twice, drying between layers with my heat gun. I then used some Distress Ink in  Faded Jeans to darken the blue areas even more.  Everything was then spritzed with Tattered Angel's Glimmer Mist Abominable Snowman. 

The heron is actually a line stamp from Just for Fun Stamps. I stamped the image and then used a black marker to fill in all the open space.  I then free handed the grasses around the heron. 

At this point I totally messed up my outline of the moon.  Soooo, I cut out another "moon" lightly sponged it with Distress Broken China ink and adhered it over the previous moon.  This meant that I had to use my stampamajig and re stamp the heron. Sigh....

The sentiment is from Stampin' Up (?) All Year Cheer.  I stamped it on a scrap piece of Pure Luxury Ivory with Ranger's Archival Ink in Jet Black.  I rounded two of the corners, lightly sponged more Distress Broken China along the edges and adhered. 

This is a little different than my usual, but I rather enjoyed going a different path!!  Sometimes it's good to get off the beaten path!!

I'll be back later this week with the E-Team!!  We've got another hop in the works for you!!  'Till then.....

Thursday, January 12, 2012

S...T...R....E....T...C...H...I...N....G...

Hey Peoples!  Did you give up on me ever posting again?  I was beginning to wonder!  It is just rather weird.  I have ideas that I really want to try, but just lack the motivation to sit down and actually work on them.  Maybe I'm still burnt out from the mad rush of the holidays.  Maybe it's the fact that I still haven't finished getting my creative area back up to a level of where I have space to work.  I don't know.  Maybe it is just plain and simple laziness!!

Despite all of the above  (or none of the above, as the case may be) I got hit with bug to actually create last night.  I was cruising the various challenges on SCS and the sketch challenge sparked an idea.  In the flow of creativity, my third panel may be a bit of a stretch, but! I can see it clearly! haha


Deets:  card base is 5.5 square Pure Luxury white.  Red card stock was found in my scrap pile.  Design paper is BoBunny Timepiece.  Vintage Photo ink was used to distress all the edges.  Idea-ology Findings Timepieces and  Sprocket Gears were added with glue dots and dimensionals (under the clock).  

Somewhere I got the notion that I wanted to use the old style of label makers for my sentiment, which was going to require me to make a run to an office supply store to buy one. 

First:  Did you know that electronic label makers are now the norm?  I had to call the Toad at work to see if he would run to the office supply store by his office after my search failed.  He did find one, but called me back to say that for a little bit more, I could have a nice electronic one

Uhhh.  Thanks for thinking of me, but I, uhhh, already bought one of  those!  I just want the old fashioned one for a card.

  Silence.  "So, I'm spending $13 so you can make ONE  card? 

No.  You are spending $13 so that I will have it to make other projects in the future. 

And being the prince that the Toad is, he came home with my old fashioned label maker!

Second:  This is where the s...t...r...e...t...c..h...i...n...g  comes in.  I just happened to check out the Ways to Use It challenge on SCS this morning.

STICKERS. 

I decided that since I had to peel off the backing for my labels, and stick it to my card, that counts as stickers. 

Yes?! 

I'm sticking with the theory that they count!  BWHHAAAAA!!

I think that this will be the Toad's Valentine's card. I think it is only fitting, since he spent the $$ to make it! hehe.  Plus, I really do think it is perfect for a guy card!


Alrighty then!!  'Till next time............strrrreeeetttcccchhh  yourself creatively!!


Thursday, October 20, 2011

Riding a Bike

Hey People!  I hope that your week has been a good one!  I'm not sure how it has gotten to be late Thursday already!  But hey!  The weekend is upon us!!  The Toad and the Oldest Kiddo will be attending the Kiddo's first live rock concert this weekend, while the Youngest Kiddo and I take in the action movie Real Steel.  I would vote for Footloose, but don't think that suggestion will fly until the manly man movie is seen!! LOL!!

Needed a birthday card for my father in law today.  Now, just in case you are a new visitor to this little blog o' mine, bicycling is LIFE in this family.  There was a time, before children, that it wasn't a matter IF we would ride, but WHERE we were going to ride.  So, it seemed only appropriate that I incorporate the bicycle theme into the birthday card.


I searched the web for a bicycle type quote, got brave and used PSE9 to lay it out more fancy like, and printed it out onto SU's Very Vanilla because my printer HATES Pure Luxury!!  I die cut the image with Spellbinder's Labels Twelve.  While the die was still in place, I lightly sponged around the edges with Distress Ink Antique Linen.  A very minimal sponging was done along the outer edge with Distress Gathered Twigs.  The sentiment was then adhered using dimensionals. 

The card base is (of course) Pure Luxury Ivory 5 1/2" square.  A small mat of basic black is behind the dp from the Kraft Resist Idea-ology line Paper Stash.  I lightly sponged more Gathered Twigs ink along the edges of the resist paper. 

The bicycle is from a Glimmer Glass collection, Clear Destination, from Tattered Angel's that I have had in my stash for waaaaay too long!  I snipped teeny, tiny little pieces of dimensionals and carefully placed them behind the more solid portions of the image.  I did color the edges with a black marker to hide the white tape from a side view.  Some 1/2 pearls were adhered in the corners, a little library clip to the sentiment and called it done!

Pretty CAS, but hey!  It's for a guy who thinks riding a single speed is all you need. Actually, who thinks that riding period is all you need!!  Perfect for him.

That's it for me today!  I have another idea in the works on my desk.  I'm hoping to get that finished this weekend!  Until then.................enjoy the Ride.....


Sunday, October 9, 2011

Metallic Rock

Hey there People!  How has your weekend been so far?  I spent the ENTIRE day yesterday in my room creating!!  Unfortunately, I can only share one project now (what a tease!) as the other projects are for publication!  Very exciting, not to mention, nerve racking, for me!!

By now, you'd think I'd have male teen cards down to a science.  NOPE.  While I have no clue as to what type of cards to make for female teens, I find I struggle with the male teen cards in a whole different way.  All these kids are into Xbox, paintball and air soft guns and music.  Great!! Except, how many different cards can one come up with, year after year, with these same themes?!!  I'm tellin' ya~~~teens are a difficult bunch, in more ways than one!! hehe


For the life of me, I could not get a decent picture of this card to save my life!  The background is a piece of Rock Star black metal embossed with the Alterations texture fade embossing folder Sheet Music.  I sanded off the raised portions, exposing the aluminum metal.  The guitar is from Inkadinkadoo's Rock Star, and was stamped with SU's Riding Hood Red.  I then used my VersaMarker to go over the main body and the top of the guitar neck (I have no idea what the proper terms for these areas are called.  Basically, the solid portions!) and clear embossed with Ranger clear embossing powder.  I think the combination of the metal and the shiny embossing is what did this photo in!  To much shine and glare no matter what angle I tried!

To finish it off, I stamped the sentiment, from Tami Mayberry's Live Life Loud, in the corner with more Riding Hood Red.  Pretty CAS, but perfect for a teenager to give to his buddy! No gush allowed!

I'm going to try and clean up this mess so that I can finish up another project that I have in the works!  I'm on a creative roll and I need to keep it going before the mojo decides it needs another break!! 

'Till then................take some time for exploring some creativity in what ever medium tickles your fancy!

Sunday, September 25, 2011

Trying to Rock Kraft

Are you sitting down?  Yes, I'm actually posting a new project today!!  I'm still fighting the lack of mojo, but seeing as I had yet to make the youngest kiddo's thank you cards for his b-day, it was time to grit my teeth and try to buckle down. I used the sketch challenge on SCS to launch myself off the cliff. 


I always admire those who can use Kraft card stock.  I have a really hard time getting it to "work" for me.  So, of course, just to add to the frustration of not having any mojo, I pulled out my pack of Kraft card stock.  HEY!  I figure if I'm going to go down in flames, I may as well do a good job of it! LOL!!

I started by smooshing Distress Inks Vintage Photo, Shabby Shutters and Tumbled Glass in a random way on my craft sheet.  I misted heavily with Tattered Angel's Glimmer Mist Pearl.  Then I layed a piece of Very Vanilla card stock in the beaded ink to make my Wrinkle Free Distress Background.  The "glare" on the last guitar panel is actually the glimmer mist!  I then stamped the guitar from Tami Mayberry's Live Life Loud set using the new Gathered Twigs Distress Ink.

Allow me to interrupt here:  Let me just say that this now my most favorite brown ink in the Distress Ink line!  It is the ink that was missing between Vintage Photo and Walnut Stain.  I am already panicking that there are no reinkers for the new seasonal Distress Inks. What am I going to do when this ink pad has reached it's saturation limit?!!  Hello, Ranger?  We NEED the reinkers.  This is the ink that MUST be added to the Distress Line.  Just sayin'.  Thank you for listening to little' ol' me.

Back to our previously scheduled post.

After stamping the guitars (I did mention that I LOVE the Gathered Twigs ink, right?!), I distressed the edges of the panels with my distressing tool and then inked the edges with Gathered Twigs ink.  The sentiment, from the same set, was stamped and two score lines added with my Scor-Buddy

This is a bit more involved than what I usually like to make for mass produced cards.  But, seeing as I only had to make 6 cards, it wasn't too bad on the time.  As far as the Kraft card stock~~not bad, not great, LOL!

That's it for me today!  Have a couple of other projects that I need to get crackalacin' on!  Till then..........

Saturday, August 20, 2011

Leapin' Lizards!

Happy Saturday People!

Yesterday, I realized (quite belatedly), the the youngest kiddo has a birthday party to attend TODAY.  Somehow, I got it in my head that it was next weekend.  Doesn't matter.  What matters is, I had to come up with a birthday card PRONTO.  Which is a scary thought when my mojo and I are just holding polite conversation with each other versus chatting like old friends.

But!  We managed to come up with this card, that was inspired by the picture of the birthday boy holding some reptile, on the invitation to join him at the local reptile store for his party.

So help me if my kid starts begging for another reptile.  Been there, done that.  I do NOT miss hearing crickets chirp at all hours of the night, nor do I miss finding the escapees throughout my house. 

Anyhoos!  I digress!  Here is the card that I came up with!


I bought this lizard stamp years ago at a little stamp store in Santa Fe, New Mexico.  I bought is purely for the fact that the wood mount has the imaged carved onto the block!  It is a showcase of craftsmanship!  I didn't care if I never used the stamp.  The carving is an incredible piece of art.


See what I mean?!  I can't imagine the time it took to carve this incredibly small detail!

I stamped the image with Memento Rich Coco onto a left over piece of paper that I had done my version of Wrinkle Free distress. This means, I have NO idea what particular distress inks were used.  Or what Glimmer Mists I used.  I think that Antique Brass was one as some of the shimmer looked brassy.  I then had to fussy cut the lizard.  It would seem that someone really didn't plan the angle of her stamping correctly!  shhhh.  I think that might have been mojo.  But, heaven knows!  I don't want to tick her off by mentioning it!

The lizard was then adhered to another Wrinkle Free sheet that was Pure Luxury white based.  The inks that I ended up using were Distress Frayed Burlap, Weathered Wood and a touch of Shabby Shutters.  I spritzed the ink with a combination of Tattered Angel's Glimmer Mist in Antique Brass and Patina.  I then roughly sponged around the edges with Distress Walnut Stain.  I then ran the background piece through the Big Shot with an old Fiskers Leather texture plate, to give a subtle texture and added dimension.  The lizard was attached with a combination of Scor-Tape and a Quickie Glue pen (for those little toes).  I used my Copics, B45, C1, C3, to add some more shading around the lizard to make him pop off the background a bit more.  The sentiment is from SU's, It's Your Birthday.  I did some masking to have the words layered versus in a straight line as the stamp is.  The whole shebang is attached to a Ivory Pure Luxury 5 1/2" square base. 

That's it for me today!  But!! Before I leave, I wanted to remind you all that you have until tomorrow, Sunday, August 21, to add your creation to to the Egg-cellent E-Team challenge! 


 You don't want to miss the chance at a $40 gift certificate to shop all the new goodies that Daisy has in the eP store!!

'Till then..........................