Showing posts with label Splitcoaststampers. Show all posts

Tuesday, January 17, 2012

Inspired for a Simple Embossed Thanks

Hey People!  I'm still having a hard time finding my mojo.  Yesterday, I spent the ENTIRE day trying to get a couple of technique ideas to work for the next E-Team hop, to no avail.  Frustrated does not begin to express my creative mind right now! haha!!

I decided to step away from that project today and focus on getting some very belated Christmas thank you's done.  Since I need to mass produce a few and considering the fact that they are to be from my kiddos (no girly girl stuff allowed by my boys!), I went with a CAS (clean and simple) layout.  I really liked the CAS Challenge for this week on SCS and used that as my starting point.  I was also inspired by Joan's Tone on Tone Dimension card and added my own twist. 


I spent more time trying to decide on what sized circles I wanted than I did die cutting and embossing the elements for 5 cards! HA! Go figure!! 

Deets:  Card base is Pure Luxury Ivory.  Circles are from scap PL Ivory and were die cut using Spellbinders Circle Nestabilities. Embossed with a Cuttlebug folder Diamonds.  The sentiment was die cut using Cuttlebug Olivia alphabet (this is a bonus die with the set). from SU's Taken with Teal card stock. 

EASY! 

I'm going to go finish assembling the rest of the cards.  Then take a deeeeep breath and go back to work on another technique idea. Make sure and check back on Friday to see if I got anything to work! haha!

'Till then................remember that not all ideas are destined to work.  Failure is the stepping stones to success.

Thursday, January 12, 2012

S...T...R....E....T...C...H...I...N....G...

Hey Peoples!  Did you give up on me ever posting again?  I was beginning to wonder!  It is just rather weird.  I have ideas that I really want to try, but just lack the motivation to sit down and actually work on them.  Maybe I'm still burnt out from the mad rush of the holidays.  Maybe it's the fact that I still haven't finished getting my creative area back up to a level of where I have space to work.  I don't know.  Maybe it is just plain and simple laziness!!

Despite all of the above  (or none of the above, as the case may be) I got hit with bug to actually create last night.  I was cruising the various challenges on SCS and the sketch challenge sparked an idea.  In the flow of creativity, my third panel may be a bit of a stretch, but! I can see it clearly! haha


Deets:  card base is 5.5 square Pure Luxury white.  Red card stock was found in my scrap pile.  Design paper is BoBunny Timepiece.  Vintage Photo ink was used to distress all the edges.  Idea-ology Findings Timepieces and  Sprocket Gears were added with glue dots and dimensionals (under the clock).  

Somewhere I got the notion that I wanted to use the old style of label makers for my sentiment, which was going to require me to make a run to an office supply store to buy one. 

First:  Did you know that electronic label makers are now the norm?  I had to call the Toad at work to see if he would run to the office supply store by his office after my search failed.  He did find one, but called me back to say that for a little bit more, I could have a nice electronic one

Uhhh.  Thanks for thinking of me, but I, uhhh, already bought one of  those!  I just want the old fashioned one for a card.

  Silence.  "So, I'm spending $13 so you can make ONE  card? 

No.  You are spending $13 so that I will have it to make other projects in the future. 

And being the prince that the Toad is, he came home with my old fashioned label maker!

Second:  This is where the s...t...r...e...t...c..h...i...n...g  comes in.  I just happened to check out the Ways to Use It challenge on SCS this morning.

STICKERS. 

I decided that since I had to peel off the backing for my labels, and stick it to my card, that counts as stickers. 

Yes?! 

I'm sticking with the theory that they count!  BWHHAAAAA!!

I think that this will be the Toad's Valentine's card. I think it is only fitting, since he spent the $$ to make it! hehe.  Plus, I really do think it is perfect for a guy card!


Alrighty then!!  'Till next time............strrrreeeetttcccchhh  yourself creatively!!


Wednesday, August 17, 2011

Stamping and Metal

Hey People!  Can you believe it is Wednesday already?!  The family has been running around getting the last details ready for the kiddos to start school tomorrow.  I would swear that we just got out for the summer just days ago!!

Have another tutorial to share with you today!  Beate, from Splitcoaststampers, asked me to do another Wednesday tutorial using metal.  Now, what is seen in the tutorial is NOT my original idea.  It is just my version of a very common technique!  Because I am lazy, I am not going to do the step by step here.  I'm going to send you to the home page of Splitcoaststampers for the link.  I will share the picture of the project and the youtube link here though!!


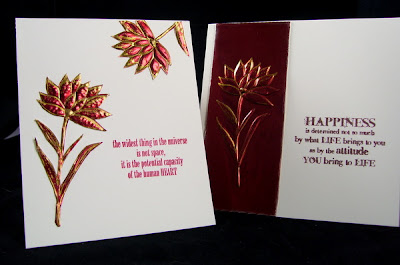
I used my stamped images two different ways today.  Both cards followed the stamping and metal instructions the same.  For my first card, I just cut out the stamped images after the backing paste had dried and I used them as metal embellishments for my card.  The second card keeps the stamped image on the metal panel. 

Here is the video of the technique


Ok.  Seriously.  I must have ticked off the technology gods sometime recently.  NOW Splitcoaststampers is also down, so I can't link to their site! 

What type of offering do you think the technology gods like?  Insert a looong, heavy sigh here_______.

Supplies:  Both cards use Pure Luxury Ivory cardstock as the base.  Both cards use Wendy Vecchi's Be Happy, Make Art stamp set.  Stazon Metallic Gold was used on TenSecond Studios Barn Red metal

If you are not inspired to emboss your image, just stamping on the metal is a fabulous look too!  I especially like the metallic Stazon on top of the metal.  Very rich looking!

I hope this inspires you to try combining your stamps and metal.  'Till then..............explore some type of creativity today!!

Wednesday, May 18, 2011

Metal Tutorial

Shortly after a friend introduced me to stamping, she brought to my attention an online community, that in all honesty, changed my creative life for the better.  She linked me to Splitcoaststampers.

OH MY! 

When I joined in 2006, the community was much smaller.  There was a core group of us who "chatted" everyday and participated in the daily challenges.  I found a very sharing and caring group of crafters, who were willing to share their expertise with me, the newbie stamper.

Even more important, I formed friendships that continue to this day.  These special gals are the ones I look to for inspiration, a swift kick in the rear, when needed, and a resource for everything from crafting to daily life.

Today, I am sharing a tutorial on Splitcoaststampers on making Flower Embellishments Out of Metal, which are based on Lin Brown's ( of yoursartfully) metal flower tutorials. 

Insert terrified look here___________________.

I'm not going to repeat the step by step written  instructions here.  Instead, I'll let you view them on Splitcoaststampers (insert VERY frustrated look here_____.  My STUPID computer is still not working and I'm trying to edit this on my in-laws Mac.  Which I have NO STINKIN' idea how to use.  The link for SCS is above.  I'm sorry!)

But I will share the  project pictures again. 


Supplies:  Stamps--TenSecond Studios Life.  Paper:  7gypsies Gypsy Market.  Inks:  Archivial Jet black
Accessories:  TenSecondStudio Spiced Rum metal, finishing/burnishing block, Ranger Alcohol inks, Sizzix sizzlet leaf die, Tattered Florals die, Patchwork texture fade and Cuttlebug Swiss dots embossing folder, Wendy Vecchi's Large Circle frame Art Part, acrylic paint, 1/2 pearls.  I believe you can find just about all these supplies at eclecticPaperie.  

And the video version. 
Be kind.  My first attempt at making a video tutorial required learning how to edit and use a Mac on the same day. 


I hope that this tutorial will show you how easy it is to use metal in your creations and inspire you to give it a try!

'Till next time................remember to explore some creativity every day!