Showing posts with label Tutorials. Show all posts

Wednesday, February 29, 2012

Marbling Faux Many Ways

Hey People!  The E-Team is gathering again today to bring you another technique hop!  Today, the different E-Team members are showcasing Faux Marble!!

Of course it wouldn't be an E-Team blog hop without some blog candy!!  Daisy will chose random TWO winners from comments left between today, February 29, until March 2, on the E-Team members blogs.  The two winners will  receive a $25 eP gift certificate! 

The E-Team
Me
Linda L--couldn't play along today, but make sure you drop by and let her know she was missed!
The winner's will be announced on the eP blog Monday, March 3!

OK!! Let's get this Faux Show rolling!!


Today I'm going to show you several variations on how you can achieve a Faux Marble.  I must admit I got a bit carried away with playing! 

First up:  This is what I call Distressed Faux Marble.  Step One:  smoosh Distress inks of choice randomly on your craft mat. I just smoosh block and lines here and there.   Spritz with Tattered Angel's Glimmer mist until ink beads up. Place your paper (I used Pure Luxury Ivory in this sample) down in the beaded ink.  Lift, dry.  You have now completed my version of the Wrinkle Free Distress Technique. 

wish I could have captured the shimmer!! Drat these dreary days!

Tear a piece of scrap paper.  Grab your sponge dauber or stencil brush, a couple of Distress Inks in complentary colors and apply the ink along the torn edge of the paper to your background.  Try to avoid making letters with your lines (such as "Y", "T", "K") as they are not natural in marble!!


I used a combination of Distress Brushed Corduroy and Vintage Photo for the lighter brown lines.  The dark brown lines are Tattered Angle's Glimmer Mist in Tattered Leather.

I have to say I LOVE how this turned out!  I must admit that I stared a this forever trying to come up with a project that wouldn't hide the effect, LOL!  Alas, I failed to come up with anything today, but keep an eye out for this, I'm mulling over some ideas!

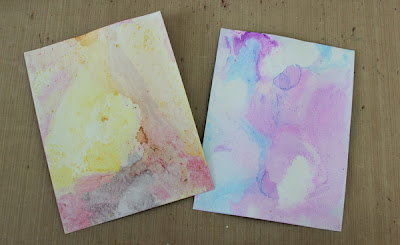
Ok...next version of Faux Marble.  Now, this is something that I found on Andy Skinner's blog.  He came up with a faux marble technique that he calls Alcohol Floating Backgrounds.  His technique combines alcohol inks and water.  You can see his video here.  WARNING: THIS TECHNIQUE IS VERY ADDICTING!

Begin with a tub of water and some alcohol inks. 


Drip two/three drops of each of the alcohol inks into the water


Slip your paper of choice into the water


Out comes some fabulous backgrounds!!


Front side


BACK SIDE!!  YEP!! You get two different backgrounds on each sheet!!  This lets you choose which side you want to work with!!


Different colors on shipping tags

On Pure Luxury Cardstock
NOTE the middle sample...that one will be used for my project!!


On Glossy Paper


Slight variation.  Spritzed glossy paper heavily with water.  Applied alcohol inks with ink applicator. 

I also did samples with the alcohol ink Snow CapIt added a cool effect, but I found that on the glossy, it clumped up and then just brushed off once dried. Still a variation!! 

For the most part, I could make one sample, add new colors for another sample before needing to dump my water and starting over. 

I also tried this technique with some sticky back canvas. I wanted to try to make a background that was complentary to the middle sample seen above on the Pure Luxury.  Funny thing, I actually liked the PAPER backing of the canvas better!! haha!   And this is what I came up with using the Alcohol Floating background. 

This is an 8.5 x 8.5" layout.  the papers are retired Stampin' Up (Sorry, I don't recall the specific paper names and will admit that I'm too lazy and too far behind schedule in trying to get this posted!)  The main base was scored using my Scor-Pal every 1/4".  The backing to the sticky back canvas makes up the second background piece.  Tip:  Tape will NOT adhere to this backing! I had to put the tape on the black layer and then applied the background.  My guess is that if I could pull it up easily.  If I was really wanting this to stick, I would use some glue (either hot glue or strong glue like E6000.

The Suzi Blu image was stamped twice with Memento Tuxedo Black ink.  I stamped it on a piece of Pure Luxury White and again on the Alcohol Floating background that was seen previously.  I paper pieced her dress using the background.  I added a very slight bit of shading to her dress and hair with some Copic markers, but deliberately left her body uncolored, as I liked the stark, rather gothic look to her!

The roses were made with more of the retired SU papers.  Ok, I felt guilty.  I'm taking a wild guess here:  Lovely Lilac, Lavender Lace and Almost Amethyste would be my guess on which shades of paper I used.  The large roses were die cut with Spellbinder's Spiral Blossom One.   The small rose was made from a Spellbinder's Scalloped circle that I just hand cut the spiral to roll.  The large flowers were stamped  and sponged with Distress Inks in Dusty Concord and  Chipped Saphire, using stamps from Wendy Vecchi's Art Colors Life and Be Happy, Make Art sets.  The leaves were die cut from SU's Kiwi Kiss using Spellbinder's Foliage and were sponged with Distress Peeled Paint ink.  The pearls in the center were made with a Viva Decor pearl pen.

The edge embellishment was cut with Spellbinder's Edgeabilities Classic Ric Rac.  The black rhinestones are from Want 2 Scrap nestabling that match Spellbinder's circle dies.  I just cut them to fit the area I wanted to place them in.

Close up of the Faux marble on the dress and flowers


I hope that these variations of doing Faux Marble will inspire you to create!!

'Till next time...................


Wednesday, February 8, 2012

Tooting My Own Horn (but I added a tutorial!!)

Hey People! Hope your week has started out well!  The Oldest Kiddo's JV basketball team (which is coached by the Toad) had back to back games on Monday and Tuesday but walked away undefeated in league! WooHoo!!  Last night's game was an away game and the boys convinced the Toad that they should stop and eat on the way home to celebrate.  So, I'm a tad late this morning getting this post up!!

Back in August I was asked by Papercraft Inspirations Magazine if I would consider being a contributor for their Masterclass article in issue 95 (January issue).  Let's just say I'm amazed I was able to type Yes, thank you! with all my hootin' and hollerin!!


I actually had TWO cards published in this issue.  Today I'm going to share the Thinking of You card that was highlighted for the technique, versus the entire card.


Supplies Used:  Paper Gina K's Pure Luxury Ivory.  Basic Grey's 6x6 Sweet Threads. Stamps:  Hero Arts Stitched Frame. Inks:  Distress Ink Gathered Twigs.  Accessories:  TenSecond Studios Kiss Me Pink and Poison Ivy metal, mat set, Teflon refiner and decorative wheel.

And as an added bonus, the step by step!!


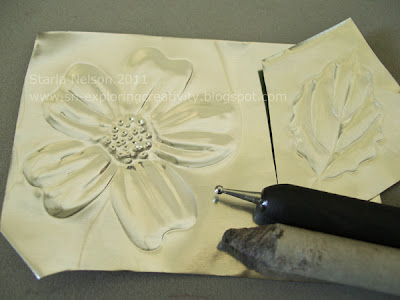
                                Using Stazon Ink, stamp your image onto the front side of the metal

Place the stamped metal face up on the acrylic mat and trace around the image with the Teflon refiner.  You could also use a stylus.


Place the metal stamped side down on the thin acrylic mat.  Use a paper stump and stylus (or ball and cup tool) to puff out the image

Still on the thin acrylic mat, use a decorative wheel to add detail


Use the pointed tip Teflon refiner to add "scribbles" between the petal lines

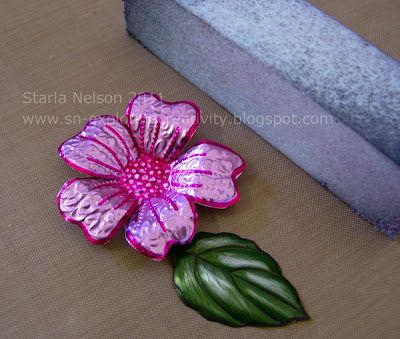
Cut out the flower and leaves (which were done the same up through step #3).  Using a sanding block (aka a burnishing block) lightly sand off some of the raised portions on the leaf to give highlights.  You could also sand the flower petals to highlight the "scribbles", but I wanted a more subtle texture, so I chose not to sand the flower.

Stamp stitched frame onto decorative paper.  Stamp sentiment onto scrap piece of Ivory card stock and distress edges with scissors or distressing tool.  Ink edges with Distress Gathered Twigs.  Adhere flower and leaves with strong glue dots, Humungo sticky tape or hot glue.

  A few notes on the flower:  I cut out two layers, but the bottom layer I did not add the decorative scribbles or lines.  I liked the look of the contrast between the layers.  You can gently form the petal leaves with your fingers to give shape to the flower. 

When adhering metal to metal, I like to use E6000 glue, Humungo Killer adhesive (link above) or a hot glue  gun.  I find that these work best for keeping the metal on metal adhered.  For adhering metal to paper, strong glue dots or the Humungo sticky tape work fine. 

That's it for me today!  I'll be back in a day or so with the SECOND card that was published!! (insert cheesy grin here_________).

'Till then..................
Sunday, November 6, 2011

Just a Blue Note

Hey People!  It would seem that fall has finally hit our little neck of the woods.  It's dreary out, raining and rather cold for this part of California! haha

I thought I would share a card that I made that wasn't chosen for another project. 


I spent my ENTIRE morning trying to figure out how to make a slide show video of the steps to make this card using Photoshop elements.  Got a video made, but the slides were all blurry!  I need to figure out what size settings to use for videos!  After much frustration, I resorted to using Picassa.  Much more user friendly, I must say. 

So, here is a picture video of the process.  Be kind...remember I have spent all day trying to get this to work and am beyond frustrated with technology at this point, LOL!! 


I'm off to watch the oldest Kiddo play in the season's first basketball scrimage.  The NBA may be on lockout, but the school season is soon to start!!

Till next time.............remember that trying something new may be frustrating (grrrrr on technology) but it keeps you on the path of exploring something new!

Wednesday, August 17, 2011

Stamping and Metal

Hey People!  Can you believe it is Wednesday already?!  The family has been running around getting the last details ready for the kiddos to start school tomorrow.  I would swear that we just got out for the summer just days ago!!

Have another tutorial to share with you today!  Beate, from Splitcoaststampers, asked me to do another Wednesday tutorial using metal.  Now, what is seen in the tutorial is NOT my original idea.  It is just my version of a very common technique!  Because I am lazy, I am not going to do the step by step here.  I'm going to send you to the home page of Splitcoaststampers for the link.  I will share the picture of the project and the youtube link here though!!


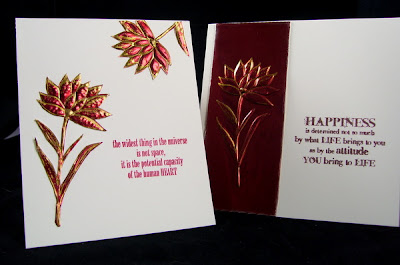
I used my stamped images two different ways today.  Both cards followed the stamping and metal instructions the same.  For my first card, I just cut out the stamped images after the backing paste had dried and I used them as metal embellishments for my card.  The second card keeps the stamped image on the metal panel. 

Here is the video of the technique


Ok.  Seriously.  I must have ticked off the technology gods sometime recently.  NOW Splitcoaststampers is also down, so I can't link to their site! 

What type of offering do you think the technology gods like?  Insert a looong, heavy sigh here_______.

Supplies:  Both cards use Pure Luxury Ivory cardstock as the base.  Both cards use Wendy Vecchi's Be Happy, Make Art stamp set.  Stazon Metallic Gold was used on TenSecond Studios Barn Red metal

If you are not inspired to emboss your image, just stamping on the metal is a fabulous look too!  I especially like the metallic Stazon on top of the metal.  Very rich looking!

I hope this inspires you to try combining your stamps and metal.  'Till then..............explore some type of creativity today!!

Wednesday, May 18, 2011

Metal Tutorial

Shortly after a friend introduced me to stamping, she brought to my attention an online community, that in all honesty, changed my creative life for the better.  She linked me to Splitcoaststampers.

OH MY! 

When I joined in 2006, the community was much smaller.  There was a core group of us who "chatted" everyday and participated in the daily challenges.  I found a very sharing and caring group of crafters, who were willing to share their expertise with me, the newbie stamper.

Even more important, I formed friendships that continue to this day.  These special gals are the ones I look to for inspiration, a swift kick in the rear, when needed, and a resource for everything from crafting to daily life.

Today, I am sharing a tutorial on Splitcoaststampers on making Flower Embellishments Out of Metal, which are based on Lin Brown's ( of yoursartfully) metal flower tutorials. 

Insert terrified look here___________________.

I'm not going to repeat the step by step written  instructions here.  Instead, I'll let you view them on Splitcoaststampers (insert VERY frustrated look here_____.  My STUPID computer is still not working and I'm trying to edit this on my in-laws Mac.  Which I have NO STINKIN' idea how to use.  The link for SCS is above.  I'm sorry!)

But I will share the  project pictures again. 


Supplies:  Stamps--TenSecond Studios Life.  Paper:  7gypsies Gypsy Market.  Inks:  Archivial Jet black
Accessories:  TenSecondStudio Spiced Rum metal, finishing/burnishing block, Ranger Alcohol inks, Sizzix sizzlet leaf die, Tattered Florals die, Patchwork texture fade and Cuttlebug Swiss dots embossing folder, Wendy Vecchi's Large Circle frame Art Part, acrylic paint, 1/2 pearls.  I believe you can find just about all these supplies at eclecticPaperie.  

And the video version. 
Be kind.  My first attempt at making a video tutorial required learning how to edit and use a Mac on the same day. 


I hope that this tutorial will show you how easy it is to use metal in your creations and inspire you to give it a try!

'Till next time................remember to explore some creativity every day!