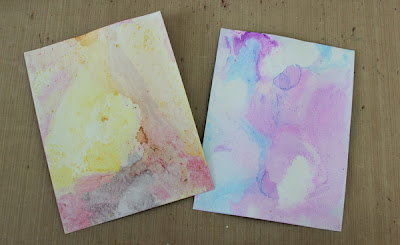
Showing posts with label E team. Show all posts

Wednesday, June 27, 2012

Saying Good-bye

Today is the final blog hop for the E-Team (sniff, sniff).  Like all fun rides, the E-Team has come to an end (more details on that below).

BUT!  Daisy has decided that the closing show is gonna be the BEST!

Visit each blog and leave a comment, between today,Wed, June 27, and Sunday, July 1, for a chance to win  a special blog prize that will be given away on each Team member's blogs!

While being on the E-Team, my love for working with metal from TenSecond Studios grew.  Daisy thought it would be appropriate that my special blog prize share some of that love with you!


Can I just say that I'm giddy about this prize?!!  Seriously, everything you need to get started using metal in your own projects!!

P.S.  Cheryl and Megan have some great videos on using their metal on their site.  PLUS:  I have a few tutorials here.  And, of course, I am more than willing to share what I've learned about this medium with you!!  I hope you leave a comment for the chance to win the opportunity to explore creating with one of my personal favorite mediums!!

Here are the links to the other Team Member Blogs.  You do NOT want to miss out on their projects!

Me!

Winner's will be announced on the eP blog Tuesday, July 3.

*****

I don't know about you, but I hate good-byes.  Especially, when I am saying good-bye to people I love to hang out with or if it is something I love doing.

Today, I have to say good-bye to both.

Almost two years ago, I got asked to join E-Team.  Me.  

Now, mind you, I am not "known" in the paper craft community.  I had (and have) been involved in the SCS forums for several years, but really, I am not one of those people who everyone knows their name, oo's and ahh's over each project, companies ask them to be on their design teams, followers ask to take pictures with.

I'm in my own little corner of the crafting world, sharing what I enjoy doing.

Lucky for me, Sherry saw something in my work that she felt could grow with a little push.

Okay.  More like a shove.


And she convinced Daisy of the same.

Oh. My. Goodness.

I was now on the same design team with my "idols":  Sherry, Broni, Linda D.  Then added to the mix were other well known designers.  Linda L, Micki, Latrice.

No pressure here, LOL!

 You know what?!  Grabbing the E-Ticket was one of the most fun, thrilling, enjoyable creative rides I have been on!!  There was moments of panic, laughter, g-force grins and dips in the track (ie, saying good-bye to Latrice and Linda D.).  Most of all, good times with gals who became good friends.

But, like all the good rides, this one has come to an end too soon.  Daisy has decided that it is time she moves in a different direction from eclecticPaperie.

I am sooo happy that Daisy knows which path she wants to explore now.

I am sooo sad that the eP park is closing.

I'm on an emotional roller coast ride now!!

Today, the E-Team is saying good-bye with projects that are inspired by favorite Disney quotes. I decided that sometimes, the classics are the best. And that "silly old bear" summed everything up perfectly.  I drew a pen and pastel drawing with much acknowledgement and inspiration from the original drawing of Ernest H. Shepard for Winnie the Pooh. (page 158 in my book).


"How lucky I am to have something that makes saying Good-bye so hard"
-Winnie the Pooh (A.A Milne)


To the E-Team.   I love you all!!

Wednesday, May 23, 2012

A Woman's Strength

Whew!

Today is another blog hop with the E-Team and special guests!!  I didn't originally think that I would be able to participate, but while on the drive home from work last night, creativity hit me over the head and I left dishes in the sink so that I could join in on the E-Team's Inspired By Words, part 2!


Before I show you my page inspired by this quote, let me give you the details for a chance to win an eP gift certificate
  • Visit each E-Team blog participant PLUS the guest bloggers to leave a comment for the chance to win a $25 eP GC. Comments can be left from May 23-May 28th. Two random winners from the blog hop will be chosen. GC winners posted May 29th on the eP blog.  

    Join the E-Team in our journal adventure and post your journal cover on the eP blog. We are going to pick 2 people to join us next month for another journalism adventure.  You have until Sunday, June 3rd, to upload your  journal page inspired by this month's inspiration quote. We'll pick and announce the next E-Team guest blogger Fri, Jun 8th on the eP blog. 
    Daisy/eP Blog
    Broni
    Micki
    Sherry
    Me!
    Guest Melody Schwartz
    Guest Marjie Kemper

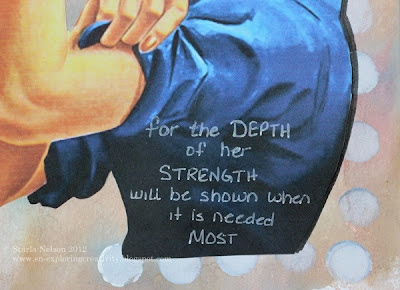
    Here is my page.  I paraphrased the inspiration quote as I felt it fit better with my main image.


    Basic details on the makings of this:  I started with my version of the Wrinkle Free Distress technique. I smooshed (technical term) randomly Distress Inks in Fired Brick, Faded Jeans and Tea Dye onto my craft mat and misted heavily with Tattered Angels Glimmer Mist in Vanilla Breeze and Antique Brass.  I then placed my paper in the wet ink and ran my hands on the back to spread out the wet ink to all the edges.  


    Using a finger sponge dauber, I applied Claudine Hellmuth's blank canvas paint randomly over the background.  Since I grabbed a finger dauber that is usually used for blue inks, the dots have a blue tint.  

    The image was found on the Internet and cut out and taped onto the background.  The letters were written with a combination of Copic markers, Faber-Castell PITT artist pens and an inkssentials opaque pen.  

    I personally am dedicating this to my sister!! Love ya!

    Hope you will join the journaling adventure!  I look forward to seeing your take on this inspiring quote!

    'Till next time

Wednesday, February 29, 2012

Marbling Faux Many Ways

Hey People!  The E-Team is gathering again today to bring you another technique hop!  Today, the different E-Team members are showcasing Faux Marble!!

Of course it wouldn't be an E-Team blog hop without some blog candy!!  Daisy will chose random TWO winners from comments left between today, February 29, until March 2, on the E-Team members blogs.  The two winners will  receive a $25 eP gift certificate! 

The E-Team
Me
Linda L--couldn't play along today, but make sure you drop by and let her know she was missed!
The winner's will be announced on the eP blog Monday, March 3!

OK!! Let's get this Faux Show rolling!!


Today I'm going to show you several variations on how you can achieve a Faux Marble.  I must admit I got a bit carried away with playing! 

First up:  This is what I call Distressed Faux Marble.  Step One:  smoosh Distress inks of choice randomly on your craft mat. I just smoosh block and lines here and there.   Spritz with Tattered Angel's Glimmer mist until ink beads up. Place your paper (I used Pure Luxury Ivory in this sample) down in the beaded ink.  Lift, dry.  You have now completed my version of the Wrinkle Free Distress Technique. 

wish I could have captured the shimmer!! Drat these dreary days!

Tear a piece of scrap paper.  Grab your sponge dauber or stencil brush, a couple of Distress Inks in complentary colors and apply the ink along the torn edge of the paper to your background.  Try to avoid making letters with your lines (such as "Y", "T", "K") as they are not natural in marble!!


I used a combination of Distress Brushed Corduroy and Vintage Photo for the lighter brown lines.  The dark brown lines are Tattered Angle's Glimmer Mist in Tattered Leather.

I have to say I LOVE how this turned out!  I must admit that I stared a this forever trying to come up with a project that wouldn't hide the effect, LOL!  Alas, I failed to come up with anything today, but keep an eye out for this, I'm mulling over some ideas!

Ok...next version of Faux Marble.  Now, this is something that I found on Andy Skinner's blog.  He came up with a faux marble technique that he calls Alcohol Floating Backgrounds.  His technique combines alcohol inks and water.  You can see his video here.  WARNING: THIS TECHNIQUE IS VERY ADDICTING!

Begin with a tub of water and some alcohol inks. 


Drip two/three drops of each of the alcohol inks into the water


Slip your paper of choice into the water


Out comes some fabulous backgrounds!!


Front side


BACK SIDE!!  YEP!! You get two different backgrounds on each sheet!!  This lets you choose which side you want to work with!!


Different colors on shipping tags

On Pure Luxury Cardstock
NOTE the middle sample...that one will be used for my project!!


On Glossy Paper


Slight variation.  Spritzed glossy paper heavily with water.  Applied alcohol inks with ink applicator. 

I also did samples with the alcohol ink Snow CapIt added a cool effect, but I found that on the glossy, it clumped up and then just brushed off once dried. Still a variation!! 

For the most part, I could make one sample, add new colors for another sample before needing to dump my water and starting over. 

I also tried this technique with some sticky back canvas. I wanted to try to make a background that was complentary to the middle sample seen above on the Pure Luxury.  Funny thing, I actually liked the PAPER backing of the canvas better!! haha!   And this is what I came up with using the Alcohol Floating background. 

This is an 8.5 x 8.5" layout.  the papers are retired Stampin' Up (Sorry, I don't recall the specific paper names and will admit that I'm too lazy and too far behind schedule in trying to get this posted!)  The main base was scored using my Scor-Pal every 1/4".  The backing to the sticky back canvas makes up the second background piece.  Tip:  Tape will NOT adhere to this backing! I had to put the tape on the black layer and then applied the background.  My guess is that if I could pull it up easily.  If I was really wanting this to stick, I would use some glue (either hot glue or strong glue like E6000.

The Suzi Blu image was stamped twice with Memento Tuxedo Black ink.  I stamped it on a piece of Pure Luxury White and again on the Alcohol Floating background that was seen previously.  I paper pieced her dress using the background.  I added a very slight bit of shading to her dress and hair with some Copic markers, but deliberately left her body uncolored, as I liked the stark, rather gothic look to her!

The roses were made with more of the retired SU papers.  Ok, I felt guilty.  I'm taking a wild guess here:  Lovely Lilac, Lavender Lace and Almost Amethyste would be my guess on which shades of paper I used.  The large roses were die cut with Spellbinder's Spiral Blossom One.   The small rose was made from a Spellbinder's Scalloped circle that I just hand cut the spiral to roll.  The large flowers were stamped  and sponged with Distress Inks in Dusty Concord and  Chipped Saphire, using stamps from Wendy Vecchi's Art Colors Life and Be Happy, Make Art sets.  The leaves were die cut from SU's Kiwi Kiss using Spellbinder's Foliage and were sponged with Distress Peeled Paint ink.  The pearls in the center were made with a Viva Decor pearl pen.

The edge embellishment was cut with Spellbinder's Edgeabilities Classic Ric Rac.  The black rhinestones are from Want 2 Scrap nestabling that match Spellbinder's circle dies.  I just cut them to fit the area I wanted to place them in.

Close up of the Faux marble on the dress and flowers


I hope that these variations of doing Faux Marble will inspire you to create!!

'Till next time...................


Friday, January 20, 2012

Getting the Faux on..........

Hey People!  The E-Team is starting the New Year with a New Series:  Getting Your Faux On!! 


Of course, it wouldn't be an E-Team hop with out some goodies!!  All you have to do is leave a comment on each Team member's blog for a chance to win one of  THREE $25 eP gift vouchers!  You will have from today, Friday, January 20 until Sunday, January 22 to leave a comment.  Winners will be announced late Monday, January 23 on the eP blog.

E-Team Members
Me!

The lovely Wendy Vecchi posted a fabulous faux technique, Faux Crazed Porcelain, on her blog a while back, using Glue n Seal and Rock Candy Crackle Paint.  Our fearless leader, Daisy, challenged the E-Team to use this technique and see what we could come up with to inspire you to give it a try!!   

I did a lot of experimenting with this technique.  Let me first share my project, then I'll share some tips on what I discovered.

Let's just ignore the fact that I put my cage on base at an angle.  Yes, it really bothers me, as I was wanting it to be straight!  The bent "bars" would be my failed attempt trying to correct the angle of placement after the fact.  Obviously, sometimes you just have to let those little mishaps go. sigh.

I decided to make a decor item or wall hanging.  The base is a piece of foam board that was cut to 6x6".  Two layers of Pure Luxury Ivory card stock the bottom layer is slightly larger than 6x6") were distressed and form the base.  All the decorative papers come from My Mind's Eye 6x6 pad Madison Avenue.  The fall seasonal Distress Ink Gathered Twigs was used to add distressing along the edges of the papers.  The cage was die cut from Ten Second Studios Dark Chocolate metal. It's difficult to tell from the picture, but the cage was bent to form a 3D effect off the base.   The butterflies were punched using a MS butterfly punch and Alterations  movers and shakers  Mini Butterflies. The Clearly for Art modeling film was used to add dimension to the butterflies. 


Other accessories used were Old Lace Glimmer Mist (on the base design paper and the Fleur de Lis "lace", made with the Spellbinder's die), 1/2 back self adhesive pearls (from my stash) and the decorative pearl swirls, also from my stash.  The sentiment tag is just a scrap of Ivory card stock, distressed with Gathered Twigs ink that I wrote the saying on. 

NOW for the faux porcelain!!  One of the surfaces for this technique that I tested was the Clearly for Art modeling film.  I brushed a thin coat of Glue n Seal onto the film and after that had dried, I coated again with the Rock Candy Crackle Paint. I die cut the flower pieces with the Tattered Floral die and then used the reinker for Distress Ink Spun Sugar to color the  flower.  I just dropped several pools of ink onto the film and used a paper towel to rub it into the cracks and wipe off the excess.  The color and technique seemed to hold well, even with the heating of the film to mold the flower petals. 

The center of the flower was made with a Viva Pearl Pen in Cream.  I colored it with Copic markers to match the flower. 

The leaves were done the same way, only I used a transparency sheet from Office Depot for my base. 


Let me share some tips/tricks with you that I learned while exploring this technique.

Surfaces:  This technique works on a variety of "slick" surfaces.  I tested it on glass, transparency and Clearly for Art modeling film.  You MUST use the Glue n Seal (or perhaps Elmer's Glue) for a base for the crackle paint to adhere too.  Otherwise, the crackle paint will rub off!!  A thicker layer of crackle paint will yield larger cracks, but I have found it takes a VERY thick layer to get large cracks.  You can speed up the drying process with your heat gun once you notice the cracks appearing.  Just beware that if you happen to hit a thicker pocket of paint, it may bubble with the heat gun.  It can sometimes result in a different texture than the rest of the cracks.  I'm not sure if that is from the paint or perhaps the glue bubbling. 

I also tried this technique on Ten Second Studio's metal, using the same methodology. While the technique works on the metal, I found that the cracks were sooo fine, that they were difficult to see with the shine of the metal. And I'm still experimenting as to what type of inks I could use to highlight the cracks more. I really wanted LARGE cracking on the metal versus the fine cracking that I was getting more often than not. So far, I have found that it takes a VERY, VERY thick coat to crack large on the metal, but that is not consistent. I also tried to speed up the drying process of the paint, once cracking was noticed, with my heat gun, but it seems to have a reaction with the glue/paint/metal and results in a change in color of the metal. I will be experimenting more with this technique and metal and will let you know what I come up with at a later date!!

Coloring:  Surprisingly, Distress Stains and the Distress ReInkers seem to color the faux porcelain without rubbing off.  I found that I could get a second layer of color on if I allowed the first layer of color to dry.  I still need to test permanent inks to see how those will color.  The mottling effect of darker Alcohol inks tended to obscure the detail of the cracks since the ink will adhere to the smooth surface under the cracks.  The lighter color of inks look FAB!

Other:  I also tried using the glue as a base for other crackle paint on these same surfaces.  Worked well, but you obviously don't get the transparency as you do with the Rock Candy crackle paint. 

 Tip:  If you by chance find that your crackle paint has dried up, mix in some water.  It doesn't seem to affect the crackling compound of the paint.  DO NOT  use a glaze to thin the paint.  That, DOES seem to affect the crackling!!  Also, Linda L, had a great suggestion to store your paints and Distress Stains upside down to help prevent air from getting into the jars and bottles.   Just tip the paint jars upright for a minute or so, before using them, and the paint will drip off the brush back into the jar.

I hope that you found this technique inspiring and will give it a try! 

'Till next time.................explore a new technique or experiment, with a twist, using an old favorite technique!!
 

Tuesday, November 15, 2011

Be Merry!!

Hey People!  I hope that your week is starting off with a BANG!  I'm trying to catch up after falling to the season's first winter cold.  Ick.  But!!  I mustered enough brain cells to come up with a project for another E-Team hop!!  I didn't want to miss out on all the holiday fun!!

Be Merry Tag series #3

E-Team
ME!!


And as you have all come enjoy and expect, it wouldn't be an E-Team blog hop without some wonderful goodies up for grabs!!  Leave a comment on all the participating Team member blog's for a chance at 3 Be Merry Goody Boxes that will be chosen randomly.  PLUS:  make sure you leave a comment on the eP blog on what your favorite Thanksgiving dessert is (or your favorite dessert period! hehe) for a chance at 2 $20 eP gift vouches to the eP store!!  Comments can be left from today, November 15 until Thursday, November 17.  Winners will be announced on the ep blog Friday, November 18. 


For this series Daisy gave us free reign as to what holiday stamps, papers, embellishments we could use from the wonderful eP store.  Our only instructions were to make a Tag and an ATC.

Have you noticed that lately I have had a very hard time following directions?!!  I'm going to grab onto the very thin life line that I have been sick and just did not have enough energy or mojo for two projects.  BUT!! In my defense, I did create a project that required a few more ideas!

My Be Merry Chunky  TAG ATC!!

Paper:  Idea-ology Paper Stash Seasonal.  Ink:  Distress Vintage Photo.  Accessories:  TenSecond Studios Barn Red and Poison Ivy Metal altered with alcohol inks in Meadow, Cranberry and Current. Dies:  Spellbinder's Layered Poinsettia.  Idea-ology Findings Curio Knobs and Numerals. 1/2 pearls colored with Copics from Want2Scrap.


Paper:  Idea-ology Paper Stash Seasonal.  Accessories:  Rock Candy Stickles (covering main image).  Glossy accents to adhere fine glitter.  Dies:  Spellbinder's Create a Flake One. TenSecond Studios Peal metal altered with alcohol inks Denim and Cloudy Blue.  1/2 pearls from stash.


Metal:  TenSecond Studios Barn Red.  Cuttlebug Dots embossing folder.  Letters are Idea-ology Grungeboard Mixed Mini Plain altered with Claudine Hellsmuth's Studio Paint Blank Canvas.  Essentials Glue pad used to adhere fine glitter (from stash)


Metal:  TenSecond Studios Barn Red embossed with Alterations Texture Fade Snow Flurries.  Letters again are Grungeboard Plain altered as above.  Snowflake is two layers of plain grungeboard cut with Spellbinder's Create a Flake One and altered with paint and glitter as above. 


Metal:  TenSecond Studios Barn Red altered with a Cuttlebug embossing folder (sorry, don't recall the name.  It is a Christmas tree).  Idea-ology Findings Curio Knob.

Other: 2x4 cut to ATC size.  Claudine Hellsmuth's Studio Paint Dash of Red.  Burnishing/sanding block from TenSecond StudiosTombow Mono Metal liquid glue.  TenSecond Studio's Killer Adhesive.  E6000 to layer metal embellishments and glue to project. 


I hope you enjoy!  'Till next time...................enjoy the creativity

Friday, September 30, 2011

Want to Scrap?


The E-Team is excited to share in fun blog hop with the Want2Scrap Design team. If you are new to eclectic Paperie or Want2Scrap, here is a little information about these two creative companies. Each offer a unique line of products for all paper crafters.

eclectic Paperie(eP) is an online boutique for all who love paper crafts. There is an eclectic assortment of products, supplies, tools, and materials to assist you in your quest for creative expression. Stretch your basic paper crafting skills beyond simple scrapbooking and cardmaking. Take the next step into artistic expression by "feeding your creativity" at eclectic Paperie. You keep up new product offerings by following eclectic Paperie on Facebook, Twitter, or the eP Blog.

Want2Scrap™ manufacturers rhinestones lines including the Nestabling™ line that coordinates with the newly released Nestaboard™ chipboard line. A variety of Nestabling and Nestaboard shapes correspond with specific Spellbinders™ Nestabilities™ die templates. Want2Scrap also manufacturers their own line chipboard albums and accents, acrylic albums, and multi-layered laser designs and other fine scrap booking products. Want2Scrap brings ease of use and flexibility in their product lines by offering products uniquely tailored to its customers’ needs. Follow Want2Scrap on Facebook and the Want2Scrap Blog!

The E-Team and Want2Scrap Design Team were on a mission to create some fun projects using the Nestabling, Nestaboard with any coordinating Spellbinders dies, too. Come blog hop with the two teams to see what kind of creative juices resulted.

The E-Team


and
Me!
Linda L is actually on a cruise this week!!  Lucky gal! But stop by and let her know she was missed!


Want2Scrap™ Design Team


Twice the number of blog hop participants means twice the fun that includes prizes, too!! Visit each E-Team and Want2Scrap participating member and leave them some feedback about their creations. One comment per person per blog, please. You have until today, Friday, September 30th to Sunday, October 2nd to visit each blog participant. eclectic Paperie and Want2Scrap will each be choosing 3 random winners from the blog hop participants. Three random winners will win an eP $20 gift voucher and three will win a Want2Scrap $20 gift voucher.   Winners be posted on the eclectic Paperie Blog and on the Want2Scrap blog on Tuesday, Oct 4th so make sure you check back to claim your prize.

OK!! Onto the project!

I started with this empty Brie cheese container that I had saved for altering.


I then pulled out one of my favorite Graphic45 paper lines, Curtain Call, Want2Scrap Nestaboard Stars Five, the coordinating Spellbinders dies and some Idea-ology Film Strip Ribbon.  A combination of Studio matte Multi Medium, Antique Linen Distress Ink and some left over bling that I altered with a black Copic marker and this is what I came up with:


But wait! There's more!!  Take off the lid and inside is a little mini album of various pictures of my kiddos, in costume at differnt stages of their young lives, ready to play the leading men in the show!!


I covered circles cut from thin cardboard (the 12 x 12 cardboard that comes in paper packs) with more of the Graphic45 Curtain Call and used them as my background for pictures that I edited to a sepia tone in PSE. 


The "pages" of the mini album where adhered to a piece of black ribbon and covered over on the back with SU's Riding Hood Red card stock with Scor-tape.  I'll write the details of the photos on the back for journaling.  I did add a loop to the top of the ribbon, just in case I decide that I want to hang the collage for show.


A couple of observations:
 
1) The Nestaboard is sturdy, yet light weight.  And I was very impressed that it matched PERFECTLY with the Spellbinder's coordinating dies.
 
2) The Multi Medium held up the best to adhere the Film Strip Ribbon. I tried to use Humungo Sticky Tape, as it adheres metal wonderfully, but the twisting of the ribbon caused it to pull off.  The Multi Medium is still holding strong.
 
3) It would appear that my children stopped posing for pictures at age 3.  I really have no excuse not to get caught up on my scrap booking (I'm only behind about 12 years) as I would only have a total of 6 years to scrap.  sigh.............
 
I'm thinking that this idea would be great gifts for the grandparents for the holidays! 
 
Till next time...............enjoy some creativity!!

Friday, September 16, 2011

Bea A. Ware!!!

Hey People!  Remember me?!  I know that my posting has been very lacking lately.  I'll spare you the long version excuse and cut to the chase:  LIFE!! Not enough hours or energy in the day/week and the creativity time is the first to go!!

BUT!!  Lucky for you, Mz. Daisy has issued another challenge for the E-Team!!


 And no E-Team blog hop would be complete without the chance of winning some awesome goodies from the eP store!  Daisy is putting together an "Tag/ATC" goodie box that will have a variety of tags and tag surfaces, some Twinery Samples and other eP goodies!!  Three randomly selected winners will be chosen from the comments left from TODAY UNTIL SUNDAY, SEPT. 18, on each of the participating Team member's blogs. 

BUT WAIT! There's more!!  Leave a comment on the eP blog about your favorite Halloween treats and another lucky person will win a $25 eP voucher!!

The E-Team
and ME!
Micki and Latrice are not able to join in today, but make sure you stop by and let them know they were missed!!

 Ok!! Onto the fun stuff!! 

My project started out with this little guy:


It's an M&M mmmmMUMMY!! This little guy was so quick and easy to make!  I started with one of these plastic tubes.(this is the smaller of the tubes).............


.............cut 1/2" and 3/4" strips of Sticky Back Canvas and haphazardly inked the edges with Distress Tea Dye Ink.  Randomly wrap the strips of canvas around the tube and across the top and around the lid, glue on some googly eyes and MUMMY!! You've got yourself a cute little treat holder that your kids can make for their entire class or neighborhood!!

But then my brain got to thinking (yes, it hurt),that all Mummy's deserve a nice home to haunt.  So I got out some Distress Ink in Weathered Wood and Pumice Stone.  Randomly squished it on my craft mat and spritzed with Tattered Angel's Glimmer Mist in Pearl and Patina and layed a piece of Pure Luxury card stock in the pooled ink (this is my version of Wrinkle Free Distress). A little selective shading with my Copic markers, using C1, C3, C5 and C7, a little dry embossing along one edge.


I REALLY wish the shimmer from the Glitter Mists showed up in the picture!  It is just enough shimmer to make the tombstone look like granite!

Of course, it's the little decorating details that make a home stand out.  Since I currently lack the Raven and Branched Tree dies in my collection, I had to resort to drawing my own!  The great thing about ravens and barren, dead trees, is~~ they are suppose to look bad!! BWHAHAAAA!! I drew out my rough ideas on scratch paper and then traced the templates onto Black Pure Luxury card stock.  I spritzed the raven with Tattered Angel's Glimmer Mist in Cinder, which added a great blue/black shimmer.  I deliberately left my pencil marks on the raven to add a faint definition of detail, with so much black!

The tree was embossed with the Texture Fade Woodgrain.  Paper easel's were made to hold the leaning tombstone and tree.


After I was all done with the mummy's home, my kiddo's informed me that Mummy was too "cutesy" for the grave site!! Siiiigh.  If you ask for constructive criticism, you better be willing to listen to the answer!!

So, Mummy will not be moving into this particular grave site.  He will just have to haunt some cute little kid's candy bucket instead. Or, he would make a great ghoulish party favor!!

As for Bea A. Ware's final resting spot~~I think it would make a great table name tag setting.  Change out the name for a guest's name.  Or make each tombstone have some funny play on words.  Both would be just SPOOKTACULAR!!

Until next time...........................