Showing posts with label 3D. Show all posts

Sunday, November 16, 2014

Route 66

(Tap, tap, tap.  Is this thing still on?  Hello?  Bueller?  Bueller?  Anyone?)

It has been quite a while since I last posted. Really, I have no excuses, unless you would like to consider both kiddos in cross country, the Oldest Kiddo simultaneously in flag football, working everyday and just all around general fatigue that makes taking and editing photos seem more like a chore than a joy to share, haha!!

I'm really not complaining. I'm enjoying every minute that I can of the Oldest Kiddo's last year in high school. I've just put blogging in the freezer for a while!!

A couple of weekends ago was the annual fall fair. This year, the Youngest Kiddo's teacher made a friendly wager with another classroom mom that her class would win the "Best Fall Fair Booth".

Ha!  No pressure to come up with an awesome design. The teacher kept saying it was all in fun and she didn't care what the out come was.

Did I mention that this teacher has also coached for many years and EVERYONE knows she is competitive, lol?!!

I was recruited to help determine the booth's theme. This year's theme was Route 66  The internet and Pinterest gave lots of inspiration.  We decided to base our booths on this old gas station.
We placed both our booths side by side and made a false front with large sheets of cardboard.  Two old window frames were wired onto each side of the "door" (basically, a screen door leaning against the front of the facade).

I painted two large gas tanks to go in front of the gas station. These were about  6x2'.  I snapped a few photos of the creative process:  All these photos were taken with my phone.  I don't know why I never actually grabbed my camera. Too lazy, I suppose!! LOL! So. less than stellar photos ahead.  Bad, bad blogger. I was also too lazy to transport the pictures and do some basic editing.  BAD, BAD, BLOGGER. On the other hand, I did take photos that I am sharing, and figured you'd rather actually have me post sooner than later, lol. YAY me!! One or two points in my favor!


Youngest Kiddo giving the thumbs up for the job finally completed

This picture shows a bit of the "windows" that we used for taking orders.  Anyone for an ice cold root beer, churro, pretzel or shaved ice?!


The facade door can be seen in this shot. The roof tarp and name of the gas station can also be seen in this photo.  After the initial set up on Saturday night, I decided that the pumps need that last final touch of the actual pump handle.  I think these little details really added to the completeness of this booth.  We also swapped out that little gas can for a larger one.  


Notice the Mobilgas horse and the Coco-cola bottle on the front of the booth?  Those were done by one of the girls in the Youngest Kiddo's class.  I informed K that she is going to do help out more with the painting embellishments in the future!! She did an AWESOME job!!


The Toad got into the spirit of things and was willing to don a pair of borrowed overalls, sit on the bench with his oil rag and a bottle of root beer, playing the part of  "Willard " (the namesake of the "gas station" )

And yes, we won the contest. An extra $50 from the Home and School were added to the classroom coffers.

Next up, the Youngest Kiddo outshines both his parents with his photography skills.  Stay tuned!! 


Friday, May 9, 2014

She's Making Lists......

.......and more importantly, CHECKING off on the lists!!

Order invites for Newest Kiddo's graduation party:  CHECK

Individual Senior Boys Baseball collages put together and ordered:  CHECK

Coach's and Team Baseball collages put together and ordered:  CHECK

Teacher appreciation gift card (yes, I admit that that I caved to the convenience of a gift card. Survival is what we are aiming for in the month of May!):  CHECK

Cute presentation Teacher's Mug to give gift card:   CHECK, CHECK, CHECK!!  

Thank heavens for those paper crafter's who are willing to share their talents and templates online.  It is those saintly souls who make harried mom's like me not look quite so lame in in our gift giving.

Traci Cornelius has a wonderful video that demonstrates how to make this cute little mug. Since she did such a fabulous job, I skipped the step by step photos. This is truly easy  peasy to make!! You can find her video here.  


It actually took me longer to figure out what papers I wanted to use then the making of the mug itself.  The gift card peeking out the top will give you an idea as to the size of the mug.  It's tiny, but CUTE! 

I made the mug and handle out of Gina K's pure luxury 120# card stock as I wanted the cup to be more sturdy. You will notice in the last picture that the handle started pulling off the mug due to the stiffness of the paper.  I had used Scor-tape originally to adhere the handle, but had to resort to TenSecond Studios Humungo Killer tape to get the job done correctly.  The decorative papers are from Graphic 45's An ABC Primer line.  

Using up hoarded paper stash:  CHECK

I'm off to try and accomplish more check marks off my list before an afternoon of watching the Oldest and Newest Kiddo's baseball game.  To all you wonderful and under appreciated Teachers:  a HUGE THANK YOU!!

And to all you mom's (harried or cool, calm and got it together) HAPPY MOTHER'S DAY!!

'Till next time......................

Sunday, February 23, 2014

Red, Turquoise, Box?!!

There are some days (weeks) that I am amazed that I am even able to complete a project.  Not because of time restraints, but because my brain continually zigs and zags all over the creative route. I start out with one idea, then ZIG! Another idea leaps in, changing the path. I go along happily on the new path and ZAG!! A major rut cuts down the path, resulting in another detour.

This creative endeavor is a prime example of my wandering creative journeys.  I started on a path for a birthday card that included red metal altered with alcohol inks against a design paper that brought thoughts of a sunny blue sky with wispy clouds floating.

ZIG!!

Found a few jewelry trinkets that I decided would accompany the  birthday card.  Just so happens the jewelry was turquoise and leather.  Okay, switched gears a bit and decided to make the card coordinate with the gift.  Got out some new metal, paper and accents.

For the life of me, I just struggled with the card.  While I liked the elements for the card, I could not escape the feeling that something was "off".

ZAG!!

Detour number two took me from a card to a box to hold the trinkets.  Ahh! Yes!! Finally! I could see the path through all the weeds!!


Supplies:
Box: from my stash
Paper:  (from my stash):  From Fabscraps Shabby Chic Romance
Metal:  Ten Second Studios  Peacock and Dark Chocolate metal.  Kabuka mold #13. Decorative wheel and fine tip refiner
Embossing folder: Cuttlebug  Swiss Dots
Dies:  Tim Holtz's Tattered Florals and Garden Greens by Sizzix
Other:  SU Antique brad altered with Copic marker.  Suede ribbon: stash.  Brown Paint 
Adhesive:  Glue and Seal, Beacon's Glass, Metal and More

The flower creation was totally inspired by Lin from Yours Artfully .  She graciously allowed me to create a tutorial based on her flowers for SCS a while back.  The step by step photos can be seen here on the SCS resource page or the video below


'Till next time.........remember the path we start out on may not be the path we actually travel!!


Sunday, November 17, 2013

Having Hindsight

After completing my Gelli Print Meets Metal Roses card I immediately had to buckle down and start creating another card needed for a birthday celebration.  I pulled out some older paper packs and found inspiration from one of the papers in My Mind's Eye Sunshine 6x6 pack.  I started die cutting, assembling, spritzing, panicking because I spritzed the wrong color, spritzing some more, over spritzing, became frustrated and them almost ruined the whole thing by trying to remove hot glue from a wet petal.

Then I discovered that I had basically re-created my Gelli Print Meets Metal Rose card, but with paper.

Which, would explain why I liked it, but I admit I started to chant stuck in a rut, stuck in a rut, stuckinarut.


Details:  Card size is 5.5" square. Paper: Gina K Ivory, basic black, SU Wild Wasbi. MME's Sunshine. Mustard paper is scrap paper.  Ink: Distress Old Paper, Vintage Photo.  Stamps: Unity Bold Insight. Dies: Spellbinder's Label Two, Rose creations.  SU small flower punch (sorry! I don't recall the name of the punch!). Sizzix Branch w/Leaves.  Other: Tattered Angels Glimmer mists.  Sorry, I don't recall which ones I used!! I was grabbing left and right to try to fix my mistakes!

 A CAS version to be revealed next!! stuck in a rut....stuck in a rut....stuck in a rut........ 


Monday, November 11, 2013

Gelli Prints and Metal Roses

I had a very creative weekend as it seemed everyone and my mother in law celebrated birthdays!!

Okay.  That is a slight exaggeration, but I cranked out 3 cards in one weekend.  And if you have visited this blog much in the past, you know that makes up more creativity than I usually manage in a month!!

I, of course, will only share one card today!! I am going to take advantage of having a "stash" of work to share over the next week or so!! hehe

While I was on the creative endeavor to make my father in law a birthday card a couple of weeks ago, (the card that actually came to be can be seen here ) I actually started out with the idea for a Gelli Print on the sticky side of a self laminating sheet.

Allow me to digress.  Making Gelli Prints on packing tape or the sticky side of a self laminating sheet is probably one of my most favorite Gelli Print techniques.  While I love the "unknown" outcomes with the more traditional methods of making monoprints with the Gelli Plate, I really, really REALLY like the process of planning out what what direction my print will take.

I might have a little issue with control.  Or just letting my art F....L...O....W....

ANYHOOS!!  I made this wonderful turquoise and copper print a couple of weeks ago and for the life of me, could NOT figure out how "finish" the card without taking away from the print.

Sometimes, walking away is the best way to complete a creative project.

So, I started with the background.......


Gelli print made with some turquoise and brown acrylic paint (stash) brayered over the TCW's Mini Gears stencil. Copper Pearl Ex was then applied on the "clear" area of the print. 

And rediscovered my love of working with metal.......


Roses were die cut from Ten Second Studios Dark Chocolate Metal with Spellbinders/Donna Salazar's Rose Creation dies.  The leaves are from Spellbinder's Foliage and the flourish is an old Sizzix die.   

Finished with  a little extra wire and bling ! Who needs a sentiment?! Not this card!!

I will admit that this card ended up being more than what I had envisioned.  But I thoroughly enjoyed working with the metal sheets again and have vowed to pull out that medium more often in the future!!

'Till next time..............


Monday, June 3, 2013

Are You Sitting Down?!!

No, your eyes are not deceiving you.  It is really yours truly, come back from the land of No Time for Creating!!

I always have to fight the urge to apologize and over explain my prolonged absences from posting on my blog.  Why do we busy mom's feel we have to apologize for putting Life before creativity or blog posting? I guess it is that secret compartment inside that holds that ugly word comparison.  We (okay, I ) see other creative mom's posting daily and it is hard not to think "well, so & so posted her six cards, the homemade 8 layer cake with step by step instructions, the final pictures of her living make over and her finish of the half marathon this week.  Why can't YOU make one measly card  and post it, say every other week????!!

I think I'm about to digress.

Let's just move onto the ACTUAL card I did manage to create, shall we?!!

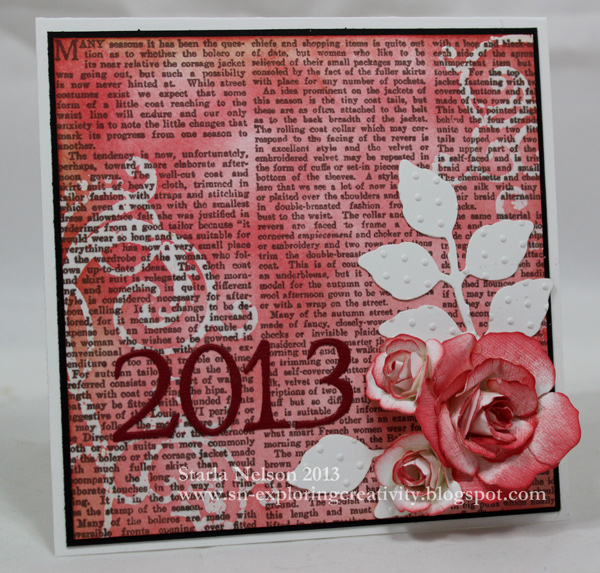
School is finally out for our little school and with that I was in need of a graduation card for a senior girl.  Now, I am obviously SOOOO out of practice in making cards (just in case you missed the significant time lapse between posting dates) and this card went in a TOTALLY different direction than I had planned.  This particular senior girl, while all girl, is, was our little school's top female athlete.  I wanted a touch of feminine with a coating of athleticism.

I failed.  Miserably.  Somehow my vague idea of what I wanted turned into a girly girl card.  Which, is okay.  Just not what I had planned.

Sometimes, it is just best to go with the flow!! I really do like how this card turned out and while not what I had envisioned, it was still a touch of feminine without being over the top girly girl.

Before I share the card, I do have to giggle at how rusty my card making skills have become.  First,: it took me all day to make the card.  I will give myself credit for the fact that I spent quite a bit of time experimenting with the background technique until I got the look I wanted.

Second: may I strongly suggest that when making cards, one FIRST verifies that one has an envelope that FITS the card dimensions PRIOR to completing the card?!! Let's just say that the card was tucked into the envelope, but in no way, shape or form, was the enveloped sealed.  And the card was hand delivered. 

Finally: THE CARD


I made the background paper by stamping Cornish Heritage Farms 6x6 Vintage Text onto a 5x5 piece of Gina K's Pure Luxury card stock with Memento Rich Cocoa ink.  I then stamped the swirls (old set I've had in my stash fo-evah!) using Versamark ink and embossed with clear embossing powder.  Distress Inks in Barn Door and Fired Brick were sponged over the entire background.  Distress Vintage photo ink was lightly sponged along the edges.


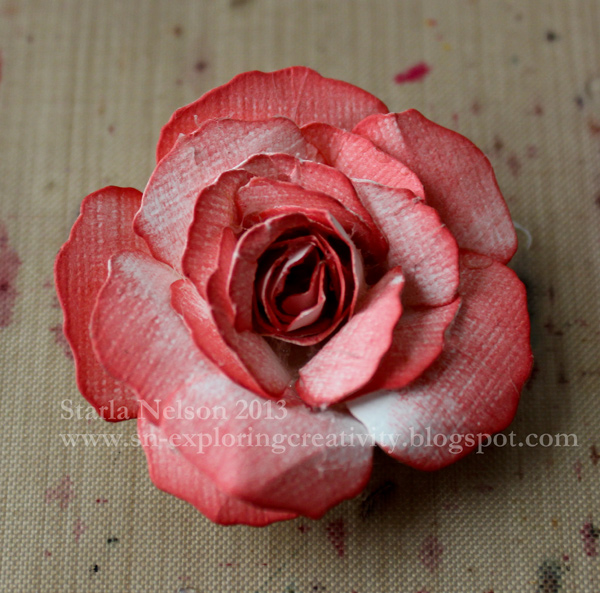
I then die cut two flowers from three different sizes from  Rose Creations by Donna Salazar for Spellbinders from textured white card stock (I believe it is SU, but don't quote me.  I'm using my stash!!) and sponged only one side along the edges and partially down the petals.  


The petals were then shaped using a large stylus and a foam mat.


Beginning with the smallest flowers, the flowers were glued using a hot glue gun. Shaping of the petals were done by hand and a small stylus (you could use tweezers also, but I couldn't find mine!!)


The smaller flowers were made the same way, except I used smaller variations of the dies and sponged only the edges of the petals. 

The leaves were die cut using Spellbinder's Foliage.  They were then embossed with the Swiss Dots Cuttlebug embossing folder.  


The numbers were die cut using Cuttlebug's Olivia alphabet dies.  


Well, that is about it for me today! I will make no promises that I'll be around more frequently this summer, as our schedule seems to be jammed packed and just as crazy as the school year was, BUT!! I will be back!! said in my best Arnold Schwarzenegger voice!! 

'Till then, enjoy the creativity!!


Thursday, December 6, 2012

Black Metal Rose

Howdy Strangers!! Oh wait!  It's me that has been missing for a while!!

 I was all set to apologize for my absence, but then I realized that I would be apologizing for the fact that I have been busy with family happenings that have trumped creating.

And to be honest, I'm working on NOT feeling guilty or feel that I need to apologize for that.  I sooo admire those who are busy with family, jobs and life happenings, yet are still able to create several times a week.

Nope.  That's not me.

But!  You didn't drop by to hear me ramble about my weird guilt trips!

This week the high school boys are gearing up to ask out dates for the Winter Banquet.  Oldest kiddo is going to ask a classmate who shares his preference for 80's rock and metal music.  When he asked other friends to find out her favorite flower, she replied she likes "black roses.  A single black rose".  

Now, I don't know if she was being silly, but a black rose she will be getting!!

A black metal rose, that is.  


I have made roses out of metal before, using die cuts.  But I wanted a larger rose than what my available dies  were going to allow me to make.  I went online and found this template that I felt would work perfectly.  

I printed off the template onto regular copy paper.  I then traced  the templates with a Teflon refiner (you can use a stylus also) onto the metal by layering a thin mat, the metal and copy paper.


After tracing and cutting out the different pieces, I ran each layer through my Big Shot with Spellbinders M-Bossabilities Ornamental Iron.  


I then used a burnishing block to sand off the raised portions to expose the silver aluminium.


Usually, when making roses, you glue the petals of the larger layers into a cone shape.  Since I was wanting to adhere the rose onto a "stem" (a bamboo skewer wrapped in more of the black metal), I skipped that step. Using a hot glue gun, **Warning** Hot glue on metal gets HOT!  Be careful when handling!! I built up from the center out, wrapping and gluing each layer as I went.  Sorry there are no pictures of this step.  My hands were a tad bit occupied trying to maneuver the metal over the hot glue without leaving too much skin!! 


I wish you could see the texture and layers better!! Trying to photograph shiny metal at night is a bit beyond my photography skills at this time! LOL!!  The layers and texture add an elegance, yet still edgy, look to this "black rose".  

Basic supplies:  Rose Template from Ellinee.com.  Metal, mat, burnishing block (sanding block) and Teflon refiner:   Ten Second Studios Rock Star Black.  Embossing folders:  Spellbinders M-bossabilities Ornamental Iron and Cuttlebug Swiss dots.  

Well, that's it for me today!  I need to clean up this mess and start thinking about a couple of other projects that I would like to get done by this weekend!  

'Till then.....


Friday, May 11, 2012

Tea Time

Happy Friday People!  It is getting close to the end of the year and life has been shifted into 5th gear in this household!! Now if only this life was a high performance sports car!! 

This past week was Teacher Appreciation week.  The Youngest Kiddo die cut an apple and wrote a sweet note on it for his teacher earlier this week, but wanted to give a more formal type gift too.  His teacher loves her daily tea and a bite of chocolate so we went with that as our starting point.  This teacher also loves the little packages and class room treats that the Kiddo and I come up with for his class so we wanted to make sure that the packaging was a bit special too.  I gave myself a break and went shopping for a couple of templates to accomplish the job versus trying to come up with my own.  I ended up buying a few templates from Lauren Meader's My Time Made Easy web store.  

Seriously, what ever took me so long to utilize her talents?!!  First, allow me to commend Lauren on her customer service.  I emailed Lauren late at night with a question as to how the templates would size on a regular 8.5x11" piece of paper, as I am the last person in the crafting world who still does not own an electronic cutter.  She replied promptly the next morning.  Bonus points for her!!

Second, her templates were not difficult to hand cut!  Step by step instructions with pictures are also provided with the downloads, which took any guessing out of the assembly process.  So far, I have been more than pleased with my purchase and expect that more of her templates will find their way to my downloads!! FYI:  I have not been asked to promote Lauren's products.  I am just pleased as punch with my purchase and will not have a problem ordering from her again!!

As I said earlier, the Kiddo and I decided to give his teacher a gift of some special tea and chocolates.  Using the My Time Made Easy  templates, this is what we came up with:


The box holds some full leaf Vanilla Rooibos tea from Starbucks.  The cup holds some specialty chocolates that I actually found at my LSS.  The box template has the option to make a slit that tea packets can be grabbed from, but with the tea bags, that wasn't needed.  

Basic details:  Templates for tea box and cup from My Time Made Easy Pretty Packaging. Paper was SU's More Mustard and Basic Black and Vanilla.  Design paper is My Mind's Eye Lost and Found Sunshine.  Spellbinder Dies of Fleur de Lis Squares, Spiral Blossom One and the leaves from the Daisy Head set were used for the accents.  Flowers and leaves misted with Tattered Angel's glimmer mist in Old Lace and Honey Dew.  The sentiment was computer generated.  

That's it for me today!  I have shopping to do for a class party at the beach tomorrow, plus some extra food to feed the additional boys that will be staying the weekend here so that they can attend the party!!  

Enjoy your weekend, Happy Mother's Day to you that are mother's and remember to take some time to explore some creativity!!