Showing posts with label blog hops. Show all posts

Wednesday, September 18, 2013

It's a PARRRRTYYYYY!!!


WhootHoo!!  Welcome to eclectic Paperie's Belated Birthday Bash!  Today we're celebrating the (belated) one year anniversary of the store's new ownership! It's been an amazing year, full of inspiring projects, wonderful classes, and many, many new products!!  eclectic Paperie wouldn't be where it is today without the ongoing support of our customers and as a BIG thank you, you'll have an opportunity to lots of great prizes!  You have until midnight, tomorrow(9/20), to comment for your chance to win the following prizes!!!

 A full set of Tim's NEW Distress Paints
6x6 Paper Pad Bundle
Dylusions Stencil Bundle
A set of NEW Wendy Vecchi Archival Inks
Crafter's Workshop Stencil Bundle

 To be entered into the prize drawing, please be sure to comment on the eclectic Paperie blog and on each of the eTeam blogs.  Check out all of the thumbnail links below to view the rest of the eTeam projects!  Enjoy the hop!

I was very excited to be asked by Kim to help eP celebrate it's first year under new ownership!  When Kim started this new journey of ownership, her goals included  offering lots of new products, ideas and inspiration. I have personally been inspired by the current eTeam members and have enjoyed watching them explore new ideas and mediums in their own creative journeys.  It was with that thought in mind that I decided to try a new technique (for me!) in using the Gelli Plate with clear adhesive (in my case, the sticky side to self laminating sheets).

First things first; getting out all the possible supplies that I thought I might use to make my mono prints.  *Note: originally I had thought I would use Distress Paints for this technique.  It just wasn't the look I was going for. While not pictured, I ended up using Claudine Hellmuth's wonderful paints instead.


Supplies:  6x6 Gelli Printing Plate (HIGHLY recommend the 8x10 one.  That will be on my next shopping spree!!), various stencils, masks cut from dies, embossed papers, Paints (see above note) brayer, non-stick craft sheet

Next; lay out masks in various spots on the Gelli Plate.  You will note that this layout is not the actually one I used for my final project.  It took several prints before I came up with the look I wanted!


The next steps are lacking photographic representation.  It would seem that somebody (ahem!) got caught up in the making of prints that she forgot to take pictures of the steps!  OOOPS!! Basically, I placed my masks on the Gelli Plate. Using the brayer, I applied a combination of Claudine's Dab of Yellow and Dash of Red paints onto the Plate and over the masks.  Carefully removing the masks, I then added some stenciling (TCW's Susana'a Arrows and Mini Ledger) and free hand elements, using the end of a paint brush, an old hair pick and a marker cap.  Remember, for this particular technique, what you see on the plate is what you will transfer to your clear adhesive. You also want to keep some areas free of paint.


HELPFUL TIP:  it is important to let the paint dry between layers to avoid making a muddy paint mess!

AFTER THE PAINT HAS DRIED *VERY IMPORTANT*, apply your clear adhesive to the plate.  I used the sticky side of self laminating sheets for my project.  You could also use clear packing tape. Burnish the adhesive onto the plate using a scraper or a bone folder.  Then, carefully, remove the adhesive from the plate.  If you find an spot of paint that didn't stick to the adhesive, roll back the tape and use your fingers or scraper to burnish that spot again, so that the paint sticks.  

After you have removed your tape from the plate, you have several options for the clear areas.  You could apply some printed tissue paper, dictionary pages, fine glitter, foils, or as I did, some Pearl Ex powder. I chose to use some bronze. I sprinkled the powders on the sticky side and used a "glitter" brush to evenly spread the Pearl Ex evenly onto the surface.  

WAH-LAH!! You now have a wonderful piece with shine and texture to add to a project!  

Originally I thought I would use my piece to make a birthday card (as this is a birthday celebration!) but instead, I went a different path.  I dug out a 6x6 chipboard cover (from my stash) and randomly applied a fairly dry brush layer of Claudine's Charcoal Black  paint.  


Using an adhesive spray I adhered my focal image to the center.  Pulled out some old idea-ology Alpha Parts and added them to the image.

Final project is still to be determined.  I am debating on using this as a cover to a small 6x6 mixed media journal (in which case I will decided on whether to use my Bind It All, Jump Rings or some other binding mechanism to put it all together) OR I will leave this as a little art piece for my desk.  


I wish I could have captured the lovely shiny sheen this has!  The Pearl Ex adds a wonderful metallic glimmer and the shiny surface of the laminating sheet give this another depth that catches the eye!!

Congratulations Kim for your first birthday at eP's helm!!  Here is wishing you many, many more creative years!


Wednesday, October 24, 2012

Giving Mojo an Ultimatum

I have decided that this extended vacation that Mojo has taken needs to come to an immediate end.  So I'm giving her an ultimatum.  I'm giving her a challenge she must show up for by Tuesday, October 30, for a guest spot on a blog hop with the new E-Team or she will be replaced.

Did I mention that this hop is with the incredibly talented Wendy Vecchi?!!!! Squeaaalllll!!!! 


I'm very excited to be joining the newly expanded E-Team and Wendy Vecchi (squeaaallll!!!) for this hop!!  


Wednesday, June 27, 2012

Saying Good-bye

Today is the final blog hop for the E-Team (sniff, sniff).  Like all fun rides, the E-Team has come to an end (more details on that below).

BUT!  Daisy has decided that the closing show is gonna be the BEST!

Visit each blog and leave a comment, between today,Wed, June 27, and Sunday, July 1, for a chance to win  a special blog prize that will be given away on each Team member's blogs!

While being on the E-Team, my love for working with metal from TenSecond Studios grew.  Daisy thought it would be appropriate that my special blog prize share some of that love with you!


Can I just say that I'm giddy about this prize?!!  Seriously, everything you need to get started using metal in your own projects!!

P.S.  Cheryl and Megan have some great videos on using their metal on their site.  PLUS:  I have a few tutorials here.  And, of course, I am more than willing to share what I've learned about this medium with you!!  I hope you leave a comment for the chance to win the opportunity to explore creating with one of my personal favorite mediums!!

Here are the links to the other Team Member Blogs.  You do NOT want to miss out on their projects!

Me!

Winner's will be announced on the eP blog Tuesday, July 3.

*****

I don't know about you, but I hate good-byes.  Especially, when I am saying good-bye to people I love to hang out with or if it is something I love doing.

Today, I have to say good-bye to both.

Almost two years ago, I got asked to join E-Team.  Me.  

Now, mind you, I am not "known" in the paper craft community.  I had (and have) been involved in the SCS forums for several years, but really, I am not one of those people who everyone knows their name, oo's and ahh's over each project, companies ask them to be on their design teams, followers ask to take pictures with.

I'm in my own little corner of the crafting world, sharing what I enjoy doing.

Lucky for me, Sherry saw something in my work that she felt could grow with a little push.

Okay.  More like a shove.


And she convinced Daisy of the same.

Oh. My. Goodness.

I was now on the same design team with my "idols":  Sherry, Broni, Linda D.  Then added to the mix were other well known designers.  Linda L, Micki, Latrice.

No pressure here, LOL!

 You know what?!  Grabbing the E-Ticket was one of the most fun, thrilling, enjoyable creative rides I have been on!!  There was moments of panic, laughter, g-force grins and dips in the track (ie, saying good-bye to Latrice and Linda D.).  Most of all, good times with gals who became good friends.

But, like all the good rides, this one has come to an end too soon.  Daisy has decided that it is time she moves in a different direction from eclecticPaperie.

I am sooo happy that Daisy knows which path she wants to explore now.

I am sooo sad that the eP park is closing.

I'm on an emotional roller coast ride now!!

Today, the E-Team is saying good-bye with projects that are inspired by favorite Disney quotes. I decided that sometimes, the classics are the best. And that "silly old bear" summed everything up perfectly.  I drew a pen and pastel drawing with much acknowledgement and inspiration from the original drawing of Ernest H. Shepard for Winnie the Pooh. (page 158 in my book).


"How lucky I am to have something that makes saying Good-bye so hard"
-Winnie the Pooh (A.A Milne)


To the E-Team.   I love you all!!

Wednesday, May 23, 2012

A Woman's Strength

Whew!

Today is another blog hop with the E-Team and special guests!!  I didn't originally think that I would be able to participate, but while on the drive home from work last night, creativity hit me over the head and I left dishes in the sink so that I could join in on the E-Team's Inspired By Words, part 2!


Before I show you my page inspired by this quote, let me give you the details for a chance to win an eP gift certificate
  • Visit each E-Team blog participant PLUS the guest bloggers to leave a comment for the chance to win a $25 eP GC. Comments can be left from May 23-May 28th. Two random winners from the blog hop will be chosen. GC winners posted May 29th on the eP blog.  

    Join the E-Team in our journal adventure and post your journal cover on the eP blog. We are going to pick 2 people to join us next month for another journalism adventure.  You have until Sunday, June 3rd, to upload your  journal page inspired by this month's inspiration quote. We'll pick and announce the next E-Team guest blogger Fri, Jun 8th on the eP blog. 
    Daisy/eP Blog
    Broni
    Micki
    Sherry
    Me!
    Guest Melody Schwartz
    Guest Marjie Kemper

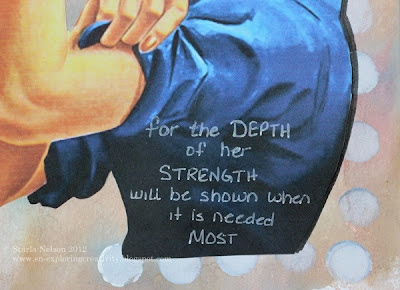
    Here is my page.  I paraphrased the inspiration quote as I felt it fit better with my main image.


    Basic details on the makings of this:  I started with my version of the Wrinkle Free Distress technique. I smooshed (technical term) randomly Distress Inks in Fired Brick, Faded Jeans and Tea Dye onto my craft mat and misted heavily with Tattered Angels Glimmer Mist in Vanilla Breeze and Antique Brass.  I then placed my paper in the wet ink and ran my hands on the back to spread out the wet ink to all the edges.  


    Using a finger sponge dauber, I applied Claudine Hellmuth's blank canvas paint randomly over the background.  Since I grabbed a finger dauber that is usually used for blue inks, the dots have a blue tint.  

    The image was found on the Internet and cut out and taped onto the background.  The letters were written with a combination of Copic markers, Faber-Castell PITT artist pens and an inkssentials opaque pen.  

    I personally am dedicating this to my sister!! Love ya!

    Hope you will join the journaling adventure!  I look forward to seeing your take on this inspiring quote!

    'Till next time

Wednesday, April 25, 2012

Inspired By

TODAY IS THE DAY!  The BIG reveal of the project you have all been anxiously awaiting! Just go with my disillusions here! hehe.   The E-team is starting a new series that I think we will all enjoy and hopefully grow from!

This new blog hop is featuring our own personal journals as we embark on a journal that is
INSPIRED BY WORDS.

Visit each E-Team blog participant and leave a comment between today, April 25 to Sunday, April 29th for the chance to win a $25 eP gift certificate.  Winner's will be announced on the eP blog, Monday, April 30. PLUS!!  Join the E-Team in our journal adventure and post your journal cover on the eP blog by May 4th and we will pick 2 people to join us next month for the next journal adventure!!

ME!

I'm really excited about this new series!  I have been wanting to do an art journal for a while, but just never jump off the ledge. Add my love of inspirational words and this series has become the icing on the cake!  I'm so glad the Daisy snuck up behind me, and shoved! LOL!

I decided to make my own journal book instead of buying one.  My thought is that this will allow me to add what ever type of base paper or medium I would like to work with for that particular entry.  And I can add as many pages as I can fit my binding rings around! haha.  For my journal cover, I wanted to combine a couple of my favorite mediums; paint, metal and most recently, Ice Resin.  I started with a couple of Zutter book covers and painted a base coat of TenSecond Studios Verday paint in Bronze.  

Tips:  shake the paint well before applying.  The Verday paint is an acrylic paint that has actual metal particles in it.  You want to make sure that those particles get dispersed from settling on the bottom of the bottle.  

After letting the base coat dry for a couple of hours, I took a rough sea sponge and lightly dabbed more VerDay Bronze paint randomly onto the cover.  Immediately, while the paint was still wet, I misted with the VerDay Patina.  I put my Verday Patina into a cheap, fine mist bottle (like "hairspray" bottle), found  in the area where travel sized accessories are at Target.  
Let the Verday chemically react with the paint overnight.


After drying, I felt that I had gotten a bit heavy handed with the sponging/VerDay and had too much patina. I then just took my course sea sponge again, dipped it into a bit more VerDay Bronze paint, dabbed off on a paper towel and "dry" sponged randomly on the top of the covers to add more copper

Here is a picture, deliberately angled so that you can see all the wonderful metallic bronze shine


I have to say, I hated to cover up all this wonderful patina!!  LOL!  But cover it up I did!  Here is the cover to my journal.


I die cut various layers from the Tattered Floral die and from Spellbinders Carnation Creations from TenSecond Studio's Barn Red metal. I ran some of the flower layers through the Big Shot with an embossing folder and some layers I just hand doodled squiggle lines and others I used a decorative wheel tool on the metal to make patterns.  I then intensified the color with some alcohol inks 


I then shaped the flowers and applied a thin layer of Ice Resin to both sides of the individual layers using a small paint brush.  I recommend wearing gloves for this step.  It gets rather messy and you will get Ice Resin on your hands while trying to paint both sides of the petals.  I left a small portion of the bottom of the flowers unpainted so that I could set them down on my craft sheet to dry.  I was hoping that the Ice Resin would harden the metal enough that the flower petals would be more stable and would not bend as easily.  The Ice Resin DID help stabilize the metal.  I'm thinking that if I were to add another layer, it would make the metal really solid.   After letting the Ice Resin cure for a couple of days, I glued the layers together with Beacon's Glass, Metal and More Permanent Glue.  This is the first time I have used this glue and I was pleased at how relatively quick it set. I would highly recommend using it in a well ventilated room though! It has a bit of a strong odor!

The leaves were die cut using a combination of Spellbinders Carnations Creations and Foliage from TSS's Peacock metal.  


Here is my tutorial , with a video link for making flowers out of metal.  

And a close up of my "first" journal entry.  


The journal entry was typed on the computer, then each word cut out and sponged with Distress Vintage Photo ink.  I cut off a flap from a cardboard box, saturated it with water and peeled off the smooth layer of cardboard, revealing the rough layer underneath.  Distress Stain in Picket Fence was randomly applied.  The words were then attached using glue dots.  

The final touch was adding some swirling bling from Want2Scrap.  

I also finished the inside of the cover. 


I like to think that the TOTALLY different look is reflective of what I hope to accomplish with this journal.  No preconceived ideas.  No limits.  Just go for it.

I first covered the inside with Claudine's gesso.  I didn't really worry too much about how thick the coverage was.  Since I was totally impatient, I heat dried the gesso with my heat gun.  I then dropped random spatters of alcohol ink onto the gesso and hit them with a blast of canned air, dispersing the inks.  A light mist of Tattered Angels Glimmer Mist Tuscan Sun  was added on top.  After drying, I stamped the sentiment from Wendy Vecchi's I Am My Art set, using Archival Jet Black Ink.  Tip:  I would HIGHLY recommend that you do the inside of the cover before completing all the dimensional work on the outside.  It would make getting a clean, crisp stamped image soooo much easier and you will be able to avoid having to go over the stamped image with a black Sharpie.  Just sayin'.  

I'm really excited about this new adventure!  I hope that you will check out all the other E-Team's journal cover's and be inspired to join us!!


Friday, March 30, 2012

While the Boss was Away.....

.......I had NO TIME TO PLAY!!

This has been a CRAZY, crazy week at work and after putting in full days and bringing home a couple of hours of more paperwork, my mojo, energy and gumption crawled under the covers and hid!! I'm totally bummed that I couldn't (ok, chose to give myself a break) participate in the E-Team's latest blog hop today.  I'm still hoping that maybe I can come up with something this weekend (note the bold maybe).  BUT!! Make sure you feast your eyes on the lovely works the rest of the team came up with!!


And....don't forget that leaving a comment on each team member's blog will enter you for the chance to win one of two $25 vouchers to the eP store!!  Comments may be left from today, Friday, until Sunday, April 1.  Winner's will be announced on the eP blog Monday, April 2.  Good luck!!

I'm soooo glad it is Friday and the weekend is just ahead!  This cranky, over worked girl needs a break, hehe!!


Wednesday, February 29, 2012

Marbling Faux Many Ways

Hey People!  The E-Team is gathering again today to bring you another technique hop!  Today, the different E-Team members are showcasing Faux Marble!!

Of course it wouldn't be an E-Team blog hop without some blog candy!!  Daisy will chose random TWO winners from comments left between today, February 29, until March 2, on the E-Team members blogs.  The two winners will  receive a $25 eP gift certificate! 

The E-Team
Me
Linda L--couldn't play along today, but make sure you drop by and let her know she was missed!
The winner's will be announced on the eP blog Monday, March 3!

OK!! Let's get this Faux Show rolling!!


Today I'm going to show you several variations on how you can achieve a Faux Marble.  I must admit I got a bit carried away with playing! 

First up:  This is what I call Distressed Faux Marble.  Step One:  smoosh Distress inks of choice randomly on your craft mat. I just smoosh block and lines here and there.   Spritz with Tattered Angel's Glimmer mist until ink beads up. Place your paper (I used Pure Luxury Ivory in this sample) down in the beaded ink.  Lift, dry.  You have now completed my version of the Wrinkle Free Distress Technique. 

wish I could have captured the shimmer!! Drat these dreary days!

Tear a piece of scrap paper.  Grab your sponge dauber or stencil brush, a couple of Distress Inks in complentary colors and apply the ink along the torn edge of the paper to your background.  Try to avoid making letters with your lines (such as "Y", "T", "K") as they are not natural in marble!!


I used a combination of Distress Brushed Corduroy and Vintage Photo for the lighter brown lines.  The dark brown lines are Tattered Angle's Glimmer Mist in Tattered Leather.

I have to say I LOVE how this turned out!  I must admit that I stared a this forever trying to come up with a project that wouldn't hide the effect, LOL!  Alas, I failed to come up with anything today, but keep an eye out for this, I'm mulling over some ideas!

Ok...next version of Faux Marble.  Now, this is something that I found on Andy Skinner's blog.  He came up with a faux marble technique that he calls Alcohol Floating Backgrounds.  His technique combines alcohol inks and water.  You can see his video here.  WARNING: THIS TECHNIQUE IS VERY ADDICTING!

Begin with a tub of water and some alcohol inks. 


Drip two/three drops of each of the alcohol inks into the water


Slip your paper of choice into the water


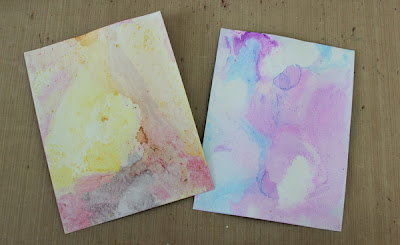
Out comes some fabulous backgrounds!!


Front side


BACK SIDE!!  YEP!! You get two different backgrounds on each sheet!!  This lets you choose which side you want to work with!!


Different colors on shipping tags

On Pure Luxury Cardstock
NOTE the middle sample...that one will be used for my project!!


On Glossy Paper


Slight variation.  Spritzed glossy paper heavily with water.  Applied alcohol inks with ink applicator. 

I also did samples with the alcohol ink Snow CapIt added a cool effect, but I found that on the glossy, it clumped up and then just brushed off once dried. Still a variation!! 

For the most part, I could make one sample, add new colors for another sample before needing to dump my water and starting over. 

I also tried this technique with some sticky back canvas. I wanted to try to make a background that was complentary to the middle sample seen above on the Pure Luxury.  Funny thing, I actually liked the PAPER backing of the canvas better!! haha!   And this is what I came up with using the Alcohol Floating background. 

This is an 8.5 x 8.5" layout.  the papers are retired Stampin' Up (Sorry, I don't recall the specific paper names and will admit that I'm too lazy and too far behind schedule in trying to get this posted!)  The main base was scored using my Scor-Pal every 1/4".  The backing to the sticky back canvas makes up the second background piece.  Tip:  Tape will NOT adhere to this backing! I had to put the tape on the black layer and then applied the background.  My guess is that if I could pull it up easily.  If I was really wanting this to stick, I would use some glue (either hot glue or strong glue like E6000.

The Suzi Blu image was stamped twice with Memento Tuxedo Black ink.  I stamped it on a piece of Pure Luxury White and again on the Alcohol Floating background that was seen previously.  I paper pieced her dress using the background.  I added a very slight bit of shading to her dress and hair with some Copic markers, but deliberately left her body uncolored, as I liked the stark, rather gothic look to her!

The roses were made with more of the retired SU papers.  Ok, I felt guilty.  I'm taking a wild guess here:  Lovely Lilac, Lavender Lace and Almost Amethyste would be my guess on which shades of paper I used.  The large roses were die cut with Spellbinder's Spiral Blossom One.   The small rose was made from a Spellbinder's Scalloped circle that I just hand cut the spiral to roll.  The large flowers were stamped  and sponged with Distress Inks in Dusty Concord and  Chipped Saphire, using stamps from Wendy Vecchi's Art Colors Life and Be Happy, Make Art sets.  The leaves were die cut from SU's Kiwi Kiss using Spellbinder's Foliage and were sponged with Distress Peeled Paint ink.  The pearls in the center were made with a Viva Decor pearl pen.

The edge embellishment was cut with Spellbinder's Edgeabilities Classic Ric Rac.  The black rhinestones are from Want 2 Scrap nestabling that match Spellbinder's circle dies.  I just cut them to fit the area I wanted to place them in.

Close up of the Faux marble on the dress and flowers


I hope that these variations of doing Faux Marble will inspire you to create!!

'Till next time...................


Thursday, December 15, 2011

Deck the Cards with Lots of Embellies.....

Fala la la la la la la!!

'Tis the season to be decorating and adding all those extra little touches to the home, decor items  and packages!  Today and tomorrow, the E-Team is going to share some ideas on using Maya Road's Vintage Embellishments Bits Pack. 


Thursday's Blog's to Hop
Me!

Friday's Blog's to Hop

Sherry is sitting this one out, but make sure you stop by and wish her some holiday cheer!!

Daisy is REALLY in the Holiday Spirit and is generously picking 6 (SIX) winners for this blog hop! A winner will be chosen from each blog. 3 winners will win a $20 eP GC & 3 winners will win a fun box stuffed with eP embellishments that will include trims, brads, buttons, decorative pins, Stickles, & more!


•You can leave comments beginning Thurs - Sun (Dec 15-Dec 18)

•Winner's will be announced on Tues Dec 20th on the eP blog

I don't know about you, but I'm soooo far behind in my holiday preparations, that I'm beginning to think I'm ahead of the game, haha!  So, I'm looking for quick easy ideas to use on my (ahem) last minute gifts and projects.  While looking through the Pottery Barn Teen catalog and BINGO!!  Fun, quick and CUTE inspiration!!

First, the catalog inspiration:


Aaand....My Take!!
 

The main circle is from the Embellishment Pack.  What is nice about this is, it has a different pattern on the "backside", so there is no wrong way to wear the necklace, or if it gets twisted, no worries!  I just looped the chain and using jump rings, added the Findings Baubles and the smaller circle and beads from an old necklace.  Easy Peasy!!

Then I just happened to notice the cute flower paper clips that were also in the pack.


Seriously.....how easy was this to make such CUTE earrings?!!  All I did was use jump rings to hook everything together!! I think both these projects together took me under 15 minutes to make (I spent more time trying different layouts than the actual assembling!!)
 
I think that these would make a great stocking stuffer for a teen girl (or a young at heart lady! haha).  Quick, easy and cute.  What more could one ask for from a homemade gift?!! 
 
I'll be back later this weekend with the project that I did for one of the teachers.  'Till then.....