Showing posts with label Wendy Vecchi products. Show all posts

Sunday, March 16, 2014

Lessons From an Art Journal...Chapter One

Chapter One

Letting Go


In case you haven't noticed, mixed media art journals are all the rage.  Everyone seems to be getting out all their ink sprays, stains, paints and stencils and creating layer upon layer that somehow comes together as a whole.

I bought a new mixed media journal at the beginning of the year.  The original plan was that I'd try jumping on this creative band wagon and see what all the hoopla was about. I had the over zealous idea that I would let my creativity flow at least once a week and let it meander where ever it decided it needed to go.

But what I am finding is that I am struggling with the question as to whether or not this type of journal art fits me.  Or, if the struggle I'm having is a result of not having done this type of creating previously and I am lost in how to make it happen.

When I look at journal pages I have one of two reactions.  First reaction is "Whoa.  Waaaayyyy too much happening on this page".  My mind/eyes don't know where to focus as there are too many layers, colors, dots, dashes, words, zig zags.

The second reaction is "Whoa!  I like this! How does this person put together all these different elements that draws my eye to seek out the details in all the layers?"

My first attempts at an art journal page enlightened me to a few personality traits that I'm not sure fit this type of art form.  For one, I apparently have the compulsive need to control where and how inks, paints and sprays apply to the paper.  I don't like, or perhaps, cannot foresee how the blotches of the above mentioned mediums will look like a cohesive work of art.  This is more than likely due to my lack of skill using stencils and inks in this manner.  I have used stencils for many years to assist in painting of murals.  But, those stencils were to facilitate a more realistic piece of art.  Not a free flowing "let the splatters land where they may" type of art.

The second annoying trait would be that I over think each and every placement of the different elements.  This should come as no surprise to me, as I have over thought each and every element on every card I have every made.  But, when one is trying to have a random, flowing of creativity, this does not work in one's favor!

As a result, my first page looks exactly like what is is:  an over analyzed, stay within the lines, stiff piece of work.


Please don't take me wrong!  In reality, I know that there is nothing really wrong with this page. It is just not the page that I was hoping to create.  This page, unfortunately, just does nothing for me, except bring to mind the feelings of frustrations, disappointment and a major "Eh. Whatever", attitude.  

Instead, this page will be a page of lessons learned from my vast amount of mistakes.


I began my page by applying Gesso over a 9x11" multi media journal page.  I then randomly smooshed (technical term) Distress Inks over the page and moved them around with a watercolor brush that had been dipped in some water. 

Lesson One:  I need to figure out how to use spray inks.  I don't know if it is because I did not adhere the stencils down securely or because I held the inks too close while spraying.  What I do know is, I was left with just a blotches of ink, pooling under the stencil. 

Lesson Two:  It is just paper.  The ink spray splotches were beyond my tolerance.  And before I even thought to try and salvage the piece, I redid the background.


 Which is where my compulsive need to control the inks came in.  I replaced the stencil and used a variety of inks to give the background leaves a definite outline.  The edges were still a bit fuzzy due to the fact that I was too impatient to let the wet paper dry completely before applying the Distress Inks.  Which, if you have never used Distress Ink, react with water and spread out.  

Lesson Three:  When one is applying Wendy Vecchi's black embossing paste through a stencil, one needs to be aware of the smudges of black that are being spread around in the haste to apply more paste instead of properly cleaning the stencil between flipping it from front to back.  


Lesson Four:  Yes, Gesso covers mistakes. But, sometimes, covering the mistake with Gesso makes a larger mistake.  

To my dismay, I discovered that Distress Stains and Inks do not completely cover Gesso.  The resulting color is muted, as if the Gesso absorbs the ink, leaving areas that do not "match" the rest of the background.  No matter how many layers of ink you apply.

Lesson Five: Walk away.  Sometimes you just have to walk away and let the stewing simmer to a less frustrated level.

  At some point, you have to acknowledge the fact that the page is never going to turn out like you had hoped it would.  So, grab another stencil and experiment with using Copics through a stencil.


Lesson Six:  Review Lesson Five and walk away.  Several days (okay, a couple of weeks later) grab some random paints and try to fix the leaves one more time.


The leaves still don't match.  But they aren't as muted as they originally were.  

Lesson Seven: Take to heart the words Kenny Roger's sang so long ago in The Gambler


You got to know when to hold 'em, know when to fold 'em,
Know when to walk away and know when to run.
You never count your money when you're sittin' at the table.
There'll be time enough for countin' when the dealin's done.


I'm walking away.  

'Till next time...................


Wednesday, April 24, 2013

Be Yourself

Hey there Peoples!! Today is my last day as guest DT on the eP blog.  I started out with the idea of exploring a more layered mixed media journal page and ended up with more of my usual style of  CAS (clean and simple) mixed media canvas instead!! LOL!

AND I used PINK!!!  

I am dying of laughter on that one!! I find it beyond amusing that I titled this project "Be Yourself" and I used PINK!!! BWHAHAAA!!

 Yes, for those of you who may not know, I am sooo NOT a pink type of gal but for some unknown reason I reached for some pink stains and inks on this one!!


I hope you will visit the eP Blog  to see more details about this "girly girl" project!!

Wednesday, April 10, 2013

Canvas Message Board

I am so thankful that Kim from eP invited me to be a guest DT for the month of April.  My creative wheels have been turning in over drive!!  

This week I'm sharing how I altered an 8 x 8" canvas board to create a message board.


I hope that you will head over to the eP blog  for more details as to how I made this!!

'Till next week.....make sure you add some creativity time on your calendar!!


Wednesday, April 3, 2013

Hello???  Hello???? Is anyone still out there?!!

It's been a loooong time since I last posted!! I had to just walk away from it all.

Walk away from the mess created from moving from my craft room to a corner of my bedroom.

Walk away from the overwhelming task of downsizing.

Walk away from trying to figure where to put everything.

Walk away from blogging and looking at blogs.

And then  literally, I started walking and exercising again.  Which takes up quite a bit of my "free" time.

The mess is still present.  I'm ready to start dealing with it again.  I need to deal with the clutter so my messy creative self has room to throw paint, pull out papers and make a whole new pile!! LOL!!

Yep.  I'm ready to get back to my creative journey.

That journey starts today.


I am very excited (and a bit nervous!) to be joining once again with the E-Team as a Guest DT blogger for the month of April!!

Head on over to the eP blog  to get more details on how I used these products-----


to make THIS!!!


She's BAAACCCCKKKK!!!! lol!!

'Till next time.................make a mess!! Explore some creativity!!


Tuesday, October 30, 2012

Making ART

I'm so excited today!!

First:  I'm hoping with the e-Team as a guest designer today!!

Second:  OMG!! WENDY VECCHI is in the HOUSE!!

Today's hop will not only share projects made with Studio 490 products, but will also share some insight as to the inspiration and thought process that went into making the projects.

The eTeam is a wonderful group of talented women, each with their own style. Some are clean and simple card makers, others love scrapbooking, and still others are drawn to altered art and mixed media projects. The goal of this hop is bring each of the designers and their favorite mediums together and to share how they used these products to express their own individual styles through their projects. 

AND, as an added bonus, the eP store has some great specials to go along with the hop!

  • This week only save 25% on all Studio 490 products, this includes Wendy's stamps, stencils, Art parts, Book and Blossom Bucket embellishments. Use code WENDY25 when checking out.
  • During the hop, comment on each blog and you'll be entered into a drawing for a prize package worth $50! Your package will include a collection of Studio 490 products as well as paper and embellishments from the store. 
WAIT!  There's MORE!!

  • We want to hear about what inspires you! Share your thoughts about why you create, what styles you're drawn to, even share a favorite project on the eP Facebook page. Next week Kim will randomly select a winner from those who have commented on the eTeam Make Art Facebook posts and give away a $25 gift certificate to eP! 
eclectic Paperie--start of the hop!


and 
ME!

*******

I've been a big fan of Wendy's for a long time.  I love her unique style and her products.  I have to say that if the Clearly for Art Modeling film came in rolls, I'd be first in line to order (insert cheesy smile with a "hint, hint, Wendy!!" here__________________!!!!).  I have made a couple of projects as a previous designer for eP that combined Art Parts, TenSecond Studio metal and the modeling film.  If you are interested a couple of examples  can be found here and here.  

BUT, for today's project, I veered off to a different path.  I wanted to explore using Wendy's stamps in a bit of a different way.

Note:  Today I'm using some of Wendy's previously released stamp sets. But by all means! Check out all the NEW goodies that Kim has in the eP store!!

Let me give you a little peek as to how my brain (sometimes) works when I'm creating.

First:  I rummaged through my collection of Studio 490 stamps and Art parts.  The Art Parts just weren't calling to me (gasp!) so while I was pondering what direction I was going to go, I happened to catch a look at an open back bezel that has been waiting for me to do something with.  I then start looking at my collection of stamps to see what might work with the bezel.   The Visions of Art set and the sentiment "She only flew when no one could see" from It's Face Art set kept drawing me in.  

Both of these stamps were too large for the bezel.  But, by now, I'm stuck on the bezel idea.  Sooo, Shrink Film to the rescue!  I first lightly sanded the film with a sanding block and stamped the main image with Stazon ink.  I usually stamp an image a couple of times just in case I mess up.  

**Disclaimer:  most of these photos were taken at night. My work table is glass topped.  Clear plastic, glass tables, night lights and flashes don't mix!!


The image after shrinking.  

I then stamped another image from It's Face Art onto a piece of clear transparency that had been inked with various alcohol inks.  Since this piece was in my "possibility" file, I have NO idea what inks were used on it!! But it just seemed to fit the color main image!  


After a bit of finagling, I made myself a template for the inside of the bezel (it had a small lip on the inside, so it took a bit of trimming from a tracing to get it to fit right) and cut out the stamped image.  I decided that the background was too light, so I cut out another template from the unstamped portion of the inked transparency. Hindsight says I should have stuck with just the one layer....more on that later!!!

When I create mixed media projects, I tend to come up with a scenario or story line of what my project is portraying. I kept thinking about the sentiment, "she only flew when no one could see", and envisioned my Indian Princess (because, of course, she is a Princess!) allowing her thoughts to take flight to a different place or world that no one else could see or understand.  To symbolize the flight of her dreams, I stamped the butterfly, from Make Mine Mini Art, with black Stazon, onto a piece of the shrink film that I inked with cranberry, red pepper and rust alcohol inks.  I firmly adhered my bezel to a piece of duct tape and  then layered my two pieces of inked transparency and the Princess in the bezel and filled with Ice Resin.  I then added the butterfly and finished filling to the top.


This would be where hind sight should have spoken up earlier.

The double layer of the inked transparency seemed to get an air bubble.  And the double layer also seemed to deepen in intensity, so the main image blended into the background more.


And the butterfly.  The butterfly sank. There was no dreams taking flight here!!

BUT!  I did not toss the project.  I still liked the overall look.  It just needed a little road side assist!!

Another mini butterfly was stamped with Blazing Red Stazon ink onto the shrink film.  A second butterfly was stamped again on the red tone inked shrink film.  Both were cut out and shrunk with my heat gun.  While still HOT (and yes, I do mean you will singe your fingers HOT), I gently molded the wings to add dimension.  I adhered both butterflies with Beacon's Glass, Metal and More Glue.  The result:


Interestingly, the clear butterfly in her hair shows up the red coloration of the sunken butterfly in the picture, but in real life, you can't see the red !!

And the thickness of the butterfly wings is NOT so in your face.  I obviously need to figure out how to take photos of shiny objects better!! 

Originally, I was going to make this a piece of jewelry to wear, but without the light shining through the pendent, it is pretty dark and loses it's definition.  Instead, I think I will look for some multicolored fibers to hang the pendent from and make it into a book marker for myself so that the light can shine through the pendent.

Because books are another way to take flight to different places and  new worlds. 

I hope you take a couple of thoughts away with you today from my project:

First:  There are so many different ways to use your supplies.  Don't be afraid to go off onto a different path!  Explore creativity in a NEW way!

Second:  Even if a project has some mistakes, it doesn't mean that it is "ruined".  It may mean you just have to look at it from a different angle to see the light

and Third:  There really is no such thing as mistakes in Art.  They are just experiences to make the journey of Making Art more interesting!! 

Many, many thanks to Kim and the eTeam for inviting me to hop along with Wendy this week!!  I had sooo much fun Making Art!

Thanks for dropping by and for those of you on the East Coast, my thoughts are with you!!!


Wednesday, October 24, 2012

Giving Mojo an Ultimatum

I have decided that this extended vacation that Mojo has taken needs to come to an immediate end.  So I'm giving her an ultimatum.  I'm giving her a challenge she must show up for by Tuesday, October 30, for a guest spot on a blog hop with the new E-Team or she will be replaced.

Did I mention that this hop is with the incredibly talented Wendy Vecchi?!!!! Squeaaalllll!!!! 


I'm very excited to be joining the newly expanded E-Team and Wendy Vecchi (squeaaallll!!!) for this hop!!  


Saturday, June 30, 2012

Steampunk Time

Wow!  Thanks so much for all the wonderful comments you have all left in regards to the retirement of the 
E-Team.  Knowing that you all found inspiration in what we all shared is humbling and inspiring to keep on creating!  There is still time to leave a comment and be considered for the chance to win the generous blog prize of some yummy Ten Second Studio metal and molds!  Comments can be left here until Sunday!

While I won't be a design team member anymore, I'm not going anywhere! I'll still be around sharing bits and pieces of what grabs my creative fancy!  

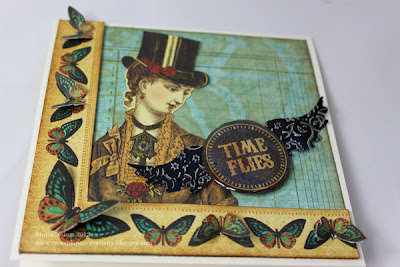
Today, that fancy would be a card.  I was asked by the front office gals to make the office birthday card for one of the assistant therapists.  *L has a bit of an eclectic side to her, so I went with Graphic45 and a Steampunk theme. 

Because one can never go wrong with Steampunk when thinking eclectic, in my humble opinion.  


Card details:  Base is Gina K's Pure Luxury Ivory in 5 1/2" square.  Graphic45's Steampunk Debutante Collection for all the design paper elements.  I used Tim Holtz's Idea-ology Timeworks mask with Distress Ink in Antique Linen to sponge the large clock on the background.  I adhered scrap portions of the butterfly border to Wendy Vecchi's Blackout modeling film, cut them out and heated to shape.  The body's of the butterflies were then attached to the border using some Glossy Accents. Sponging with Distress Vintage Photo ink was done along the edges of butterfly border and the background border.  The butterfly border was then adhered with dimensionals to give more of a "framed" look.

I stamped Unity's Itty Bitty Time Flies onto a scrap piece of the Graphic45 paper and covered with Glossy Accents.  Due to an impatient glitch on my part, I had to apply another layer of the glossy accents to try and smooth out my "oops".  It's not perfect, but I did not have time to do it over, so it is what it is!!  

The wings were die cut from TenSecond Studios Rock Star Black metal using Tim Holtz's Alterations die Heart Wings.  I then embossed the wings with an embossing folder (sorry, I don't have the name on the folder...it is a Cuttlebug folder) and sanded off the raised portion, exposing the aluminum.  The Time was adhered using a double layer of dimensionals.  


Lousy picture, but it does show the dimension of the butterflies!  I like the fact that these butterflies will NOT get smooshed!!

I hope you are enjoying your weekend!  I got to take a nice long walk/hike (we did a bit off trail!) this morning with friends and now I need to the disaster zone that was once my kitchen!!  

'Till then....enjoy some creativity!


Wednesday, April 25, 2012

Inspired By

TODAY IS THE DAY!  The BIG reveal of the project you have all been anxiously awaiting! Just go with my disillusions here! hehe.   The E-team is starting a new series that I think we will all enjoy and hopefully grow from!

This new blog hop is featuring our own personal journals as we embark on a journal that is
INSPIRED BY WORDS.

Visit each E-Team blog participant and leave a comment between today, April 25 to Sunday, April 29th for the chance to win a $25 eP gift certificate.  Winner's will be announced on the eP blog, Monday, April 30. PLUS!!  Join the E-Team in our journal adventure and post your journal cover on the eP blog by May 4th and we will pick 2 people to join us next month for the next journal adventure!!

ME!

I'm really excited about this new series!  I have been wanting to do an art journal for a while, but just never jump off the ledge. Add my love of inspirational words and this series has become the icing on the cake!  I'm so glad the Daisy snuck up behind me, and shoved! LOL!

I decided to make my own journal book instead of buying one.  My thought is that this will allow me to add what ever type of base paper or medium I would like to work with for that particular entry.  And I can add as many pages as I can fit my binding rings around! haha.  For my journal cover, I wanted to combine a couple of my favorite mediums; paint, metal and most recently, Ice Resin.  I started with a couple of Zutter book covers and painted a base coat of TenSecond Studios Verday paint in Bronze.  

Tips:  shake the paint well before applying.  The Verday paint is an acrylic paint that has actual metal particles in it.  You want to make sure that those particles get dispersed from settling on the bottom of the bottle.  

After letting the base coat dry for a couple of hours, I took a rough sea sponge and lightly dabbed more VerDay Bronze paint randomly onto the cover.  Immediately, while the paint was still wet, I misted with the VerDay Patina.  I put my Verday Patina into a cheap, fine mist bottle (like "hairspray" bottle), found  in the area where travel sized accessories are at Target.  
Let the Verday chemically react with the paint overnight.


After drying, I felt that I had gotten a bit heavy handed with the sponging/VerDay and had too much patina. I then just took my course sea sponge again, dipped it into a bit more VerDay Bronze paint, dabbed off on a paper towel and "dry" sponged randomly on the top of the covers to add more copper

Here is a picture, deliberately angled so that you can see all the wonderful metallic bronze shine


I have to say, I hated to cover up all this wonderful patina!!  LOL!  But cover it up I did!  Here is the cover to my journal.


I die cut various layers from the Tattered Floral die and from Spellbinders Carnation Creations from TenSecond Studio's Barn Red metal. I ran some of the flower layers through the Big Shot with an embossing folder and some layers I just hand doodled squiggle lines and others I used a decorative wheel tool on the metal to make patterns.  I then intensified the color with some alcohol inks 


I then shaped the flowers and applied a thin layer of Ice Resin to both sides of the individual layers using a small paint brush.  I recommend wearing gloves for this step.  It gets rather messy and you will get Ice Resin on your hands while trying to paint both sides of the petals.  I left a small portion of the bottom of the flowers unpainted so that I could set them down on my craft sheet to dry.  I was hoping that the Ice Resin would harden the metal enough that the flower petals would be more stable and would not bend as easily.  The Ice Resin DID help stabilize the metal.  I'm thinking that if I were to add another layer, it would make the metal really solid.   After letting the Ice Resin cure for a couple of days, I glued the layers together with Beacon's Glass, Metal and More Permanent Glue.  This is the first time I have used this glue and I was pleased at how relatively quick it set. I would highly recommend using it in a well ventilated room though! It has a bit of a strong odor!

The leaves were die cut using a combination of Spellbinders Carnations Creations and Foliage from TSS's Peacock metal.  


Here is my tutorial , with a video link for making flowers out of metal.  

And a close up of my "first" journal entry.  


The journal entry was typed on the computer, then each word cut out and sponged with Distress Vintage Photo ink.  I cut off a flap from a cardboard box, saturated it with water and peeled off the smooth layer of cardboard, revealing the rough layer underneath.  Distress Stain in Picket Fence was randomly applied.  The words were then attached using glue dots.  

The final touch was adding some swirling bling from Want2Scrap.  

I also finished the inside of the cover. 


I like to think that the TOTALLY different look is reflective of what I hope to accomplish with this journal.  No preconceived ideas.  No limits.  Just go for it.

I first covered the inside with Claudine's gesso.  I didn't really worry too much about how thick the coverage was.  Since I was totally impatient, I heat dried the gesso with my heat gun.  I then dropped random spatters of alcohol ink onto the gesso and hit them with a blast of canned air, dispersing the inks.  A light mist of Tattered Angels Glimmer Mist Tuscan Sun  was added on top.  After drying, I stamped the sentiment from Wendy Vecchi's I Am My Art set, using Archival Jet Black Ink.  Tip:  I would HIGHLY recommend that you do the inside of the cover before completing all the dimensional work on the outside.  It would make getting a clean, crisp stamped image soooo much easier and you will be able to avoid having to go over the stamped image with a black Sharpie.  Just sayin'.  

I'm really excited about this new adventure!  I hope that you will check out all the other E-Team's journal cover's and be inspired to join us!!


Friday, January 20, 2012

Getting the Faux on..........

Hey People!  The E-Team is starting the New Year with a New Series:  Getting Your Faux On!! 


Of course, it wouldn't be an E-Team hop with out some goodies!!  All you have to do is leave a comment on each Team member's blog for a chance to win one of  THREE $25 eP gift vouchers!  You will have from today, Friday, January 20 until Sunday, January 22 to leave a comment.  Winners will be announced late Monday, January 23 on the eP blog.

E-Team Members
Me!

The lovely Wendy Vecchi posted a fabulous faux technique, Faux Crazed Porcelain, on her blog a while back, using Glue n Seal and Rock Candy Crackle Paint.  Our fearless leader, Daisy, challenged the E-Team to use this technique and see what we could come up with to inspire you to give it a try!!   

I did a lot of experimenting with this technique.  Let me first share my project, then I'll share some tips on what I discovered.

Let's just ignore the fact that I put my cage on base at an angle.  Yes, it really bothers me, as I was wanting it to be straight!  The bent "bars" would be my failed attempt trying to correct the angle of placement after the fact.  Obviously, sometimes you just have to let those little mishaps go. sigh.

I decided to make a decor item or wall hanging.  The base is a piece of foam board that was cut to 6x6".  Two layers of Pure Luxury Ivory card stock the bottom layer is slightly larger than 6x6") were distressed and form the base.  All the decorative papers come from My Mind's Eye 6x6 pad Madison Avenue.  The fall seasonal Distress Ink Gathered Twigs was used to add distressing along the edges of the papers.  The cage was die cut from Ten Second Studios Dark Chocolate metal. It's difficult to tell from the picture, but the cage was bent to form a 3D effect off the base.   The butterflies were punched using a MS butterfly punch and Alterations  movers and shakers  Mini Butterflies. The Clearly for Art modeling film was used to add dimension to the butterflies. 


Other accessories used were Old Lace Glimmer Mist (on the base design paper and the Fleur de Lis "lace", made with the Spellbinder's die), 1/2 back self adhesive pearls (from my stash) and the decorative pearl swirls, also from my stash.  The sentiment tag is just a scrap of Ivory card stock, distressed with Gathered Twigs ink that I wrote the saying on. 

NOW for the faux porcelain!!  One of the surfaces for this technique that I tested was the Clearly for Art modeling film.  I brushed a thin coat of Glue n Seal onto the film and after that had dried, I coated again with the Rock Candy Crackle Paint. I die cut the flower pieces with the Tattered Floral die and then used the reinker for Distress Ink Spun Sugar to color the  flower.  I just dropped several pools of ink onto the film and used a paper towel to rub it into the cracks and wipe off the excess.  The color and technique seemed to hold well, even with the heating of the film to mold the flower petals. 

The center of the flower was made with a Viva Pearl Pen in Cream.  I colored it with Copic markers to match the flower. 

The leaves were done the same way, only I used a transparency sheet from Office Depot for my base. 


Let me share some tips/tricks with you that I learned while exploring this technique.

Surfaces:  This technique works on a variety of "slick" surfaces.  I tested it on glass, transparency and Clearly for Art modeling film.  You MUST use the Glue n Seal (or perhaps Elmer's Glue) for a base for the crackle paint to adhere too.  Otherwise, the crackle paint will rub off!!  A thicker layer of crackle paint will yield larger cracks, but I have found it takes a VERY thick layer to get large cracks.  You can speed up the drying process with your heat gun once you notice the cracks appearing.  Just beware that if you happen to hit a thicker pocket of paint, it may bubble with the heat gun.  It can sometimes result in a different texture than the rest of the cracks.  I'm not sure if that is from the paint or perhaps the glue bubbling. 

I also tried this technique on Ten Second Studio's metal, using the same methodology. While the technique works on the metal, I found that the cracks were sooo fine, that they were difficult to see with the shine of the metal. And I'm still experimenting as to what type of inks I could use to highlight the cracks more. I really wanted LARGE cracking on the metal versus the fine cracking that I was getting more often than not. So far, I have found that it takes a VERY, VERY thick coat to crack large on the metal, but that is not consistent. I also tried to speed up the drying process of the paint, once cracking was noticed, with my heat gun, but it seems to have a reaction with the glue/paint/metal and results in a change in color of the metal. I will be experimenting more with this technique and metal and will let you know what I come up with at a later date!!

Coloring:  Surprisingly, Distress Stains and the Distress ReInkers seem to color the faux porcelain without rubbing off.  I found that I could get a second layer of color on if I allowed the first layer of color to dry.  I still need to test permanent inks to see how those will color.  The mottling effect of darker Alcohol inks tended to obscure the detail of the cracks since the ink will adhere to the smooth surface under the cracks.  The lighter color of inks look FAB!

Other:  I also tried using the glue as a base for other crackle paint on these same surfaces.  Worked well, but you obviously don't get the transparency as you do with the Rock Candy crackle paint. 

 Tip:  If you by chance find that your crackle paint has dried up, mix in some water.  It doesn't seem to affect the crackling compound of the paint.  DO NOT  use a glaze to thin the paint.  That, DOES seem to affect the crackling!!  Also, Linda L, had a great suggestion to store your paints and Distress Stains upside down to help prevent air from getting into the jars and bottles.   Just tip the paint jars upright for a minute or so, before using them, and the paint will drip off the brush back into the jar.

I hope that you found this technique inspiring and will give it a try! 

'Till next time.................explore a new technique or experiment, with a twist, using an old favorite technique!!
 

Wednesday, November 30, 2011

Vintage Wishes

Hey People!  Are you all in full throttle for the holidays?  I have my large, formal tree done, but that is it.  Still need to put up the family room tree.  Not even going to mention where I am in the scheme of things as far as  holiday cleaning, baking, shopping or even making Christmas cards!!

Today work celebrated the December Birthdays (mine and one other gal) with lunch out.  The other crafty gal in the office made my card, but I was asked to make the other gal's b-day card.  Originally, I thought I would use a card I had in my stash.  But, none of them flipped my trigger for N.  So, in true Starla fashion, I decided at the last minute to make a new card!  I LITERALLY finished photographing just as I needed to be leaving for the eats!

I started with the sketch challenge on SCS for my inspiration. 


  While I stuck pretty close to the actual sketch, I could not get the large panel to work for my embellishment and sentiment.  Sooooo.  This is MY take on the sketch!


Card base is Pure Luxury Ivory (vanilla) 5.5" square.  All the decorative paper came from MME's Lost and Found Sunshine.  I sponged Distress Ink in Vintage photo on all the decorative paper edges and on the tag that was cut and embossed with Spellbinder's Label Eleven.  The b-day sentiment is from SU's It's Your Birthday and was stamped with Chocolate Chip ink.

The Flower.  sigh...........I love the flower!  hehe. I covered Clearly for Art Whiteout with Broken China Distress Stain.  Now, you have to realize that CFA has more of a slick surface.  The Distress Stain just wants to bead up on it, rather than absorb.  But, that was ok with me!  I covered both sides of the whiteout with the stain, then wiping off the excess.  I repeated 2-3 more times until the color that did absorb was to my liking.  I then die cut some with PaperArtsy's Grunge Flower and Grunge Flower #2 and #3.  I snipped between the petals to separate them so that I could heat and mold the CFA better.  Let me just say that I REALLY need to get me those thingamawhoppers that you put on your fingers to protect them when hot gluing or working with CFA film!  Trying to heat this stuff BURNS!!! Either that, or I need to get me some hemostats!!  After heating and molding my flower layers, I then sponged Distress Vintage Photo on the edges.  Again, the ink wants to wipe off the slick surface, but I just wanted a hint of the color and it seemed to stick pretty well through all my handling of the flower to assemble it!!  As I was running  a bit short on time, I used my hot glue gun (why not?!  My finger tips were already singed!) to assemble the flower and adhere it to the card.  Colored a 1/2 pearl with Copics and ran out the door!!


*******

I just wanted to let you know that blogging is going to be even more sparse than usual the next few weeks!  I'm going to be working full time, covering for the other therapists who are taking holiday vacations.  Add to that schedule are the Kiddo's ball games, Christmas concerts (multiple performances for the Oldest Kiddo) and just trying to get ready for the holiday's myself!  All in all, that  is not going to leave much time for the ol' blog!  I DO HAVE a couple of projects that I'm still hoping to complete and share and I know that there is one more eP blog hop in the works!  So, until then.............
Remember to explore some creativity!!

Wednesday, August 17, 2011

Stamping and Metal

Hey People!  Can you believe it is Wednesday already?!  The family has been running around getting the last details ready for the kiddos to start school tomorrow.  I would swear that we just got out for the summer just days ago!!

Have another tutorial to share with you today!  Beate, from Splitcoaststampers, asked me to do another Wednesday tutorial using metal.  Now, what is seen in the tutorial is NOT my original idea.  It is just my version of a very common technique!  Because I am lazy, I am not going to do the step by step here.  I'm going to send you to the home page of Splitcoaststampers for the link.  I will share the picture of the project and the youtube link here though!!


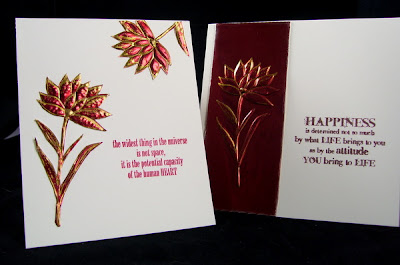
I used my stamped images two different ways today.  Both cards followed the stamping and metal instructions the same.  For my first card, I just cut out the stamped images after the backing paste had dried and I used them as metal embellishments for my card.  The second card keeps the stamped image on the metal panel. 

Here is the video of the technique


Ok.  Seriously.  I must have ticked off the technology gods sometime recently.  NOW Splitcoaststampers is also down, so I can't link to their site! 

What type of offering do you think the technology gods like?  Insert a looong, heavy sigh here_______.

Supplies:  Both cards use Pure Luxury Ivory cardstock as the base.  Both cards use Wendy Vecchi's Be Happy, Make Art stamp set.  Stazon Metallic Gold was used on TenSecond Studios Barn Red metal

If you are not inspired to emboss your image, just stamping on the metal is a fabulous look too!  I especially like the metallic Stazon on top of the metal.  Very rich looking!

I hope this inspires you to try combining your stamps and metal.  'Till then..............explore some type of creativity today!!