Showing posts with label Hero Arts. Show all posts

Wednesday, February 8, 2012

Tooting My Own Horn (but I added a tutorial!!)

Hey People! Hope your week has started out well!  The Oldest Kiddo's JV basketball team (which is coached by the Toad) had back to back games on Monday and Tuesday but walked away undefeated in league! WooHoo!!  Last night's game was an away game and the boys convinced the Toad that they should stop and eat on the way home to celebrate.  So, I'm a tad late this morning getting this post up!!

Back in August I was asked by Papercraft Inspirations Magazine if I would consider being a contributor for their Masterclass article in issue 95 (January issue).  Let's just say I'm amazed I was able to type Yes, thank you! with all my hootin' and hollerin!!


I actually had TWO cards published in this issue.  Today I'm going to share the Thinking of You card that was highlighted for the technique, versus the entire card.


Supplies Used:  Paper Gina K's Pure Luxury Ivory.  Basic Grey's 6x6 Sweet Threads. Stamps:  Hero Arts Stitched Frame. Inks:  Distress Ink Gathered Twigs.  Accessories:  TenSecond Studios Kiss Me Pink and Poison Ivy metal, mat set, Teflon refiner and decorative wheel.

And as an added bonus, the step by step!!


                                Using Stazon Ink, stamp your image onto the front side of the metal

Place the stamped metal face up on the acrylic mat and trace around the image with the Teflon refiner.  You could also use a stylus.


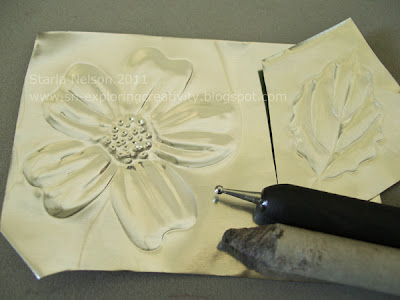
Place the metal stamped side down on the thin acrylic mat.  Use a paper stump and stylus (or ball and cup tool) to puff out the image

Still on the thin acrylic mat, use a decorative wheel to add detail


Use the pointed tip Teflon refiner to add "scribbles" between the petal lines

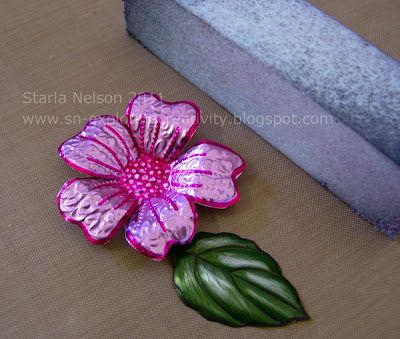
Cut out the flower and leaves (which were done the same up through step #3).  Using a sanding block (aka a burnishing block) lightly sand off some of the raised portions on the leaf to give highlights.  You could also sand the flower petals to highlight the "scribbles", but I wanted a more subtle texture, so I chose not to sand the flower.

Stamp stitched frame onto decorative paper.  Stamp sentiment onto scrap piece of Ivory card stock and distress edges with scissors or distressing tool.  Ink edges with Distress Gathered Twigs.  Adhere flower and leaves with strong glue dots, Humungo sticky tape or hot glue.

  A few notes on the flower:  I cut out two layers, but the bottom layer I did not add the decorative scribbles or lines.  I liked the look of the contrast between the layers.  You can gently form the petal leaves with your fingers to give shape to the flower. 

When adhering metal to metal, I like to use E6000 glue, Humungo Killer adhesive (link above) or a hot glue  gun.  I find that these work best for keeping the metal on metal adhered.  For adhering metal to paper, strong glue dots or the Humungo sticky tape work fine. 

That's it for me today!  I'll be back in a day or so with the SECOND card that was published!! (insert cheesy grin here_________).

'Till then..................

Sunday, November 20, 2011

Joyous Holidays

Hey People!! Are you sitting down?  Yes, I am posting another card!  Two days in a row! OH MY!  I don't believe the world is ending or pigs are now flying, but, I haven't looked outside in the last little bit either!! haha!!

I recently bought a Memory Box die from my LSS that I have had some ideas floating in my noggin' on ways I might like to use it.  Yesterday, I received a comment  on SCS from Miss Boo (aka Jen), which alerted me to the winter CAS DT search going on right now.  One of my ideas for using the die fit the first DT challenge, so I decided to LEAP and give it a go!!


My card base is 5.5" square Pure Luxury, with a side fold.  I die cut the wreath from Echo Park's Season's Greetings by Lori WhitlockTIP:  I usually place my steel ruled dies face down on my papers or metal so that I can utilize my paper space as much as possible.  I found that with this particular die, I had to run the die in the "traditional" way of having the die face up with the paper on the top.  I also had to use a thin carboard shim for my machine to cut the image cleanly.  I then cut some small pieces of SU's Real Red cardstock and cut out the largest of the flowers from the die again, adhering with a glue pen.  I then used my VersaMarker and inked the red flowers and embossed with Ranger red embossing tinsel.  I used my Fiskers stamp press to stamp the sentiment from Hero Arts Joy to All.  I then adhered only the larger flowers and some random bits to the matting with the glue pen.  Tied the ribbon along the side and she's done!!

I'm thinking that I will just try out for a guest spot on the CAS DT.  My work schedule in December is HORRENDOUS and I really don't know if I can commit to creating for each week's challenge.  Yes, I know that the CAS challenge is on Monday's, which would give me the weekend to stamp.  But I'm thinking that since I'll be working late hours everyday, that maybe my weekends should be FAMILY focused versus stamping focused!!

Anyhoos!  I've actually made a Christmas card before December 23! 

Maybe I should go look out the window after all.


Saturday, November 19, 2011

Just Another Note

Happy Saturday, People!!  It s a dreary, wet day here in California. What is up with that?!!  But, the weather makes it easy to stay inside and tackle the holiday To Do List!!

I was editing some photos for the family calendar that one of the in-law uncles puts together each year.  While scanning through the very limited photos I have of my boys in the last year, I came across a card that I haven't posted yet.  Thought I would share today!

This was actually made for an attempt at publication.  Obviously, since I'm posting it here, it wasn't accepted! haha!  It was for a sketch in one of the popular magazines.  I had just finished my Blue Note card and as everything was still out on my desk, I had this image on the brain and it seemed to me to work perfectly for the sketch (shows how much I know, huh?!).


Let's see if I remember the details on this!!  Standard 4.25"x 5.5" top folded card base from Pure Luxury White.  The image, Hero Arts Vintage Musical Clef, was found at Michael's.  Since I lacked black embossing type ink, I first stamped the image with VersaMark, then over stamped with Archival Jet Black ink and clear embossed with Ranger's Clear embossing powder.  While I had the clear ep out, I covered strips of black SU card stock in VersaMark and clear embossed to give the black card stock a nice glossy shine.  I cut my black piano keys and set aside. 

The white piano keys were cut from SU glossy card stock.  Then both sets of keys were carefully layed out onto black card stock.

The sentiment was computer generated.  Is it just me, or does anyone else lack sentiments in just the right size and font for sentiment flags?!!  I trimmed the flag by hand and scored and adhered by the flattened area, so the the sentiment is raised over the note. 

This will probably accompany a small Christmas gift to the kiddo's music teacher at school.  I'm thinking that he might appreciate it, even if the magazine wasn't wowed, haha!

So, even though this didn't make the publication, I am proud to say that I tried.  Will I submit again?  Maybe, maybe not.  To be honest, I'm trying to make a very conscious effort to use papers, embellishments and such that I have in my over flowing stash versus buying "new" stuff.  Publication requires all the "new" stuff.  I understand that people who read and get inspiration from the magazines want to be able to find the same product.  But, lately, it just seems to me that I am wasting money on "new product" that only gets used for a very short time then is cast aside since it is no longer the IT" thing. Disclaimer:  This is not to say that I won't be buying anything new, haha!!  It just means that before buying something new, I'm trying to USE what similar "old" stuff from my stash first. 

And on that NOTE (couldn't resist!), I'm off to tackle more of the To Do List.  Fun, fun!  'Till next time....remember to take time to explore some type of creativity!!