Showing posts with label die cuts. Show all posts

Friday, August 12, 2011

Egg-cellent Challenge

Hey People!  Today the E-Team is introducing a new challenge that will be open to YOU to participate in! 

Have you ever watched the Food Network show Chopped?  The premise is 4 cooks are given a basket of ingredients (some that you would NEVER think of using or combining) and are given 30 min to come up with an appetizing dish that uses the required ingredients.  After each challenge, the "chef" who does not meet the requirements is "chopped" from the competition, until only one winner is left.

Daisy has issued as similar challenge to the E-Team and YOU!  We are inviting you to join us in this new challenge!


It's an Egg-clectic Challenge!!


To enter, you must use the following 3 materials in your project. 

Any die from any manufacture of die cut machines
and an egg carton


Link your project to the eP blog any time beginning Friday, Aug 12 until Sunday, Aug 21st.  A challenge winner will be chosen and posted on the eP blog Monday, Aug 22nd.

Of course, there is still the chance for other goodies!  Just leave one comment, starting today, Friday, Aug 12 until Sunday, Aug 14, on the participating E-Team member blogs and two random winners will be chosen to win some of the new 6x6 paper pads that have arrived at eP PLUS some more surprises!  The winners will be posted on the eP blog on Monday, Aug 15. 


The E-Team
Me!
Linda L couldn't join us this week.  But make sure to stop by her blog and see what she has been creating!

Ok!  Onto my projects!  Yes, I created two projects, using the same layout and techniques, but one masculine and the other feminine. To be honest, I had grand (dis) illusions of creating something "outside the egg carton", but it would appear that my mojo and I could not agree on the trial attempts.  So, I decided to keep the frustration levle low and make it simple. 


I began by misting the lid of a cardboard egg carton with water so that I could pull off the top couple of layers, removing the writing.  I then heavily misted a portion with Tattered Angel's Tattered Leather Glimmer Mist and Antique Brass Glimmer Mist.  I used Spellbinder's Classic Diamonds Nestabilities to cut my shapes and then ran the diamonds through a Cuttlebug embossing folder.  Here is a close up that (kind of) shows the glimmer and texture a bit better (I hope!)


To make my background, I used my favorite technique of Wrinkle Free Distress, randomly wiping Distress Inks in Weathered Wood and Brushed Corduroy along my craft mat and misting with more Tattered Angel's Glimmer Mist again in Antique Brass.  I then laid a piece of SU's Textured Very Vanilla in the beaded up inks.  In real life, the glimmer makes a subtle shimmer, that is not too obvious to be used on masculine cards.  The edges were sponged with Brushed Corduroy and then I just swiped the very edge along my Walnut Stain ink pad.  The sentiment, from Tim Holtz's Just Thoughts, was stamped with Walnut Stain.  The entire panel was then matted on Basic Black card stock and adhered to a 5 1/2" square base of Pure Luxury Ivory. 

The die cut diamonds where then mounted on a piece of basic black card stock that was misted with Tattered Angel's Pearl Glimmer Mist.  A thin mat of the textured Very Vanilla behind that finishes off the strip. 


And for the girly version:


Exact same technique, Wrinkle Free Distress, for the background but this time  I used Distress Inks in Victorian Velvet, Scattered Straw and Wild Honey. The mists used to bead up the inks were Tattered Angel's Glimmer Mist in Tuscan Sun and Cherub Pink.  The sentiment is from the same set, Just Thoughts, and was stamped using Vintage Photo Distress Ink. 

I left the egg carton the original thickness with the writing on it for the butterflies (cut with the Mini Butterflies die).  The butterflies were again heavily misted with Tuscan Sun and Cherub Pink Glimmer Mists.  I customed colored the 1/2 back, self adhesive pearls with Copic marker


The green card stock is SU's Kiwi Kiss.  The panel under the butterflies was stamped with Versamark, using the large stamp from Wendy Vecchi's Art Colors Life set.  Another misting of Pearl Glimmer Mist was applied for a bit of shimmer.

Simple, yes.  But think about it, eggs are pretty simple too, but can be the focal of a recipe!  I think these egg carton embellishments add that extra element that makes this simple sketch pop!

I hope you will join along and play with this Egg-celant Challenge!  Here's the positive on joining...you might win some goodies for your effort without having to worry about getting CHOPPED!!  hehe


Friday, June 3, 2011

Graduation, CAS

I am now officially the mother of a High School student. 


Just ignore that anguished wail of a mother who can do nothing to stop her babies from growing up.

Sigh. Ok.  I'm not going to dwell on the fact that my little boy is quickly becoming a young man.  A young man who received an academic award for a GPA above 3.5.  A young man who also was pinned by The Toad for the Junior National Honor Society (Sorry.  Had to brag just a bit!!  What else is a proud mama to do?!!) A young man who is now officially 5 inches taller than me.  Who has a wing span longer than The Toad's.  A young man who borrowed his father's shoes for graduation.  A young man who is is sprouting hair above his upper lip (really?!!)

I REALLY need to stop thinking of all this or I am going to need some serious medication to get through the next four years.  This growing up thing was NOT in the "What to Expect" books that I read. 

Or maybe I just skipped that chapter thinking it wouldn't happen for a VERY long time. 

Reality has a way of smacking you right between the eyes!

******

OK!!  I'm sure that none of you stopped by to listen to me whine about my kids growing up too fast.  So, I'll put that all aside to share the card that I made for the kiddo's classmates.  Since I was making 22 of these, I tried to keep them fairly clean and simple. 


Base:  4 1/4" Pure Luxury.  Mat:  SU's Real Red.  Die cuts of hat and diploma from QuicKutz.  Not quite enough detail to suit me, so I did some shading with Copics and a Inkssentials opaque pen.  Used my Scor Buddy for the embossed edge.  Stamp is from SU (I think it is from All Year Cheer). 

I'm off to make some more graduation cards.  I need 5 more before the weekend is done!  YIKES!

'Till then.................enjoy the moment.  They tend to fly by before you know it!

Sunday, March 20, 2011

March Madness

In this household, March Madness has two meanings.  First up would be the traditional focus on the Sweet 16 and The Toad and Oldest Kiddo constantly checking their brackets and bemoaning the unexpected upsets.

The second would be the craziness of helping pull off Grandparent's Day at the school, the start of middle school varsity basketball, spring (break) fever, the increased hours I end up working covering for the vacationing boss and  The Toad's and my wedding anniversary (for which I need to make a card for......guess after 17 years he'll still stick around if I'm late?!).

Then to top it off, a last minute need for a 14 y/o boy's birthday card. 

Is there any category harder to make cards for than teen aged boys?  There is a SERIOUS lack of creative product geared towards this age group.  Teen girls?  Companies have got that covered.  Teen boys~~not so much. 

The only saving grace I had to work with is that Oldest Kiddo requested some type of basketball card.  Seeing as basketball is a year round sport in this household, I DO have some supplies to pull that off.  I decided to go fairly CAS (clean and simple) for a couple of reasons: 
A) This is for a 14 y/o boy.  Reality check: 14 y/o boys could care less about the card.  They only want to grab the Game Stop gift card inside and beg, plead and whine until their parent's take them to get the latest Call of Duty game.
B) It is late Saturday night and the Kiddo needs the aforementioned card before 8am Sunday. 

Here is what I came up with:

Do I even need to make another lame excuse for the lousy photo?  Late night photos do NOT work!

Card details:  Base is a5 1/2 square of SU's Blue Bayou (I think!).  Creamy Caramel is the next layer.  Design paper is from Karen Foster's Designs On the Line.  I have had this in my stash for a while.  I have NO idea if it is still available.  The basketball die is a Quikutz die.  The "orange" is actually SU's Dusty Durango with creamy caramel sponging to add dimensional shading. The star was die cut from some more Creamy Caramel card stock using Spellbinders Stars Five dies.  Distress ink Stormy Sky was used for the sponging and stamping.  The sentiment (from SU's Sporting) is actually in a straight line.  I masked off to stamp the sentiment in a vertical position, using my stampamajig to line the images up.  Last but not least, I used some Karen Foster stickers (I believe I may have bought the design paper and stickers as a package) to add the numbers "14" in the corner. 

Back to the basics.  It  works!

I hope that you all enjoy the rest of your weekend.  I'm going to see if I can knock out that anniversary card before The Toad takes me out to dinner!

'Till then...........................


Saturday, March 14, 2009

One Down.....


.....only 7 more cards to go!!

This card was SOOOOO much cuter in my head. That's how it goes. This is how it is going to be. I don't have time to re-do. I think the reason I'm not too happy with this, is that the layout does not flow correctly. This does not have that "triangle" that moves the eyes to the elements. Plus, IRL, it has a couple of blips (one from a tape wrinkle, another couple of slight smudges). The worse thing about this is~~it's for my upline's daughter. Now, in all reality, the young lady will probably not care about such blips. But her mom will notice them (soooo, Kerney~~Just squint when you look at this!).
Some details on this: The skates were cut out of glossy paper (to give that patent leather look, hehe) using a Quikutz die and the heels/sole were colored with my black copic marker. A very thin strip of brushed silver cs was cut for the base of the boot. The wheels (which are too big, but that was the closest circle punch I had) have an eyelet set in the middle. I cut some 1/8" ribbon in half to lace thru the boot (not an easy task, I might add!!) The sentiment was computer generated and the inside has a HUGE 10! .
Like I said, this was much cuter in my head. Sigh....... Supplies: SU Whisper White, Pink Passion. Inks Pixie Pink (sponged along the edge and stamped on the inside) Stamps: Snap Frame Alphabet by Katie Pertiet for Autumn Leaves. Accessories: Cropadile, SU eyelets, sponge dauber, Quikutz boot die, Sizzix Big Shot

Tuesday, February 24, 2009

Inspired by Textures

I'm BAAAACK!!

I got some new toys this past week, just in time to try and come up with an idea for a workshop that I had this past weekend. Wellll, inspiration was only part way there. I knew I wanted to use SU's Inspired by Nature and was hoping to use my new texture plates. The problem was, I couldn't come up with a layout idea. So, once again, I turned to Splitcoaststampers to find the answer. And what a beauty I came across!! My card was inspired by this card by Dawn, a.k.a TreasureOiler on SCS. Now Dawn is a Dirty Girl Alumni, so of course my inner wanna be Dirty Gal was drawn to her card, hehe!!

I didn't want to try and figure out the frame for this card as this was going to be for a workshop that consisted of a couple of gals who really haven't stamped. I took Dawn's basic layout and color scheme BUT I didn't have any designer paper that would wow. So out came the texture plates. BUT~ not enough "pop" for me. So I played around with an idea. I took my ink pad DIRECTLY to the texture plate then embossed. YES!!!! It mad the subtle texture POP!!! (insert major happy dance here________!!!) Now, someone else may have already come up with this idea, but I haven't seen it used yet. And I love the results. This is the card that we madeDidn't this turn out GORJUS?!! (I hate trying to type accents btw!) This was just perfect for what my gals wanted to do!! Supplies used: Paper: Kiwi Kiss, Whisper white. Inks: Old Olive, Basic Black, Pink Pirouette. Accessories: Big Shot, SU Butterfly die, Textures plate, Pretties kit, Paper piercer, sponge daubers, grosgrain ribbon, glue dots, stampamajig, scalloped edge punch
Now here is here the only bummer deal about this card: the image pretty much covered up all that LOVELY texture. So, today I played around with another idea. Here is that result:

Let's just pretend that I'm Jan Tink for just a moment (yes, I know that this is REALLY pushing the envelope, but imagination is always good for the soul!!) ISN'T THIS JUST GORJUS!! YILMS!! (yes, I love myself too, right now! hehe)
After several tries at using the inkpad directly to my texture plate and getting kinda streaky results, I used my BRAYER (major lightbulb moment!) and got rid of the streaks. BUT!! There is a catch to this technique: you have to be VERY, VERY careful when you put your paper down on your inked plate. It it slides, even a teeny, tiny, itsy bit, you will get small smudges on your embossed area (ask me how I know this! Just don't ask how many times it took to get this section! hehe). But the effort is SO WORTH it!! This is a PERFECT technique to make your own FABULOUS designer paper!! It is just lucious IRL!! (ok, before you fear that my head may blow from all this self congratulations: let me put that to rest right now. Somehow, over the 30 min that it took me to tie that ribbon on this card, my sentiment slipped up a bit from it's original position. Then I realized that my cut edges are frayed as I need to replace the blade on my cutter. So, this card is NOT perfection, BUT IT'S DANG CLOSE BABY!!! lol) Supplies used: Paper: Very Vanilla, Chocolate chip. Inks: Chocolate chip. Stamps: SU's Warmest Regards. Accessories: Big Shot, Texture plate, brayer, scalloped edge punch, paper piercer, Spellbinders die cut tag, sponge dauber, ribbon.
Thanks for stopping by! If you decide to try this technique, please link me your creation! I would love to see what you do with this idea!!

Monday, February 23, 2009

Come Sail Away

"Come Sail away, come sail away, come sail away with meeeee......" (anyone care to join me in a Styx flashback?! Yeah, this will date me!)

This is the other "STAR Baby Wish book" (hmmm.....not sure I like that....gonna have to keep working on a name for these little puppies) that I did for one of the teachers at my kiddos school ( for those of you who may be just joining in~her daughter/daughter in law are due a couple of weeks apart and she asked me to make some guest sign in/best wishes books when she saw this book and this book for the two teacher's who are expecting SOON!)

This book looks like it should have been EASY PEASY to make. NOT!!! I think I just stressed out way too much over the fact that I only have the flannel plaid background stamp and I really was wanting a more "finished" plaid look. I finally managed to kick myself in the rear and moved on. Here is the inspiration first of all


Very clean and crisp looking. I think clicking on the picture will give you a larger picture in order to see the different plaid details (hmmm....may need another kick to remind myself that I've moved on from that sticky point).
Here is the results:
The cover was done trying to make the quilt pattern.


Inside pages obviously keep repeating the theme. Like I said, this should have been sooo easy to put together. But I also kept trying to add in another blue, like the quilt. Finally got it thru my thick skull that three shades were enough (but of course, I have several other shade "squares" stamped with the flannel);


That's it for that trip!! (Maybe I should have chosen the Gilligan's Island theme song instead....A three hour tour that turns into a much bigger deal! snort)
Supplies used: Paper: SU Whisper white, Bashful blue, Gina K's pure Luxury 120# in white and Prism dark navy CS (sorry, forgot to note which one I finally settled on...I had about three different shades in my cart at one time) Inks: SU's Not Quite Navy, Accessories: Quikcuts sailboat, Sizzix Big shot, tomobow multipurpose adhesive, Zutter's pink Bind It All, white 3/4" owires

Thanks for stopping in. I have a REALLY COOL discovery that I made on my next card to share with you!!

Thursday, February 19, 2009

So You Wanna Be a Pop Star?

(My apologies to the band Cyprus Hill for the butchering of the title of their song.....) *ETA: if by chance you know of Cyprus Hill's song "So you wanna be a Rap Superstar (I think that is the title) I would like to protect my innocent reputation by saying that I only have heard the *modified* version and will deny to my deathbed of even knowing there was another version out there. (hehe)

I think that I should consider going into the "Congratulations/Best wishes/Baby shower guest book business (if anyone can come up with a catchy name for these books, let me know. My brain is stalled on this one). I was asked to make another two books for the daughter/daughter-in-law of one of the teacher's at my kiddo's school. Soooo, being the original thinker that I am, I just took the mommy-2-be's nursery sets again and made the books. I'm going to be a stinker and only post one right now (hehe....I NEED to have something to post tomorrow or this weekend and drat it all!! I've been having to work and have not been able to create something new in the last couple of days!!) Soooo, without further ado....may I present the Pop Star collection:


The diaper bag was the inspiration for the cover of the book. Then I just used the collection for ideas on the inside pages. And here is the book itself.


Pretty much a CASE (copy and share everything) of the diaper bag.


I had ordered the Spellbinders Star nesties for this project but they haven't arrived yet. I ended up buying the Sizzix Stars #2 die for this (at JoAnne's...ON SALE!! hehe) and low and behold!! My SU star punches worked great for layering on these dies, which gave me several nesting/layering options (kinda wish I hadn't ordered the Spellbinder ones now...I could have ordered someting else instead, but! OH WELL!!). The rest of this is pretty straight forward as to the supplies except for the white paper....found out that SU's whisper white is NOT great for the base paper over the chipboard. It is too thin and shows the "glue" lines. I ended up using Gina K's 120# luxury paper (LOOVE this for coloring, btw). Supplies: Paper: Gina K's 120# Pure Luxury, SU bashful blue, creamy caramel, chocolate chip and brilliant blue. Accessories: SU Small board basics, Sizzix Stars #2, Big Shot, Su large and small star punch, SU circle punches 1" and 1/2 ", SU corner rounder punch, Tombow multipurpose glue, Zutter Bind it All, 3/4" owires.
Stay tuned as we sail away for my next project!

Wednesday, February 4, 2009

Wannabe Dirty, Part 2

Since I'm still icing my shoulder from all the self congratulating, I thought that I'd share part 2 of the "this is soooo DIRTY" projects that I did for the baby shower. First, the inspiration piece.And the "Dirty" project~~~This was for the other teacher's "Best wishes" book (who knew there was such a thing! Kinda a cute idea tho. Too bad I didn't come up with it!! hehe)Again, I'm having to ice my shoulder LOTS for this one!! Now, to prove what a "Dirty" genius (cough, snort, cackle) I am, let me share some little details about this particular project.

Ever hear the saying, "It's not what you know, but WHO you know?" Well, lucky for me, I have a friend who also makes cards. But she is not a stamper. She uses die cuts and has a WONDERFUL collection of just about everything possible. Those cute little airplanes are from the die I borrowed from her. I modified the wings some, trying to get them to look more like the fat little wings on the blanket. Now, here is where my inner "Dirty girl" came in. I could not find any type of camo print in my LSS, Target, Michael's. What is a girl to do? Well, lucky for me, I just happen to own (thanks to Melody!) SU's retired Leopard print background!! PERFECT for that faux camo look on this size of project!! GENIUS!! I also used the Flannel Plaid background stamp (may I just say that this confirms my thought that I should keep all my background stamps for those "just in case" moments?!!) Ok....now a peek of the insideAnd of course, I made a card to match this one too.
So, whadda think? Is there a "Dirty Girl" in my future? (BWHAHAAAA!!! Sometimes I crack myself up! WHEW!! That's a good one for this hour of the morning!!hehe) Seriously, I REALLY liked how these two projects came out and when it is all said and done, that is probably the most important thing. Fame might be nice, but being proud of your own accomplishments is probably a much better feeling. Supplies: Paper: SU's River Rock, Cranberry Crisp, Bashful Blue, Not Quite Navy. Inks: Bashful blue, Cranberry Crisp. Stamps: SU's Leopard Print, Flannel Plaid, All Year Cheer I, Papertrey's Trajan Monogram. Accessories: Quikcuts airplane, SU's small star punch, Bind It All (pink) Tombow Multipurpose Adhesive, Zig two way glue pen, stampamajig

Tuesday, January 13, 2009

Beyond Master Yoda's Help


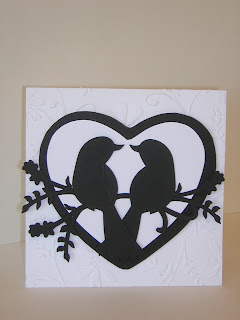
Ok....this card has been sitting on my desk for a couple of days now. It seems that something is missing. What? I have NO IDEA!! I have tried to put something in the lower right corner, but then it looks too crowded. I have tried to add the dreaded ribbon. WAY too crowded. I even went so far as to contact Master Yoda (what?!! You don't have a Master Yoda to contact when you get stuck on a card?!! hehe.....) but, alas, being the stubborn padawon that I am, I didn't heed her advice (it just messed with my force connection). Sooooo, I have come to the conclusion that it is in the design of the card itself. I like this idea....just needs tweeking......somehow.
Supplies used: Paper~SU Whisper White and Basic Black
Accessories: Sizzix Big Shot, Bird w/Leaves & Flower die cut, Provocraft embossing folder

So, I'm going to walk away from this and move on to the next REQUIRED project. Think babies. I may even try and do my first tutorial. Stay tuned. You never know what excitement we might encounter on our next crafting adventure!!