Showing posts with label Big Shot. Show all posts

Monday, September 20, 2010

Still on the Campaign Trail

Hey People!!  Believe it or not, I have not fallen off the face of the earth!! We are still in the thick of the
8th grade campaign trail.  I have spent the last couple of days making more badges~~but this time the inspiration was this Army Sergeant bade that I found on the Internet:


Now, I will be honest here.  I am SICK of making badges.  Especially for knowing that most of these will get thrown away.  But, the kiddo liked this idea so I made a template and came up with this version: 


This one was a tad bit harder to put together than the last badge!! The main badge was cut from chocolate chip paper from the tracing of my paper template.  I then used my Krylon Gold leafing pen along the edges.  About 2/3 of the way through I was running out of the ink and had to force out as much as I could and "brush" the edges.  Not very pretty, but this was when I started chanting "it will probably get thrown away....it will probably get thrown away." I then put the Kiddo to work die cutting 104 of the smallest Spellbinders Nestabilities Star.  And realized that the gold edging on the chocolate chip paper did not match as close as I thought it would to the gold stars.  Started chanting again.


Doesn't he looked thrilled?!  I figure it was good for him to realize how much work goes into this craft of ours!! 

I then made my biggest mistake when cutting out the "stripes" (or what ever they are called.  I know there is a special name for them, but it escapes my noggin' at this time).  I cut out my paper template and got the "GREAT" idea that I would fold my gold paper in half, and cut two stripes out at once.  Wonderful. Except it never occurred to me that one of the stripes would be BACKWARDS.  Which means my stripes do not line up perfectly neat.  It's a good thing I decided against joining the military (I had a good friend try and talk me into joining the military when I finished my schooling for PT.  I would have been an officer.  Great way to see the world. Considered it for about a minute.  Then realized that I don't take orders very well.  Or handle change well.  Or being in situations where I know NO ONE.)  I would have been kicked out before I ever got my bunk made properly!!  So, I just started my chant again~~"it will probably be thrown away.....it will probably be thrown away...."

Last, I stamped the Kiddo's name using Encore Metallic Gold ink.  And discovered the COOLEST tool in the world.  I used this Fiskers Compact Stamp Press to line up all the letters of the Kiddos name ( I used Papertrey's Trajen Monogram set).  PERFECT.  I could line up all the letters on the grid, ink them, then using the grid to line up in the badge area!  Press, and PRESTO!! Perfect image every time!! I will be using this a lot with my unmounted stamps!!

Again, there were 26 of these made.  The Kiddo thought they turned out pretty cool.  Which is all that matters.  And he learned a lesson that it takes work, sometimes a LOT of work,  to go after something you want. 

I'll leave you with one last shot of my good looking Kiddo working on his poster that he made to mimic the badges (only in b/w.....again using the Spellbinders Nestie stars and SU's Headline Alphabet for his name)


And with that, I'm calling it a night.  There is rumblings about making "dog tags" for the last push on the campaign trail before Friday's elections.  Geesh.  I really hope this kiddo wins the office.  If not, it will just be another lesson of life!!

Thanks for dropping by again!!  Remember to make some time for creativity in your day.  Or night. 
Till next time~~

Friday, July 9, 2010

A Moment

Happy Friday Peoples!!  I'm REALLY excited about today's Just For Fun® Friday Color Challenge!!  Today's colors are much more down my alley (meaning~~no PINK! hehe)


BUT more importantly~I had a guest designer help with today's project!!  My youngest kiddo came into my office to complain that his older brother wouldn't play with him (the cross a 9 y/o must bear when your older brother is 13!).  The Kiddo is creative, but has to be in the "mood".  He has definite ideas for his handmade projects and I try to only make suggestions instead of telling him how to do something (not that he won't say, "Nah....I was thinking of something like this")  I decided to throw caution to the wind (as I'm down to the last hours in being able to make something for today's challenge) and I asked him if he wanted to play around with my stuff and help me with today's project.  So we got out some "fun" stuff and this is what we came up with:


I had Tim Holtz's Fanciful Flight die on the desk and the kiddo decided he wanted to use that. We got out the alcohol inks and I actually demonstrated the colors that I had planned on using, but the kiddo decided that Rust, Pool and Butterscotch looked better than my blues! He applied the inks on glossy cardstock and then went over the inks again with the blending solution to mute them a bit more.  We die cut the butterfly using Tim Holtz's Fanciful Flight and the kiddo sponged the chocolate chip layer randomly with Walnut Stain Distress Ink.  Believe it or not, the Kiddo is the one who came up with the idea to make a flower for the butterfly to "land on".  I told him I was thinking of using this sentiment from Just for Fun and after I explained the meaning to him, he agreed.  After some debate on how we were going to use the sentiment and the flower idea, we pulled out the Peony Spellbinder die and die cut the bottom layers from K&Company's Ancestry line and the "center" from a piece of very vanilla using the kiddos favorite machine, the Big Shot.


The Kiddo then sponged all the edges of the flowers with Vintage Photo while I sponged the "center" of the flower with some Antique Linen and Tea Dye. 


I then did some selective masking to get the image to fit properly onto the center of the card with the help of my every trusty stampamajig.  The sentiment was stamped using Broken China Ink. 

We then decided that our focal points were getting a tad large for a card.  I pulled out a small canvas that I had and the kiddo did the wrinkle free distress technique using Distress Inks in Broken China and Tumbled glass.  Instead of spritzing with water, he spritzed it with Tattered Angels Glimmer Mist in Frost.  Now, when using a canvas, the pores of the canvas do not absorb the ink like paper does.  I have found that taking a stencil brush or paint brush and pouncing the ink into the pores of the canvas works well to spread the ink. 

We then played around with a some different flourishes and papers before deciding we liked the Flourish #2 from Sizzix the best.  It too, was cut out of K&Companies Ancestry line. 

Ok...to be honest ~~this is where the Kiddo lost interest (and the time where his brother said he would play with him!).  So, deserted, I layered the flower using dimensionals and added the 1/2 backed pearls.  The butterfly was attached in the corner, with it's body also on dimensionals. 

One last photo of the guest designer:


This was a special creative time with my Kiddo that I will put into my heart's treasure chest!!

Now, just as a reminder~~playing along with us on the JFF blog gives you the opportunity to win a $50 gift certificate for a fun shopping spree at Just For Fun® Stamps!  You don't have to use Just for Fun stamps, so there is no excuse not to play!!  For more inspiration, make sure you check out the other designer's projects to get your creative juices flowing!

and

Thanks for dropping by again today!! I hope that maybe you can find some creative time with a loved one this weekend!! (hmmmm.....take that anyway you want! LOL!! I can't come up with another way to say it now!!)

Monday, March 8, 2010

Vintage Clean and Simple

I haven't done a challenge on SCS in FOREVER.  So, today I decided that I would check out the challenges and lo and behold!! I think I covered both the CAS challenge (to layer two different shapes on your card, but keep it clean and simple) AND the Try a New Technique, Very Vintage. 


This idea started with the flower.  I have been wanting to use my Spellbinders Daisies since I got them!!  I tried cutting them out on regular cardstock and embossing, but it just did not have the look I was going for (which is all the fluffy hand made flowers that I have been seeing on other's blogs!)  I finally remembered some wonderful coffee filter flowers that Sherry Cheever made, so I opened up my package of filters that were bought just for this technique!! I swiped distress inks in Tea Dye, Old Paper and Antique Linen across my pad, but instead of misting with water, I misted them with Tattered Angels Glimmer mist in Old Lace.  I used my heat gun to dry them then layered three on top of each other, folded the filters in half and cut using my Daisy dies.  I layered the different sizes and smooshed, lifted and worked the layers until I got a look that I liked.  I then pulled out a build a brad from SU and layered on a large 1/2 backed pearl from the Pretties kit and used that to hold the flower together.  I made a 6x6" base from a piece of textured vanilla paper from my DCWV neutral stack.  A piece  of  retired  of Spring Silhouettes dp from SU  was cut slightly smaller than the base and I sponged some Distress ink in Tea dye around the edges.  I then die cut Sizzix Flowers and vine and Scibbles Swirls from a piece of SU Wild Wasabi and then spritzed with Tattered Angels Glimmer Mist in Olive Vine.  While that was drying, I die cut twice using SU's Top note, first in Soft sky then again in the base color from DCWV.  I sponged around the edge of the soft sky layer with Tea Dye and the entire vanilla layer with Old Paper.  I stamped the main image from Just for Fun Stamps® using Distress Vintage Photo and layered everything and finished off with the addition of some 1/2 backed pearls.  Supplies:  Paper:  DCWV neutral stack, SU Spring Silhouettes, soft sky and wild wasabi.  Inks:  Distress inks in antique linen, tea dye, old paper, vintage photo.  Accessories:  Sizzix Big Shot, dies Flowers and Vines #3, scribbles swirls, SU top note, Pretties Kit, Spellbinders Daisies S4-058, Tattered Angels Glimmer Mist in Old Lace and Olive Vine.  Stamps:  Just for Fun® A child's heart E3150

I think this card would make a great "Teacher appreciation" card!!

I enjoyed participating in the challenges again!  I need to try and make this a habit! LOL!!  I'm now off to find my desk top again...it would seem that while all the different ideas were trying to emerge from my brain, my hands forgot to put stuff away!!

Friday, March 5, 2010

Pink Chocolate Lillies....

Sorry about the dead blog this week. On the days that I've not been called into work,  I've been trying to catch up with 6+ weeks of neglected housework.  Let's just say that it has not been real fun to discover that bathrooms can get cob webs in the corners!! YIKES!!

Ok...now to catch up on the creative end!!  There are some exciting things happening with Just For Fun® this week. First, we would like to announce and welcome a new designer to the team . . . Kat Tucker! Kat is

one of those designers that makes my jaw hit the ground!!  I just can't wait to give some of her projects a try!!  Please make sure you drop by Kat's blog and give her a big ol' FUN welcome!

Another exciting event is the launching of the new Just For Fun® Blog! You’ll be able to find albums for all the designers on the right hand side where you can view all their designs in one place. You’ll want to check out the new Designer page where you can read more about your favorite designers and get to know them better too!!

Saving the best for last . . . . we are announcing a new weekly color challenge . . . Just For Fun® Fridays. Each Friday there will be a new color challenge posted on the Just For Fun® Blog and samples will be posted on each Designer’s blog. (yes!! This means that I will be posting at LEAST once a week now!! BWHHAAAA!!)  We are inviting you to play along with us and want to see your creative works too!!  There will be a Mr. Linky at the end of each Friday’s post for you to link to your own card.

This week Sherry challenged the team to use Pink, Green and Brown.  AAAACCCCKKKK!! There is that PINK color that I don't know how to use!!  I guess that is why it is called a CHALLENGE, huh?!! So to add to the already HUMONGOUS challenge of using pink, I gave myself another added challenge:  to pull out an old technique that I haven't used in a while.  Well, let me tell you!! I went back 20+ years for this one, peoples!! The added challenge:  Watercoloring!!

Now, way back in my entry into the collage world, I thought that I  wanted to be an art major.  Until I realized that while I do have some God given artistic talent, it is NOT the level of talent one needs in order to make a living using said talent.  But before reality hit, I did take a watercoloring class.  A BEGINNER watercoloring class.  Brushing aside all the cobwebs of my watercoloring abilities, I came up with this card:
 

 Not too shabby for being incredibly rusty at this technique! LOL!!  You'll have to look past the incorrect "shading" as I had more than one blooper in not remembering that the light spaces have to start out light and stay that way!!

I stamped the Lily onto some 140# cold press watercolor paper with Archival Jet black ink.  Using the YUMMY new distress reinkers in Spun Sugar, Vicorian Velvet, Crushed Olive as well as Peeled Paint and Shabby Shutters, I watercolored the image using a small brush.  I then had to meticulously cut out the image as it would seem that I was having some problems staying in the lines and remembering that that my hand dragging across the still wet image would leave smudges (OI!! I told you it had been a while!! LOL!).  I then made my own background paper by taking another piece of the watercolor paper and spritizing Tattered Angels Glimmer mist in Cherub Pink in various spots.  I then took my Distress Shabby Shutters ink pad and swiped it across my craft mat in "blotches" and spritzed with water to have it bead up.  I then put my watercolor paper down in the beaded ink and used a large watercolor brush to blend the edges.  I then spritzed the entire sheet with Tattered Angels Glimmer mist in Pearl (perhaps my favorite color!!) and let it dry.  I stamped the Background block script with Victorian Velvet and randomly stamped portions of it along the page.  I cut the background to be slightly smaller than my 6x6" base of DCW's (Natural stack) shimmer chocolate.  I punched out the "lace" using one of Martha Stewart's punches (sorry, don't recall the name!!) from a strip of the left over background paper.  The scalloped oval was die cut using my Spellbinder Scalloped ovals and classic ovals and adhered with glue dots.  The lillies were then adhered over the scalloped frame using dimensionals.  Tied the ribbon around the frame and called 'er done!! Supplies:  Paper:  140# cold press watercolor, DCWV natural cardstock stack.  Inks:  Archival Jet Black, distress reinkers/inks in Spun Sugar, Victorian Velvet, Crushed Olive, Shabby Shutter, Peeled Paint.  Accessories:  glue dots, Spellbinder Scalloped ovals and classic ovals, Sizzix Big Shot, glue dots, dimensionals, ribbon, Tattered Angels Glimmer Mist in Cherub Pink and Pearl. 

Make sure you check out all the other designer's projects (I know I will be!!  I need to see how other's use PINK hehe!!)


and

AND!! Don't forget to visit the Just For Fun® Blog and post your PINK, green and brown project!!

 Thanks for dropping by again today!!  I hope that you'll join us every Friday for another color challenge!! Use it as an excuse as to why you have to stamp over the weekend!! BWHHAAAA!! 
Till next time!


Tuesday, July 28, 2009

Guess who is DIRTY?!!

.....with inky fingers that is!! BWHHAAAAA!!


I'm still trying to get all the Dare to Get Dirty Challenges done. Today, I had SEVERAL ideas in my head. Guess what? The card I made isn't ONE of them!! I don't know if I got stage fright from all the bright lights going off in my head or what~~but for the life of me, I couldn't get my FABULOUS ideas onto paper today. I had a TOTALLY different idea for the sketch layout that I wanted to use. But, finally, I just let it go and this is what came out instead.


(UGGGHHH!! Why does the pic look blurry here?!! Believe me~~it was sharp when I previewed it!!.....moving on......just move on.....)

This card is for the sketch challenge posted by Susan (aka Rainy). It also covers the make your own designer paper, using punches/dies and blue embellishments. For those of you who like to pretend you are the challenge police~~YES!! I know that I flip the sentiment layer. YES!! I know that I didn't put on the "ribbon" layer. But, ya know what?!! You will just have to give me a ticket because this is what came out after spending all day fighting my brain. Sooooo there (hehe).

I used alcohol inks on glossy white paper to make my background paper that I used to punch out the butterflies (the small butterflies are made using the Martha Stewart punch. The large butterfly was made using SU's exclusive Beautiful Butterflies die and the black layer is textured black paper). I then chose to use Tempting Turquoise as my base for my card, but I did some sponging with Distress inks in broken china. Since I used my sponge that had a little bit of peeled paint distress ink...there is a very slight tint of the green IRL. The make your own dp was then completed with the use of some Cherished Memories Rub Ons that SU retired (sometimes it pays not to clean up your area!!). I then dyed two half-backed pearls from the Pretties kit using the alcohol inks in a little zip lock bag. There is very slight sponging in the broken china along the edge of the textured white panel but it is hard to see in the picture.

The "twisted" sentiment is on dimensionals and is also a rub on from the same Cherished memories rub on set.

This is a little "busier" look for me, but I rather like all the subtle colors in this. And of course I like all the dimension (another card that will probably have to be hand delivered)

ok....off to get youngest ready for swim lessons (DRATS!! DH came home early!! Now, how in the world am I suppose to pretend that I was busy doing housework all day?!!)

hehe....have a good one! (I'm soooo busted! LOL!)

Thursday, July 9, 2009

Decking the Halls In July

Anyone still hanging around wondering if I'm ever going to create again?!! Geesh....I'm tellin' ya~~it's just amazing what one must go through to not only get a card made but posted too?! (But, but, MOM!! We want dinner now!! We're s..t..a..r...v...i...n...g!!!!)

Well, never fear. No children (or Toad) went hungry. All creativity and posting was put on hold until all pushed themselves away from the table proclaiming that they could not eat another bite.
I was pretty determined to make a card today. Printed out the sketch challenge from SCS last night and even came up with an idea. But then!! The Ways to Use it challenge threw me for a loop. First of all, Christmas in JULY?!! HELLOOOOO!!! I barley get Christmas out in December!! Secondly, my idea was SOOOO not Christmas. But!! I revamp the thinking and here is what I came up with:

I flipped the sketch to work with another challenge that I added to the previous two~~ use only SU (current or retired) product. I believe I have mentioned that I am a demo for SU, but I'm more the "hobby demo with a few friends/customers" than I am a business demo. But lately, I have gotten into the habit of combining all kinds of wonderful goodies from different manufacturers to make my cards. I just thought that it might be interesting to see what I could do with SU only.

Now for all the details: I used the the SU exclusive texture plate for the dotted layer (I ended up lightly misting the paper with water to get a more distinct impression). The swirls were stamped first in versamark then heat and stick was applied and heated (think that is why they call it HEAT and stick?!! snort). Dazzling diamonds glitter was then sprinkled over the warm sticky glue. All the matting layers are Wild Wasabi (that has to be one of my favorite colors. I am soooo sad that it is retired!). Made the scalloped border with the scalloped edge punch and added the dots with my white pen (not sure on that one...but what is done, is done). Decided to pull out (wait....are you sitting down? This is gonna knock you for a loop) BOTH my silver hodgepodge accessories AND the pretties kit!! I know, I know!! I've been hoarding both of these kits, but I finally decided to see what happens when you actually USE the stuff you buy!! Pulled out the old silver cording and looped it behind the main panel and through the hodgepodge to make my dangle for the pretties. All the stamps came from the Season of Joy set. Supplies: Paper: Whisper White, Wild Wasabi. Inks: Wild Wasabi. Accessories: Big Shot, SU exclusive texture plates, heat and stick, dazzling diamonds glitter, silver cording, silver hodgepodge kit, pretties kit, scalloped edge punch, white pen, 1" circle punch.

Thanks for stopping by again!! I'm going to go do the dishes from dinner and maybe think about doing the "original" card idea that I had. I don't know.....two cards in one day after such a long hiatus might throw me into a tailspin that I'll never find my way out of!! hehe

Thursday, April 30, 2009

Mojo Maybe?

Ok....I'm not convinced that my mojo has found it's way home. But I did manage to squeak out a card this evening (please excuse the less than great picture...it is now 8pm and I have HORRIBLE lighting in my office (maybe I should request a photo box for mother's day!! hehe). I sat and stared at this stamp set, the sketch on SCS, the color challenge and the ways to use it challenge also on SCS for quite a long time before I came up with this idea:
This card is a 5x 5 square. I used Rubbernecker's new Floral Silhouette set and masked off the second flower with scotch tape while I inked the rest using Archival Jet Black. I then removed the tape and colored the flower using SU's Real Red and Old Olive Marker. I placed this panel over the leaf from the same set that was stamped randomly over the long panel. The sentiment was stamped in Real Red and then cut out and embossed using Spellbinders circle nestibilities and adhered using dimensionals.

Supplies: Stamps: Rubbernecker Floral Silhouette Set. Paper: SU's whisper white and basic black. Ink: Archival Jet Black, Real Red (pad and marker) Old olive and summer sun marker. Accessories: Big Shot, Spellbinders nestibilities, stampamajig, dimensionals.

Overall, not too bad. It is a bit out of my comfort zone as it seems a little more "busy" than what I tend to make, but I kind of like it (exploring something new, I guess!)

Did you notice that I uploaded the picture of the card in a larger format? What do you think? Do you like that format better? Let me know!

Thanks for stopping by. Tomorrow I start work at the new clinic. Cross your fingers that I don't lock up the computer while trying to chart!! (I'm soooo computer challenged, and this is a complete different charting program than what I am used to at my other job!!). Crossing my fingers that I will get some more stamping done this weekend.

Tuesday, February 24, 2009

Inspired by Textures

I'm BAAAACK!!

I got some new toys this past week, just in time to try and come up with an idea for a workshop that I had this past weekend. Wellll, inspiration was only part way there. I knew I wanted to use SU's Inspired by Nature and was hoping to use my new texture plates. The problem was, I couldn't come up with a layout idea. So, once again, I turned to Splitcoaststampers to find the answer. And what a beauty I came across!! My card was inspired by this card by Dawn, a.k.a TreasureOiler on SCS. Now Dawn is a Dirty Girl Alumni, so of course my inner wanna be Dirty Gal was drawn to her card, hehe!!

I didn't want to try and figure out the frame for this card as this was going to be for a workshop that consisted of a couple of gals who really haven't stamped. I took Dawn's basic layout and color scheme BUT I didn't have any designer paper that would wow. So out came the texture plates. BUT~ not enough "pop" for me. So I played around with an idea. I took my ink pad DIRECTLY to the texture plate then embossed. YES!!!! It mad the subtle texture POP!!! (insert major happy dance here________!!!) Now, someone else may have already come up with this idea, but I haven't seen it used yet. And I love the results. This is the card that we madeDidn't this turn out GORJUS?!! (I hate trying to type accents btw!) This was just perfect for what my gals wanted to do!! Supplies used: Paper: Kiwi Kiss, Whisper white. Inks: Old Olive, Basic Black, Pink Pirouette. Accessories: Big Shot, SU Butterfly die, Textures plate, Pretties kit, Paper piercer, sponge daubers, grosgrain ribbon, glue dots, stampamajig, scalloped edge punch
Now here is here the only bummer deal about this card: the image pretty much covered up all that LOVELY texture. So, today I played around with another idea. Here is that result:

Let's just pretend that I'm Jan Tink for just a moment (yes, I know that this is REALLY pushing the envelope, but imagination is always good for the soul!!) ISN'T THIS JUST GORJUS!! YILMS!! (yes, I love myself too, right now! hehe)
After several tries at using the inkpad directly to my texture plate and getting kinda streaky results, I used my BRAYER (major lightbulb moment!) and got rid of the streaks. BUT!! There is a catch to this technique: you have to be VERY, VERY careful when you put your paper down on your inked plate. It it slides, even a teeny, tiny, itsy bit, you will get small smudges on your embossed area (ask me how I know this! Just don't ask how many times it took to get this section! hehe). But the effort is SO WORTH it!! This is a PERFECT technique to make your own FABULOUS designer paper!! It is just lucious IRL!! (ok, before you fear that my head may blow from all this self congratulations: let me put that to rest right now. Somehow, over the 30 min that it took me to tie that ribbon on this card, my sentiment slipped up a bit from it's original position. Then I realized that my cut edges are frayed as I need to replace the blade on my cutter. So, this card is NOT perfection, BUT IT'S DANG CLOSE BABY!!! lol) Supplies used: Paper: Very Vanilla, Chocolate chip. Inks: Chocolate chip. Stamps: SU's Warmest Regards. Accessories: Big Shot, Texture plate, brayer, scalloped edge punch, paper piercer, Spellbinders die cut tag, sponge dauber, ribbon.
Thanks for stopping by! If you decide to try this technique, please link me your creation! I would love to see what you do with this idea!!

Monday, February 23, 2009

Come Sail Away

"Come Sail away, come sail away, come sail away with meeeee......" (anyone care to join me in a Styx flashback?! Yeah, this will date me!)

This is the other "STAR Baby Wish book" (hmmm.....not sure I like that....gonna have to keep working on a name for these little puppies) that I did for one of the teachers at my kiddos school ( for those of you who may be just joining in~her daughter/daughter in law are due a couple of weeks apart and she asked me to make some guest sign in/best wishes books when she saw this book and this book for the two teacher's who are expecting SOON!)

This book looks like it should have been EASY PEASY to make. NOT!!! I think I just stressed out way too much over the fact that I only have the flannel plaid background stamp and I really was wanting a more "finished" plaid look. I finally managed to kick myself in the rear and moved on. Here is the inspiration first of all


Very clean and crisp looking. I think clicking on the picture will give you a larger picture in order to see the different plaid details (hmmm....may need another kick to remind myself that I've moved on from that sticky point).
Here is the results:
The cover was done trying to make the quilt pattern.


Inside pages obviously keep repeating the theme. Like I said, this should have been sooo easy to put together. But I also kept trying to add in another blue, like the quilt. Finally got it thru my thick skull that three shades were enough (but of course, I have several other shade "squares" stamped with the flannel);


That's it for that trip!! (Maybe I should have chosen the Gilligan's Island theme song instead....A three hour tour that turns into a much bigger deal! snort)
Supplies used: Paper: SU Whisper white, Bashful blue, Gina K's pure Luxury 120# in white and Prism dark navy CS (sorry, forgot to note which one I finally settled on...I had about three different shades in my cart at one time) Inks: SU's Not Quite Navy, Accessories: Quikcuts sailboat, Sizzix Big shot, tomobow multipurpose adhesive, Zutter's pink Bind It All, white 3/4" owires

Thanks for stopping in. I have a REALLY COOL discovery that I made on my next card to share with you!!

Thursday, February 19, 2009

So You Wanna Be a Pop Star?

(My apologies to the band Cyprus Hill for the butchering of the title of their song.....) *ETA: if by chance you know of Cyprus Hill's song "So you wanna be a Rap Superstar (I think that is the title) I would like to protect my innocent reputation by saying that I only have heard the *modified* version and will deny to my deathbed of even knowing there was another version out there. (hehe)

I think that I should consider going into the "Congratulations/Best wishes/Baby shower guest book business (if anyone can come up with a catchy name for these books, let me know. My brain is stalled on this one). I was asked to make another two books for the daughter/daughter-in-law of one of the teacher's at my kiddo's school. Soooo, being the original thinker that I am, I just took the mommy-2-be's nursery sets again and made the books. I'm going to be a stinker and only post one right now (hehe....I NEED to have something to post tomorrow or this weekend and drat it all!! I've been having to work and have not been able to create something new in the last couple of days!!) Soooo, without further ado....may I present the Pop Star collection:


The diaper bag was the inspiration for the cover of the book. Then I just used the collection for ideas on the inside pages. And here is the book itself.


Pretty much a CASE (copy and share everything) of the diaper bag.


I had ordered the Spellbinders Star nesties for this project but they haven't arrived yet. I ended up buying the Sizzix Stars #2 die for this (at JoAnne's...ON SALE!! hehe) and low and behold!! My SU star punches worked great for layering on these dies, which gave me several nesting/layering options (kinda wish I hadn't ordered the Spellbinder ones now...I could have ordered someting else instead, but! OH WELL!!). The rest of this is pretty straight forward as to the supplies except for the white paper....found out that SU's whisper white is NOT great for the base paper over the chipboard. It is too thin and shows the "glue" lines. I ended up using Gina K's 120# luxury paper (LOOVE this for coloring, btw). Supplies: Paper: Gina K's 120# Pure Luxury, SU bashful blue, creamy caramel, chocolate chip and brilliant blue. Accessories: SU Small board basics, Sizzix Stars #2, Big Shot, Su large and small star punch, SU circle punches 1" and 1/2 ", SU corner rounder punch, Tombow multipurpose glue, Zutter Bind it All, 3/4" owires.
Stay tuned as we sail away for my next project!

Tuesday, January 13, 2009

Beyond Master Yoda's Help
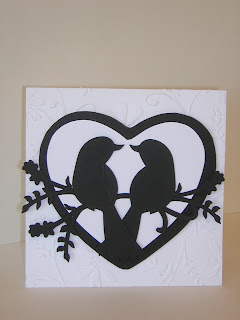

Ok....this card has been sitting on my desk for a couple of days now. It seems that something is missing. What? I have NO IDEA!! I have tried to put something in the lower right corner, but then it looks too crowded. I have tried to add the dreaded ribbon. WAY too crowded. I even went so far as to contact Master Yoda (what?!! You don't have a Master Yoda to contact when you get stuck on a card?!! hehe.....) but, alas, being the stubborn padawon that I am, I didn't heed her advice (it just messed with my force connection). Sooooo, I have come to the conclusion that it is in the design of the card itself. I like this idea....just needs tweeking......somehow.
Supplies used: Paper~SU Whisper White and Basic Black
Accessories: Sizzix Big Shot, Bird w/Leaves & Flower die cut, Provocraft embossing folder

So, I'm going to walk away from this and move on to the next REQUIRED project. Think babies. I may even try and do my first tutorial. Stay tuned. You never know what excitement we might encounter on our next crafting adventure!!