Tuesday, August 30, 2011

My Colorful Life

Hey People!  It's time for another installment of the E-Team's series It's Better With Color.  Today the team is featuring Claudine Hellmuth Studio products.

 Of course, it wouldn't be an E-Team ride without some goodies!  Stop by all the E-Team member's blogs and leave a comment for the chance of being one of three winners who will each win a Claudine Hellmuth Mini Acrylic Paint Set along with some other EP goodies.   Then mosey on over to the eP blog and leave a comment for the chance at a $25 eclecticPaperie voucher. We would welcome any comments with tips and techniques using acrylic paints in your projects.  You will have until Thursday, Sept. 1st, to leave your comments.Winners will be announced on the eP blog on Friday, Sept. 2nd. 

ME!


Due to unforeseen circumstances of having to travel out of state this past weekend to attend a family funeral and the massive invasion of ants that are trying to claim my kitchen as their new home, I was not able to complete my project!  I did start playing with a couple of techniques that I can't wait to share with you, but it will have to be at a later date.  Bare with me folks.  As usual, life is moving at warp speed and I'm just hanging on by a thread! LOL!

 I am so disappointed that I wasn't able to participate today as I ABSOLUTELY LOVE Claudine's acrylic paints!  If you have followed my blog for a while, you know that I do some back drop painting, as well as murals and such, from time to time.  This means that I use acrylic paints quite often.  To keep costs down, and because I often am painting on cardboard,  I usually use the small tubes of paint that can be found in your local craft store.  These work just fine generally for these purposes.

BUT!  For my personal art projects I will be using Claudine's paints from now on!  These paints are wonderfully creamy and smooth.  There is no need to shake and mix the paint.  And the coverage is great, with a rich pigmented color.  Believe me, these paints are what you want for your projects! 

Ok.....I am going back to battle the ants (again..........I think I'm actually just feeding the little buggers.  They are having a feeding frenzy around the nice "snacks" that I've laid out for them!! ewwwww.  HATE ants!!)

Thanks for dropping by!  I hope to be back this weekend with my painting projects! 

Till then...................
Saturday, August 20, 2011

Leapin' Lizards!

Happy Saturday People!

Yesterday, I realized (quite belatedly), the the youngest kiddo has a birthday party to attend TODAY.  Somehow, I got it in my head that it was next weekend.  Doesn't matter.  What matters is, I had to come up with a birthday card PRONTO.  Which is a scary thought when my mojo and I are just holding polite conversation with each other versus chatting like old friends.

But!  We managed to come up with this card, that was inspired by the picture of the birthday boy holding some reptile, on the invitation to join him at the local reptile store for his party.

So help me if my kid starts begging for another reptile.  Been there, done that.  I do NOT miss hearing crickets chirp at all hours of the night, nor do I miss finding the escapees throughout my house. 

Anyhoos!  I digress!  Here is the card that I came up with!


I bought this lizard stamp years ago at a little stamp store in Santa Fe, New Mexico.  I bought is purely for the fact that the wood mount has the imaged carved onto the block!  It is a showcase of craftsmanship!  I didn't care if I never used the stamp.  The carving is an incredible piece of art.


See what I mean?!  I can't imagine the time it took to carve this incredibly small detail!

I stamped the image with Memento Rich Coco onto a left over piece of paper that I had done my version of Wrinkle Free distress. This means, I have NO idea what particular distress inks were used.  Or what Glimmer Mists I used.  I think that Antique Brass was one as some of the shimmer looked brassy.  I then had to fussy cut the lizard.  It would seem that someone really didn't plan the angle of her stamping correctly!  shhhh.  I think that might have been mojo.  But, heaven knows!  I don't want to tick her off by mentioning it!

The lizard was then adhered to another Wrinkle Free sheet that was Pure Luxury white based.  The inks that I ended up using were Distress Frayed Burlap, Weathered Wood and a touch of Shabby Shutters.  I spritzed the ink with a combination of Tattered Angel's Glimmer Mist in Antique Brass and Patina.  I then roughly sponged around the edges with Distress Walnut Stain.  I then ran the background piece through the Big Shot with an old Fiskers Leather texture plate, to give a subtle texture and added dimension.  The lizard was attached with a combination of Scor-Tape and a Quickie Glue pen (for those little toes).  I used my Copics, B45, C1, C3, to add some more shading around the lizard to make him pop off the background a bit more.  The sentiment is from SU's, It's Your Birthday.  I did some masking to have the words layered versus in a straight line as the stamp is.  The whole shebang is attached to a Ivory Pure Luxury 5 1/2" square base. 

That's it for me today!  But!! Before I leave, I wanted to remind you all that you have until tomorrow, Sunday, August 21, to add your creation to to the Egg-cellent E-Team challenge! 


 You don't want to miss the chance at a $40 gift certificate to shop all the new goodies that Daisy has in the eP store!!

'Till then..........................


Wednesday, August 17, 2011

Stamping and Metal

Hey People!  Can you believe it is Wednesday already?!  The family has been running around getting the last details ready for the kiddos to start school tomorrow.  I would swear that we just got out for the summer just days ago!!

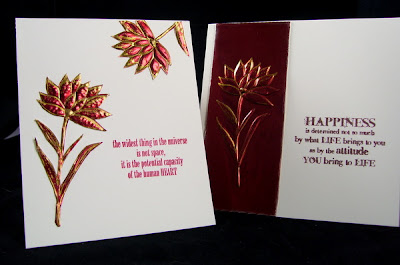
Have another tutorial to share with you today!  Beate, from Splitcoaststampers, asked me to do another Wednesday tutorial using metal.  Now, what is seen in the tutorial is NOT my original idea.  It is just my version of a very common technique!  Because I am lazy, I am not going to do the step by step here.  I'm going to send you to the home page of Splitcoaststampers for the link.  I will share the picture of the project and the youtube link here though!!


I used my stamped images two different ways today.  Both cards followed the stamping and metal instructions the same.  For my first card, I just cut out the stamped images after the backing paste had dried and I used them as metal embellishments for my card.  The second card keeps the stamped image on the metal panel. 

Here is the video of the technique


Ok.  Seriously.  I must have ticked off the technology gods sometime recently.  NOW Splitcoaststampers is also down, so I can't link to their site! 

What type of offering do you think the technology gods like?  Insert a looong, heavy sigh here_______.

Supplies:  Both cards use Pure Luxury Ivory cardstock as the base.  Both cards use Wendy Vecchi's Be Happy, Make Art stamp set.  Stazon Metallic Gold was used on TenSecond Studios Barn Red metal

If you are not inspired to emboss your image, just stamping on the metal is a fabulous look too!  I especially like the metallic Stazon on top of the metal.  Very rich looking!

I hope this inspires you to try combining your stamps and metal.  'Till then..............explore some type of creativity today!!

Friday, August 12, 2011

Egg-cellent Challenge

Hey People!  Today the E-Team is introducing a new challenge that will be open to YOU to participate in! 

Have you ever watched the Food Network show Chopped?  The premise is 4 cooks are given a basket of ingredients (some that you would NEVER think of using or combining) and are given 30 min to come up with an appetizing dish that uses the required ingredients.  After each challenge, the "chef" who does not meet the requirements is "chopped" from the competition, until only one winner is left.

Daisy has issued as similar challenge to the E-Team and YOU!  We are inviting you to join us in this new challenge!


It's an Egg-clectic Challenge!!


To enter, you must use the following 3 materials in your project. 

Any die from any manufacture of die cut machines
and an egg carton


Link your project to the eP blog any time beginning Friday, Aug 12 until Sunday, Aug 21st.  A challenge winner will be chosen and posted on the eP blog Monday, Aug 22nd.

Of course, there is still the chance for other goodies!  Just leave one comment, starting today, Friday, Aug 12 until Sunday, Aug 14, on the participating E-Team member blogs and two random winners will be chosen to win some of the new 6x6 paper pads that have arrived at eP PLUS some more surprises!  The winners will be posted on the eP blog on Monday, Aug 15. 


The E-Team
Me!
Linda L couldn't join us this week.  But make sure to stop by her blog and see what she has been creating!

Ok!  Onto my projects!  Yes, I created two projects, using the same layout and techniques, but one masculine and the other feminine. To be honest, I had grand (dis) illusions of creating something "outside the egg carton", but it would appear that my mojo and I could not agree on the trial attempts.  So, I decided to keep the frustration levle low and make it simple. 


I began by misting the lid of a cardboard egg carton with water so that I could pull off the top couple of layers, removing the writing.  I then heavily misted a portion with Tattered Angel's Tattered Leather Glimmer Mist and Antique Brass Glimmer Mist.  I used Spellbinder's Classic Diamonds Nestabilities to cut my shapes and then ran the diamonds through a Cuttlebug embossing folder.  Here is a close up that (kind of) shows the glimmer and texture a bit better (I hope!)


To make my background, I used my favorite technique of Wrinkle Free Distress, randomly wiping Distress Inks in Weathered Wood and Brushed Corduroy along my craft mat and misting with more Tattered Angel's Glimmer Mist again in Antique Brass.  I then laid a piece of SU's Textured Very Vanilla in the beaded up inks.  In real life, the glimmer makes a subtle shimmer, that is not too obvious to be used on masculine cards.  The edges were sponged with Brushed Corduroy and then I just swiped the very edge along my Walnut Stain ink pad.  The sentiment, from Tim Holtz's Just Thoughts, was stamped with Walnut Stain.  The entire panel was then matted on Basic Black card stock and adhered to a 5 1/2" square base of Pure Luxury Ivory. 

The die cut diamonds where then mounted on a piece of basic black card stock that was misted with Tattered Angel's Pearl Glimmer Mist.  A thin mat of the textured Very Vanilla behind that finishes off the strip. 


And for the girly version:


Exact same technique, Wrinkle Free Distress, for the background but this time  I used Distress Inks in Victorian Velvet, Scattered Straw and Wild Honey. The mists used to bead up the inks were Tattered Angel's Glimmer Mist in Tuscan Sun and Cherub Pink.  The sentiment is from the same set, Just Thoughts, and was stamped using Vintage Photo Distress Ink. 

I left the egg carton the original thickness with the writing on it for the butterflies (cut with the Mini Butterflies die).  The butterflies were again heavily misted with Tuscan Sun and Cherub Pink Glimmer Mists.  I customed colored the 1/2 back, self adhesive pearls with Copic marker


The green card stock is SU's Kiwi Kiss.  The panel under the butterflies was stamped with Versamark, using the large stamp from Wendy Vecchi's Art Colors Life set.  Another misting of Pearl Glimmer Mist was applied for a bit of shimmer.

Simple, yes.  But think about it, eggs are pretty simple too, but can be the focal of a recipe!  I think these egg carton embellishments add that extra element that makes this simple sketch pop!

I hope you will join along and play with this Egg-celant Challenge!  Here's the positive on joining...you might win some goodies for your effort without having to worry about getting CHOPPED!!  hehe


Saturday, August 6, 2011

Wedding Vows

First, let me just say, that it never ceases to amaze me how people I have only met in the cyber world are so willing to share, care and be there!  I really appreciate the comments and encouragement about my hum-drum state of creativity of late.  I'm still not sure that my mojo is back, but I'm forging on ahead!

This weekend we have a wedding to attend.  The time frame didn't allow for me to wallow in despair about my absent mojo so this is what I came up with.

The card base is Pure Luxury Ivory (vanilla) in a 5 1/2" square.  A small black mat frames the computer generated poem that was printed on SU's textured Very Vanilla card stock.  The doves where re sized from the doves that were on the hand made wedding invitation.  They were traced onto more textured Very Vanilla card stock, offset onto some black card stock and misted with Tattered Angel's Pearl Glimmer mist.  The bottom dove is slightly smaller than the first dove and is adhered with dimensionals. 

The flourish pearls were cut to fit the design.  I'm sorry, I can't remember which company these come from and I'm at my in-laws borrowing their Internet and don't have the supplies with me. 

To be honest, I'm not completely thrilled with how the doves look, but!  I made a card!! It will fit the bill without embarrassing me (I hope!)

HEADS UP:  Friday the E-Team will reveal a new RIDE for you all!!  I think it is going to be the HIT OF THE SEASON!  Stay tuned......


Wednesday, August 3, 2011

Catching Up

Hey People!

I know it has been forever since I've posted. Tonight I thought I'd take a bit of time and update (aka giving my excuses) as to what has been going on in my prolonged absence.

Missing Mojo

While I have experienced my mojo taking a break before, I have to admit to a growing dismay and fear that my mojo has moved permanently and has no intention of sending me a forwarding address. I don't know if it is the climbing temperature, the fatigue of fighting the never ending ant invasion in every room of my house or the restless thoughts on creativity, being an artist versus being artistic (more on this in a bit) that have caused my mojo to up and leave. I do know that the old trick of getting out some supplies and letting things flow has only resulted in extreme frustration and the ruin of several sheets sheets of my favorite metal and card stock.

Thoughts


Recently, I have been reading about people following their dreams and taking the leap to make them a reality. In the absece of my mojo, I've been giving a lot of thought regarding what it means to be creative, artistic or an artist, as I feel they are all different, yet, each can be an integral part of the others.

While I will admit to having some artistic ability, I don't think that makes me an artist. I can draw and paint, yet I lack the skill to create from an image in my mind. I have to look at visual prompt in order to be able to create my version. Whether this would change if I devoted time and effort to refine those particular skills, I don't know.

I know I have the need and desire to create and I am drawn to various mediums of creativity. Yet I sometimes wonder if the lack of devotion to a particular medium is preventing me from reaching a higher potential in my creativity. Or is the lack of my potential due to the fact that I have yet to discover what medium of creating reaches my soul in a way that I'd risk all because I'd be unable to live without the joy and fulfillment that could only be met through that medium?

Lots of thoughts. No answers. But I've bought supplies to try some new things as I'm willing to keep exploring creativity. Maybe I'll discover the artist in me yet!, LOL!

Computer Issues

I've yet to find the time to sit on hold to figure out why my computer won't connect to the Internet. I had every intention of completing that task today. But time slipped away. So posting is still a bit of a chore since I'm utilizing my phone. But since I do enjoy connecting with all of you, I'll just have to figure out another block of time to get that done. But I have to say, that it has been good in the fact that I've spent more time hanging out with my boys in the evenings, versus us all connecting to our choice of electronics. And
that has been worth the disconnect.

I think that is about it! I am interested in hearing how you all deal with missing mojos, and what dreams you have, that you haven't quite taken the leap in making a reality and how you deal with that also.

Till then............if you see my mojo, would you tell her that I'd be willing to stop the deep thinking and be happy with what she has to offer if she would move back home? Thanks.