Friday, February 27, 2009

Hit by a Semi

Ok....not literally. In reality, on Tuesday I got hit by the cold/flu bug that MADE me feel as if I had been hit by a semi truck. I started trying to overdose on Vitamin C and see just how much water a person can consume before floating away. Even took a two hour nap in the afternoon (which is usually a death sentence for sleeping that evening....NO PROBLEMS!). By Wed I just felt like I had been beaten up by bat welding thugs (a HUGE improvement!). Thursday, almost human. Today, I have a nice painful cough, but overall, I think I can pass for a human being again.

That all aside, I have a CAS (clean and simple and even better yet~~QUICK) little card to share. I made this for a customer/friend who I kept neglecting to send a package too. So, I included this stamp set in the package. I had only used it once (maybe) and it was in my pile to "get rid of".
I still had/have my stuff laying out from my workshop so I just used scraps to put this little card together. This is a little 4x4 card (I think....to be honest, it is in the mail and in my medicated addled state, I forgot a lot of details on this little guy! YIKES!! scary that I'm in charge of getting kids to school in this state of mind!! For the life of me, I cannot remember the name of this stamp set either. It had four stamps this same style.....if anyone remembers the name, let me know and I will edit it in). *ETA: the stamp set is Wishing You the Best (thanks Amber!) The card base is SU's Kiwi Kiss with a light sponging of Old olive on the white and along the edge of the scallop. There is some paper piercing in the top corner that is hard to see. The scallop was made using SU's scallop circle punch and the center image was punched out using the 1 3/8" circle punch. The scallop and the center image are both on dimensionals. A little ribbon and it's done!! Wah~lah!!
I'm soooo glad it is the weekend (almost). I hope to finish cleaning up my workshop mess so that I can just mess up my space again with creating something new.....wink!
Have a great weekend and thanks for dropping by!

Tuesday, February 24, 2009

Inspired by Textures

I'm BAAAACK!!

I got some new toys this past week, just in time to try and come up with an idea for a workshop that I had this past weekend. Wellll, inspiration was only part way there. I knew I wanted to use SU's Inspired by Nature and was hoping to use my new texture plates. The problem was, I couldn't come up with a layout idea. So, once again, I turned to Splitcoaststampers to find the answer. And what a beauty I came across!! My card was inspired by this card by Dawn, a.k.a TreasureOiler on SCS. Now Dawn is a Dirty Girl Alumni, so of course my inner wanna be Dirty Gal was drawn to her card, hehe!!

I didn't want to try and figure out the frame for this card as this was going to be for a workshop that consisted of a couple of gals who really haven't stamped. I took Dawn's basic layout and color scheme BUT I didn't have any designer paper that would wow. So out came the texture plates. BUT~ not enough "pop" for me. So I played around with an idea. I took my ink pad DIRECTLY to the texture plate then embossed. YES!!!! It mad the subtle texture POP!!! (insert major happy dance here________!!!) Now, someone else may have already come up with this idea, but I haven't seen it used yet. And I love the results. This is the card that we madeDidn't this turn out GORJUS?!! (I hate trying to type accents btw!) This was just perfect for what my gals wanted to do!! Supplies used: Paper: Kiwi Kiss, Whisper white. Inks: Old Olive, Basic Black, Pink Pirouette. Accessories: Big Shot, SU Butterfly die, Textures plate, Pretties kit, Paper piercer, sponge daubers, grosgrain ribbon, glue dots, stampamajig, scalloped edge punch
Now here is here the only bummer deal about this card: the image pretty much covered up all that LOVELY texture. So, today I played around with another idea. Here is that result:

Let's just pretend that I'm Jan Tink for just a moment (yes, I know that this is REALLY pushing the envelope, but imagination is always good for the soul!!) ISN'T THIS JUST GORJUS!! YILMS!! (yes, I love myself too, right now! hehe)
After several tries at using the inkpad directly to my texture plate and getting kinda streaky results, I used my BRAYER (major lightbulb moment!) and got rid of the streaks. BUT!! There is a catch to this technique: you have to be VERY, VERY careful when you put your paper down on your inked plate. It it slides, even a teeny, tiny, itsy bit, you will get small smudges on your embossed area (ask me how I know this! Just don't ask how many times it took to get this section! hehe). But the effort is SO WORTH it!! This is a PERFECT technique to make your own FABULOUS designer paper!! It is just lucious IRL!! (ok, before you fear that my head may blow from all this self congratulations: let me put that to rest right now. Somehow, over the 30 min that it took me to tie that ribbon on this card, my sentiment slipped up a bit from it's original position. Then I realized that my cut edges are frayed as I need to replace the blade on my cutter. So, this card is NOT perfection, BUT IT'S DANG CLOSE BABY!!! lol) Supplies used: Paper: Very Vanilla, Chocolate chip. Inks: Chocolate chip. Stamps: SU's Warmest Regards. Accessories: Big Shot, Texture plate, brayer, scalloped edge punch, paper piercer, Spellbinders die cut tag, sponge dauber, ribbon.
Thanks for stopping by! If you decide to try this technique, please link me your creation! I would love to see what you do with this idea!!

Confused, Majorly

Have I ever mentioned that I'm totally a ditz when it come to this modern technology of computers? Don't understand the lingo, am always afraid that I will click the wrong button and blow my computer up ('cause the couple of times my computer has blown up, I'm pretty sure that moi had something to do with it!)

Today I tried to add a FeedBlitz subscription link to my blog. OoooooKaaaay. Thought I had it done, but then it got to the place where it said it was FREE for 30 days then I would pay depending on the use. Now~~everyone else I've talked too says that they don't pay anything. Which leads to to the following conclusions:
1) I was totally trying to sign up for something else
2) This is a new "feature" from FeedBlitz and since I'm the last on to get on the blogging wagon, I'm the one who is going to pay for everyone else (snort)

Sooooo, sorry. If by chance you were wanting a subscription link.....as of right now, it is not going to happen. If/when I ever figure out if I was doing something wrong, I will attempt to do add a link again. Until then, you will probably have to do what I do. Add me to your favorites and just click as often as you have time!

I will be back later with another ACTUAL creation to share

Monday, February 23, 2009

Come Sail Away

"Come Sail away, come sail away, come sail away with meeeee......" (anyone care to join me in a Styx flashback?! Yeah, this will date me!)

This is the other "STAR Baby Wish book" (hmmm.....not sure I like that....gonna have to keep working on a name for these little puppies) that I did for one of the teachers at my kiddos school ( for those of you who may be just joining in~her daughter/daughter in law are due a couple of weeks apart and she asked me to make some guest sign in/best wishes books when she saw this book and this book for the two teacher's who are expecting SOON!)

This book looks like it should have been EASY PEASY to make. NOT!!! I think I just stressed out way too much over the fact that I only have the flannel plaid background stamp and I really was wanting a more "finished" plaid look. I finally managed to kick myself in the rear and moved on. Here is the inspiration first of all


Very clean and crisp looking. I think clicking on the picture will give you a larger picture in order to see the different plaid details (hmmm....may need another kick to remind myself that I've moved on from that sticky point).
Here is the results:
The cover was done trying to make the quilt pattern.


Inside pages obviously keep repeating the theme. Like I said, this should have been sooo easy to put together. But I also kept trying to add in another blue, like the quilt. Finally got it thru my thick skull that three shades were enough (but of course, I have several other shade "squares" stamped with the flannel);


That's it for that trip!! (Maybe I should have chosen the Gilligan's Island theme song instead....A three hour tour that turns into a much bigger deal! snort)
Supplies used: Paper: SU Whisper white, Bashful blue, Gina K's pure Luxury 120# in white and Prism dark navy CS (sorry, forgot to note which one I finally settled on...I had about three different shades in my cart at one time) Inks: SU's Not Quite Navy, Accessories: Quikcuts sailboat, Sizzix Big shot, tomobow multipurpose adhesive, Zutter's pink Bind It All, white 3/4" owires

Thanks for stopping in. I have a REALLY COOL discovery that I made on my next card to share with you!!

Thursday, February 19, 2009

So You Wanna Be a Pop Star?

(My apologies to the band Cyprus Hill for the butchering of the title of their song.....) *ETA: if by chance you know of Cyprus Hill's song "So you wanna be a Rap Superstar (I think that is the title) I would like to protect my innocent reputation by saying that I only have heard the *modified* version and will deny to my deathbed of even knowing there was another version out there. (hehe)

I think that I should consider going into the "Congratulations/Best wishes/Baby shower guest book business (if anyone can come up with a catchy name for these books, let me know. My brain is stalled on this one). I was asked to make another two books for the daughter/daughter-in-law of one of the teacher's at my kiddo's school. Soooo, being the original thinker that I am, I just took the mommy-2-be's nursery sets again and made the books. I'm going to be a stinker and only post one right now (hehe....I NEED to have something to post tomorrow or this weekend and drat it all!! I've been having to work and have not been able to create something new in the last couple of days!!) Soooo, without further ado....may I present the Pop Star collection:


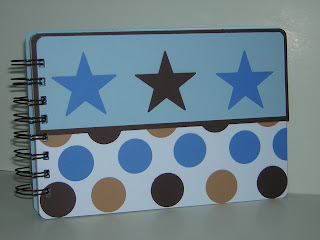
The diaper bag was the inspiration for the cover of the book. Then I just used the collection for ideas on the inside pages. And here is the book itself.


Pretty much a CASE (copy and share everything) of the diaper bag.


I had ordered the Spellbinders Star nesties for this project but they haven't arrived yet. I ended up buying the Sizzix Stars #2 die for this (at JoAnne's...ON SALE!! hehe) and low and behold!! My SU star punches worked great for layering on these dies, which gave me several nesting/layering options (kinda wish I hadn't ordered the Spellbinder ones now...I could have ordered someting else instead, but! OH WELL!!). The rest of this is pretty straight forward as to the supplies except for the white paper....found out that SU's whisper white is NOT great for the base paper over the chipboard. It is too thin and shows the "glue" lines. I ended up using Gina K's 120# luxury paper (LOOVE this for coloring, btw). Supplies: Paper: Gina K's 120# Pure Luxury, SU bashful blue, creamy caramel, chocolate chip and brilliant blue. Accessories: SU Small board basics, Sizzix Stars #2, Big Shot, Su large and small star punch, SU circle punches 1" and 1/2 ", SU corner rounder punch, Tombow multipurpose glue, Zutter Bind it All, 3/4" owires.
Stay tuned as we sail away for my next project!

Wednesday, February 18, 2009

Star Candy

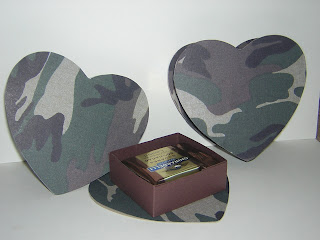
Soooo, remember how I told you that I have two boys and Valentine's Day is kinda "iffy" around here? I mean, if you were 8 and 11, you would hate for anyone to think that you LOOVED all that mushy/gushy stuff (that is sooo girly!!). Well, along with the iPods that I made, I also decided to make my own See's candy boxes. Only these are Star Candy boxes (filled with Ghiradelli chocolates.....yummmmy!!)
(GREAT!! Just noticed that the chocolates are upside down....does it really matter? I'm actually shocked there was still chocolates left in the box. Someone has replaced my child with an alien. No child of mine would have uneaten chocolate left over three days after Valentine's Day!)
Pretty cute, huh?! Now, DH totally didn't get these. Here is a bit of our conversation regarding this project:
Me: Sooo, what do you think? Pretty cute, huh?!
DH: Uhhh, wouldn't it have been easier to just buy a heart box of candy and just cover it with
the paper?
Me: (disgusted sigh)....Yeah, probably! But then the BOX would have been some shiney red
thing and wouldn't have matched. Plus, I MADE this. From start to finish....that makes
it more special.
DH: I still say it would have been easier just to cover a box already made.
Me: Guess we know who won't be getting one of these then, huh?!

How I made these: I used my trusty heart shape cookie cutters (I did order the Spellbinders heart nesties, but they were too small for what I was wanting done!). Since the dp was so thin, I taped it to SU chocolate cs and then traced my heart. Figured out what size box I would need to fit the middle of the heart and then made the "lid" 1/8 larger. Easy Peasy!

O.k....I will admit....these didn't get completely done. I had this WONDERFUL idea to add "dog tag" bling to the cover. Figured out how I was going to make "faux" dog tags and attach them with some links. Didn't have the links. No problem~I needed to run to Michael's anyways. ONLY THE MOMMY MUSH BRAIN TOOK OVER and I forgot to go to Michael's!!!! (got side tracked at my LSS!). Oh well. Somehow I know that my boys really don't care that these don't have bling on them. That is just the "dirt pile" wanna be girl in me who knows that this would have been a "AWESOME" candy box vs "my" candy box with the bling. But there is always next year ('cause you know that these puppies are gonna get saved in my project closet and get reused!! BWHHAAAA!!)
Supplies used: Paper: Camo~from Michael's, SU chocolate brown, Accessories: my ever trusty heart shape cookie cutters, red liner tape

Monday, February 16, 2009

So Fired

I am sooo fired!! (haha...that is the fav saying at the office by the 20 something girls I work with. I'm hoping if I start talking the lingo, I'll become a hip 40 something. BWHHAAAA!!)

ANYWAYS! The personality in charge of my schedule REALLY messed up this week. Somehow she said that I would work today (Monday, a holiday) and 1/2 day Tue, made the "works" hair appointment for Wed and then said I would work all day Thurs and Fri. So what, you say? I work full time every week. But here is the kicker for me. That dang Martha Stewart wannabe said she would make another two "best wishes/congratulation" baby shower books for this coming Sunday. AAANNNDD had the bright idea of having a workshop (I'm slightly above a hobby demo for Stampin'Up....just slightly) also this Sunday. Guess who has NO idea of a project for that?! I do have the books done, but need to bind them (soooo, if the sun ever comes out again before this weekend, I will take pics and post).

I do have a cheesy valentine's project that I did for my boys too. Again, that would require that the "secretary" pencil in a time slot for me to take some photos.

Oh yeah. I also said I would try and figure out how to add a subscriber feed to this here blog. Sooooo, looking at my calendar.....I have a couple hours tomorrow and Wed am to get all this stuff done. No PROBLEMO!!

I'm soooo fired!

Thursday, February 12, 2009

To Teach is to Touch Lives....

..........and come in contact with lots of kiddo germs!! BWHAHAAA!! So, for the teacher valentine gift, may I present, HAND SANITIZER with a lovely altered bottle?!!
Once again, I wish I could take credit for this project, but alas!! NOPE!! I "borrowed" it from here:

(DH keeps telling me that there are no "original" ideas, just adaptations of the ideas already born....going to keep telling myself that since I haven't had an original idea in a while!!(snort)
Once I figured out what I wanted to do this was easypeasy (yeah...I first had thought of doing smaller scalloped circles in two different shades....then it just seemed like too much work. But, of course, I didn't decide that until after cutting out several small scalloped circles first (insert major eye rolling here_________). I used a Spellbinder large scalloped circle in my Big Shot, then did direct to paper with my ink pad to give it some "leaves". Tree trunk is hand drawn with some DTP (direct to paper) and squiggle lines. Used my cuttlebug/apple/book die for the apples and leaves (yeah~those little, tiny, ittybitty leaves were put on there by hand!! Can we say "fine motor skills required?!"). The sentiment was found online and printed out on my computer (and I just cracked myself up with the irony of it!!). The "grass" was just hand squiggled (the word for the day) and cut out. Everything was adhered with red liner. Added a little twine and WAH-LAH!! A cheap (and now quick) teacher gift!!
Supplies used: Paper: SU Gable Green, Close to Cocoa, Real Red. Inks: SU's Gable green classic ink and Chocolate chip marker. Accessories: Spellbinders large scalloped die, Sizzix Big Shot, Cuttlebug (machine and apple die), red liner tape. sponge daubers

Wednesday, February 11, 2009

OOPS!! My BAD!

Sorry, I forgot to add a link to the FamilyFun site that has the directions for the iPods (plus lots of other ideas)
http://jas.familyfun.go.com/crafts?page=CraftDisplay&craftid=12116

LOOOVE this magazine and would highly recommend it. Each month has lots of ideas and I can usually find something to adapt for a party.

Rockin' Friendships

My boys are 11 and 8 and Valentine's Day is kinda "iffy" around here, especially the Valentine gifts given in the classroom. I saw this idea in Family Fun magazine and modified it some to fit my boys's personalities better. I have made a total of 30 of these and overall am very pleased with how they turned out!

Pretty clever, eh?!! (It even got a "COOL, can we have one too?!" from my boys).
This is a SweeTart candy box covered with SU basic black or pixie pink (depending on boy/girl) paper that was scored and taped with red liner. I printed off the circle from the FamilyFun web site multiple times and made a template sheet. The "grey" menu button is a 1/2" circle punched out on going grey paper (the grey faded when printed). The PlayList was made on my computer (as the FamilyFun list was a little too "Valentiney" for my boys). I took the songs off of my oldest's iPod, so figured that the songs were "cool" enough. The "ear" buds are Reese's miniture PB cups covered in tin foil.

Now I did make some mistakes and will share those with you so that you won't suffer my frustrations:

1) You cannot cut layers of tin foil in the Big Shot. It FUSES the layers together
2) Nylon string is USELESS!!!! UGGHH!! It frays when cut, it does not hold a knot and overall is just FRUSTRATING. I ended up giving up on tying knots and hope that the tape job will hold. I tried splitting the string to make the two sections of the ear pieces, but that didn't work either.
3) Different brands of the SweeTarts/SweetHearts boxes are different sizes....make sure you don't cut all you paper the same for different brands. I made two different templates for the two different brands of candy that were used.

Ok....still need to finish my personal valentine gifts for my boys and make a card for DH (funny thing, he won't let me just buy him one!! snort)
Supplies: Paper: SU Basic Black, Pixie Pink, Whisper White, Going Grey. Accessories: computer generated menu and playlist, 1 3/8" circle punch, 1/2" circle punch, Spellbinders LARGE circle die, Sizzix Big shot, tin foil, string, SweeTarts candy and Reese's PB miniture candy cups

Monday, February 9, 2009

And the Sleet has turned to Snow

I know that many of you live in snow and it is a "so-what". I grew up in snow (lived the first 16 years of my life in Wyoming, then Colorado and the first two years of collage were in Nebraska....so I do know what it is like to live in snow!) But, we RARELY get snow in our little corner of Southern California (and let me just say that is FINE with me!! hehe)

Here is some pictures of my back yard taken just a couple of hours after the sleet pictures. Like the lake that is my kid's playyard? The ground is saturated, but we need it. The snow is that real wet, slushy snow. Not too worried about the roads (yet) as the ground is too warm for it to freeze into ice (at this point anyways!)

It Never Rains in So California

IT POURS SLEET instead!! Just snapped a couple of pictures of what the weather is like in Southern California today. The fountain is in my courtyard. Now, this will tell you how much rain we've gotten over the last 4 days~~the fountain was empty (it needed to be cleaned and that was one of those jobs that I never got around too!) Now it is almost full and has a nice layer of sleet on top.


And a look down the street and to the side. I think that I'll wait to take the poor cooped up pooch for a walk! I'm likely to land on my can!!
There is still water running down the gutter (which will make for some fun driving tomorrow morning, I'm sure). My camera didn't capture the sheet of sleet (try saying that fast 5 times!!) that was falling down. Think I'll go start my fireplace!!

Saturday, February 7, 2009

Another Cupcake

Just sneeking in to post another cupcake card that I did yesterday while all the supplies where still on my desk (I'm suppose to be cleaning the kitchen from the pancake mess that was made!!). I think I like this one better!
Supplies: Paper: SU Whisper white, real read, chocolate chip. Stamps: SU It's your Birthday, Accessories: Quikutz cupcake die, Cuttlebug swirl embossing folder, liquid applique.
Quick, CAS (clean and simple) and one that I think I will use again (notice how I did the "frosting" the same way? Yeah~~~liked that "AH-Ha"!!)
Have a great weekend....Hoping to work on some family valentines tomorrow (yeah, I know. Nothing like procrastination to get you creating!!)

Friday, February 6, 2009

Making Cupcakes

WHEW!! Today I decided to use the Limited supplies challenge on Splitcoaststampers to get me going on a birthday card that I need for a 7 y/o girls party tomorrow. While I was at it, I thought that I would try and use the sketch challenge for this week too. SHEESH!! I need to do the challenges more often. This card took me FOREVAH!!! (and even tho it has some "AH-HA" moments on it....I consider it only ok....just doesn't have that "wow" punch that I was wanting. But! I have to remember that it is for a 7 y/o girl and will most likely end up in a drawer (or~gasp! The trash can!)

I had borrowed the Quikutz cupcake die from my wonderful friend (and have one on order now) as the girl's party is a "cupcake" party theme (going to decorate cupcakes....and such). I used my cuttlebug swirl embossing folder for the frosting then traced around the swirls with Liquid Applique (one of my "AH-Ha" moments). The other "AH-HA" moment is the candle. Yup!! That is a real candle there!! I tried to color it to match the pink but that didnt' work. I shaved off the back to flatten it and used Art Glitter designer adhesive to put it on. Now, the cupcake is one some major thick dimensionals that I have had in my stash for years!! Here is a side view, but it still does not show the dimension as seen in person
I kinda messed up when trying to stamp the "happy birthday. Uhhh, next time, I'll stamp the sentiment BEFORE having the cupcake adhered!! (DUH!!) Like I said...this one is so-so for me. Like the "AH-HA" moments, not real keen on the whole layout/color scheme. But, overall, ok (so much for that "Dirty Girl" inspiration roll that I was on....back to being a "normal" stamper! haha)Supplies used: Paper: SU Regal Rose, Close to Cocoa, retired SU DP, whisper white and chocolate chip. Stamps: Voila- Happy Birthday(SU) Accessories: Liquid Applique, Cuttlebug swirl embossing folder, candle, thick dimensionals, ticket corner punch, sponge daubers, heat gun, Quikutz cupcake die, Sizzix Big Shot
Thanks for looking!! It is pouring rain here so I guess the house is going to get cleaned!!

Wednesday, February 4, 2009

Wannabe Dirty, Part 2

Since I'm still icing my shoulder from all the self congratulating, I thought that I'd share part 2 of the "this is soooo DIRTY" projects that I did for the baby shower. First, the inspiration piece.And the "Dirty" project~~~This was for the other teacher's "Best wishes" book (who knew there was such a thing! Kinda a cute idea tho. Too bad I didn't come up with it!! hehe)Again, I'm having to ice my shoulder LOTS for this one!! Now, to prove what a "Dirty" genius (cough, snort, cackle) I am, let me share some little details about this particular project.

Ever hear the saying, "It's not what you know, but WHO you know?" Well, lucky for me, I have a friend who also makes cards. But she is not a stamper. She uses die cuts and has a WONDERFUL collection of just about everything possible. Those cute little airplanes are from the die I borrowed from her. I modified the wings some, trying to get them to look more like the fat little wings on the blanket. Now, here is where my inner "Dirty girl" came in. I could not find any type of camo print in my LSS, Target, Michael's. What is a girl to do? Well, lucky for me, I just happen to own (thanks to Melody!) SU's retired Leopard print background!! PERFECT for that faux camo look on this size of project!! GENIUS!! I also used the Flannel Plaid background stamp (may I just say that this confirms my thought that I should keep all my background stamps for those "just in case" moments?!!) Ok....now a peek of the insideAnd of course, I made a card to match this one too.
So, whadda think? Is there a "Dirty Girl" in my future? (BWHAHAAAA!!! Sometimes I crack myself up! WHEW!! That's a good one for this hour of the morning!!hehe) Seriously, I REALLY liked how these two projects came out and when it is all said and done, that is probably the most important thing. Fame might be nice, but being proud of your own accomplishments is probably a much better feeling. Supplies: Paper: SU's River Rock, Cranberry Crisp, Bashful Blue, Not Quite Navy. Inks: Bashful blue, Cranberry Crisp. Stamps: SU's Leopard Print, Flannel Plaid, All Year Cheer I, Papertrey's Trajan Monogram. Accessories: Quikcuts airplane, SU's small star punch, Bind It All (pink) Tombow Multipurpose Adhesive, Zig two way glue pen, stampamajig

Tuesday, February 3, 2009

Meeting My Inner Dirty Gal

If you have never taken the time to visit Splitcoaststampers, you are TRUELY missing out on a treasure chest filled with awe inspiring creations, challenges to get YOU creating and of course, resources for everything. One of the "perks" of joining the Fan Club is that you get to see what the "Dirty Dozen" have created for that month's theme.

Now~let's be honest here. There is a TEENY TINY place in each of us (remember, we are being honest here!!) that would love to be asked to join this team. Here's my reality: Not likely to happen. I have come up with numerous "excuses" as to why I will never be "Dirty" (i.e~don't have the "right" tools, papers, bling, yaddayaddayadda, my cards aren't noticed because I don't do all the challenges, I'm not on any design teams, and more blahblah) But of course, the REAL reason (snort) that I probably will never become "Dirty" is my lack of faithful dedication at this time in my life to creating. And possibly a lack of conviction that I'm capable of creating something that is "Dirty" worthy (I apologize for that one...that was about as hokey as they come!)

BUT!! Every once in a while, I truely LOVE what I've created and think that I hit the "Dirty Gal" level of artistic output (eat your heart out "WannabeMartha!). The following is one such project. Again, this was for the baby shower (this shower and all it's projects are going to give those mom's-to -be a run for their money as far as time invested, hehe). This is a picture of one of the mom's nursery sets. And a picture of the rug that was also inspirational for my creation.


I was asked to make a something that everyone could sign their best wishes and then the mom's-to-be could put them into their scrapbooks. Wellll.....personally, I like my scrapbooks (ok, when I was scrapbooking....) to have a "certain" look, theme, etc. So I came up with this little
beauty instead
Isn't it just PERFECT?!! (yeah, I've been having to ice my shoulder since straining it patting myself on the back!!) For once, I had the PERFECT paper, the PERFECT embellishments and had the PERFECT upline (hi Kerney!) who just happened to have the PERFECT tool (I'm soooo going to have to get myself a Bind it ALL!! I LOOVED it!) to get this done!! Here is a look at the inside pages

And of course, I made a card to go along with it


I REALLY like how this project turned out!! (yup! More ice coming up!!) The card was made by tracing the same chipboard letters (as I only had one "b" in the bunch and that had been used on the book). I loved the dimension of the chipboard on the album and plan on using them more often.
Supplies used: SU's book basics-small, Alphabet chipboard: unknown (been in my stash from Michael's for a while) Papers: SU cranberry crisp, barely banana, certainly celery, brocade blue, My Mind's Eye, Wild Asparagus line "little one" stripe/yellow, Inks: SU's cranberry crisp, barely banana, certainly celery, brocade blue, Accessories: SU's small star punch, ticket punch, photo corner punch, Certainly celery ribbon, Tombow multipurpose adhesive, Zutter's Bind it All (pink one) 3/4 red Owires
Stay tuned for tomorrow's project. The "Wannabe" Dirty Gal isn't done yet!!

Monday, February 2, 2009

Seven Foot Stork Invasion

Remember the baby shower that won't go away? Well here is another little project that I did for it.


All of this was done using the large rolls of paper that every school has to cover bulletin boards. I was asked to decorate the "Pit" area of the school for the shower. To give you an idea of the size of this~the Pit is approximately 9 ft x 30 something ft. Now, it would seem that since this was a fairly simple decorating idea that it wouldn't have taken so long to do. But, of course, things never go as planned!! Originally, I thought that I would take an hour or so and put up the blue background while my oldest son was in his Lego Mindstorm class (something to do with building a robot that will perform certain "missions" during a competition). Ended up pulling staples out of the wall for probably an hour first. Grabbed a couple of 5th graders to help me by holding up the paper while I add more staples to the wall. Bless their hearts, they did try...but 5th graders cannot hold still. At ALL. Sooooo, after removing staples again and re-applying the bottom layer, I found a mom to help me (amazingly, we got the next two sheets up in about the same amount of time that it took for the first sheet! Kids~~ya gotta luv 'em!!). The clouds took another hour and half to "draw" (hahaha) and put up. They are kinda outlined. Kinda.
Drawing the storks was another matter. My wonderful husband has been gracious enough to dedicate one wall in the garage for such artistic endeavors. Seriously, that is a HUGE sacrifice for him, as the "office" (which all my stamping/craft stuff has seemed to somehow made its home) was to be "his" space. Now, all he has is his garage for all his "manly man" stuff. So, for him to give me a wall to practice faux painting techniques or to draw 7 ft storks is a biggie!! Anyway, back to the subject of drawing the storks. I am not one of those type of "artists" that can just draw "out of her head" (and I'm sure it has NOTHING to do with the fact that I don't practice!!). I find several pictures and take bits and pieces and adapt them to make up my own drawings. Fine. Except that the stork that is "taking off" didn't fit in my space (he was horizontal to begin with) so I had to adjust and draw him vertically. Which is kinda scary since I can't really tell if my lines are going to look right once he is positioned how he is really suppose to be (which, as it turned out, was no big deal since he got stapled in a more vertical position).
Painting the storks was done with my vast collection of acrylic tubes of paint (did I mention that SOMEONE forgot to check her supply from the last LARGE painting project? Yeah....let's just say it is a good thing that I don't have a problem mixing multiple shades to get my colors!!) Here's a couple of "close ups" that let you see the details a little better
There is subtle shading done with my copic marker on the storks defining the feather areas and where there would be shading normally, but my cheapie digi camera didn't pick up that important detail!!
Overall, I was very pleased with how this turned out. One of the other teacher's has asked if she can try and take the storks down to be used at her daughter and daughter-in-laws baby showers. Which is just fine with me. I'd like these things to get more use before they are thrown in the trash.
Thanks for stopping by. I'll share more projects for this shower tomorrow! (I still get giddy about how those turned out!! Geesh~~ I REALLY hope that I didn't use all my allotted creativity for the month on these!!)
Starla
P.S.....the baby bottles were a hit too. This same teacher mentioned above took the one's that no one took to be used at her showers. Which is nice. I really don't need them and kinda had a sick feeling in my stomach about them just getting tossed!!