Hey People! The E-Team is gathering again today to bring you another technique hop! Today, the different E-Team members are showcasing Faux Marble!!
Today I'm going to show you several variations on how you can achieve a Faux Marble. I must admit I got a bit carried away with playing!
First up: This is what I call Distressed Faux Marble. Step One: smoosh Distress inks of choice randomly on your craft mat. I just smoosh block and lines here and there. Spritz with Tattered Angel's Glimmer mist until ink beads up. Place your paper (I used Pure Luxury Ivory in this sample) down in the beaded ink. Lift, dry. You have now completed my version of the Wrinkle Free Distress Technique.
Of course it wouldn't be an E-Team blog hop without some blog candy!! Daisy will chose random TWO winners from comments left between today, February 29, until March 2, on the E-Team members blogs. The two winners will receive a $25 eP gift certificate!
The E-Team
Me
Linda L--couldn't play along today, but make sure you drop by and let her know she was missed!
The winner's will be announced on the eP blog Monday, March 3!
OK!! Let's get this Faux Show rolling!!
First up: This is what I call Distressed Faux Marble. Step One: smoosh Distress inks of choice randomly on your craft mat. I just smoosh block and lines here and there. Spritz with Tattered Angel's Glimmer mist until ink beads up. Place your paper (I used Pure Luxury Ivory in this sample) down in the beaded ink. Lift, dry. You have now completed my version of the Wrinkle Free Distress Technique.
wish I could have captured the shimmer!! Drat these dreary days!
Tear a piece of scrap paper. Grab your sponge dauber or stencil brush, a couple of Distress Inks in complentary colors and apply the ink along the torn edge of the paper to your background. Try to avoid making letters with your lines (such as "Y", "T", "K") as they are not natural in marble!!
I used a combination of Distress Brushed Corduroy and Vintage Photo for the lighter brown lines. The dark brown lines are Tattered Angle's Glimmer Mist in Tattered Leather.
I have to say I LOVE how this turned out! I must admit that I stared a this forever trying to come up with a project that wouldn't hide the effect, LOL! Alas, I failed to come up with anything today, but keep an eye out for this, I'm mulling over some ideas!
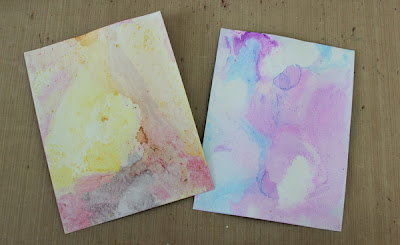
Ok...next version of Faux Marble. Now, this is something that I found on Andy Skinner's blog. He came up with a faux marble technique that he calls Alcohol Floating Backgrounds. His technique combines alcohol inks and water. You can see his video here. WARNING: THIS TECHNIQUE IS VERY ADDICTING!
Begin with a tub of water and some alcohol inks.
Drip two/three drops of each of the alcohol inks into the water
Slip your paper of choice into the water
Out comes some fabulous backgrounds!!
Front side
BACK SIDE!! YEP!! You get two different backgrounds on each sheet!! This lets you choose which side you want to work with!!
Different colors on shipping tags
On Pure Luxury Cardstock
NOTE the middle sample...that one will be used for my project!!
On Glossy Paper
Slight variation. Spritzed glossy paper heavily with water. Applied alcohol inks with ink applicator.
I also did samples with the alcohol ink Snow Cap. It added a cool effect, but I found that on the glossy, it clumped up and then just brushed off once dried. Still a variation!!
For the most part, I could make one sample, add new colors for another sample before needing to dump my water and starting over.
I also tried this technique with some sticky back canvas. I wanted to try to make a background that was complentary to the middle sample seen above on the Pure Luxury. Funny thing, I actually liked the PAPER backing of the canvas better!! haha! And this is what I came up with using the Alcohol Floating background.
This is an 8.5 x 8.5" layout. the papers are retired Stampin' Up (Sorry, I don't recall the specific paper names and will admit that I'm too lazy and too far behind schedule in trying to get this posted!) The main base was scored using my Scor-Pal every 1/4". The backing to the sticky back canvas makes up the second background piece. Tip: Tape will NOT adhere to this backing! I had to put the tape on the black layer and then applied the background. My guess is that if I could pull it up easily. If I was really wanting this to stick, I would use some glue (either hot glue or strong glue like E6000.
The Suzi Blu image was stamped twice with Memento Tuxedo Black ink. I stamped it on a piece of Pure Luxury White and again on the Alcohol Floating background that was seen previously. I paper pieced her dress using the background. I added a very slight bit of shading to her dress and hair with some Copic markers, but deliberately left her body uncolored, as I liked the stark, rather gothic look to her!
The roses were made with more of the retired SU papers. Ok, I felt guilty. I'm taking a wild guess here: Lovely Lilac, Lavender Lace and Almost Amethyste would be my guess on which shades of paper I used. The large roses were die cut with Spellbinder's Spiral Blossom One. The small rose was made from a Spellbinder's Scalloped circle that I just hand cut the spiral to roll. The large flowers were stamped and sponged with Distress Inks in Dusty Concord and Chipped Saphire, using stamps from Wendy Vecchi's Art Colors Life and Be Happy, Make Art sets. The leaves were die cut from SU's Kiwi Kiss using Spellbinder's Foliage and were sponged with Distress Peeled Paint ink. The pearls in the center were made with a Viva Decor pearl pen.
The edge embellishment was cut with Spellbinder's Edgeabilities Classic Ric Rac. The black rhinestones are from Want 2 Scrap nestabling that match Spellbinder's circle dies. I just cut them to fit the area I wanted to place them in.
Close up of the Faux marble on the dress and flowers
I hope that these variations of doing Faux Marble will inspire you to create!!
'Till next time...................


