Hey People! Hope your week has started out well! The Oldest Kiddo's JV basketball team (which is coached by the Toad) had back to back games on Monday and Tuesday but walked away undefeated in league! WooHoo!! Last night's game was an away game and the boys convinced the Toad that they should stop and eat on the way home to celebrate. So, I'm a tad late this morning getting this post up!!
Back in August I was asked by Papercraft Inspirations Magazine if I would consider being a contributor for their Masterclass article in issue 95 (January issue). Let's just say I'm amazed I was able to type Yes, thank you! with all my hootin' and hollerin!!


Back in August I was asked by Papercraft Inspirations Magazine if I would consider being a contributor for their Masterclass article in issue 95 (January issue). Let's just say I'm amazed I was able to type Yes, thank you! with all my hootin' and hollerin!!

I actually had TWO cards published in this issue. Today I'm going to share the Thinking of You card that was highlighted for the technique, versus the entire card.

Supplies Used: Paper Gina K's Pure Luxury Ivory. Basic Grey's 6x6 Sweet Threads. Stamps: Hero Arts Stitched Frame. Inks: Distress Ink Gathered Twigs. Accessories: TenSecond Studios Kiss Me Pink and Poison Ivy metal, mat set, Teflon refiner and decorative wheel.
And as an added bonus, the step by step!!

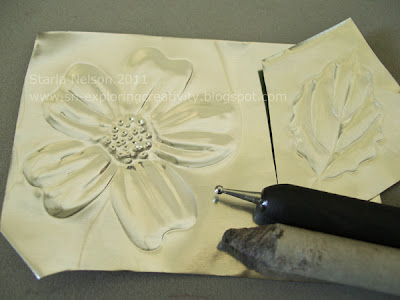
Using Stazon Ink, stamp your image onto the front side of the metal

Place the stamped metal face up on the acrylic mat and trace around the image with the Teflon refiner. You could also use a stylus.

Place the metal stamped side down on the thin acrylic mat. Use a paper stump and stylus (or ball and cup tool) to puff out the image

Still on the thin acrylic mat, use a decorative wheel to add detail

Use the pointed tip Teflon refiner to add "scribbles" between the petal lines

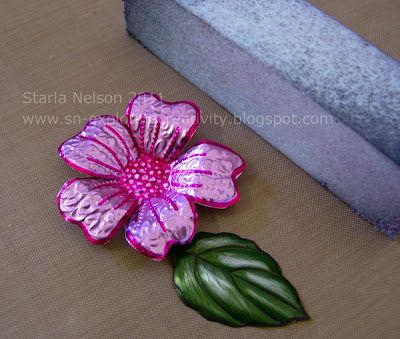
Cut out the flower and leaves (which were done the same up through step #3). Using a sanding block (aka a burnishing block) lightly sand off some of the raised portions on the leaf to give highlights. You could also sand the flower petals to highlight the "scribbles", but I wanted a more subtle texture, so I chose not to sand the flower.

Stamp stitched frame onto decorative paper. Stamp sentiment onto scrap piece of Ivory card stock and distress edges with scissors or distressing tool. Ink edges with Distress Gathered Twigs. Adhere flower and leaves with strong glue dots, Humungo sticky tape or hot glue.
A few notes on the flower: I cut out two layers, but the bottom layer I did not add the decorative scribbles or lines. I liked the look of the contrast between the layers. You can gently form the petal leaves with your fingers to give shape to the flower.
When adhering metal to metal, I like to use E6000 glue, Humungo Killer adhesive (link above) or a hot glue gun. I find that these work best for keeping the metal on metal adhered. For adhering metal to paper, strong glue dots or the Humungo sticky tape work fine.
That's it for me today! I'll be back in a day or so with the SECOND card that was published!! (insert cheesy grin here_________).
'Till then..................
5 comments:
holy moly!!!! this is gorgeous. fabulous tut too. you should have your own magazine! but wooooooo hooooo on being a regular!
hugs :)
Congrats on your published card, Starla! the bloom is lovely and the tutorial on the technique is helpful. I always love seeing what you do with tin, you are so good with it. Have a wonderful rest of you day and congrats to those boys as well on their games.
Congratulations, Starla! I am so excited for you. They would be crazy not to publish you. Your works is amazing. LOVE this card.
Hugs and smiles
HUGE congrats gf! Its no wonder they wanted to spotlight your work. This card is fabulous! So happy for you!
this is stunning. I am NOT buying metal and making this. Repeat three times. If I bring one more single craft item in the house, it may explode. But this is so gorgeous, I feel myself weakening. Whew. And the card is beautiful too.
By the way, your blog cracks me up!!
Post a Comment