Friday, October 29, 2010

The Three Faces of Suzi

 How FUN IS THIS?!! Today the E-Team is showcasing Suzi Blu for Unity and GUESS WHAT?!!  The ubber talented artist herself is joining in on the fun!!  You'll definitely want to hop to each of the team members blogs.  Suzi was asked different questions about her creativity  process, inspirations, favorite tools, etc., and the E-Team is featuring a different one on their individual blogs. 

Starla Nelson (that's me!)

After you've cruised through all the blogs, make sure you leave a comment on the eP blog, letting us know which Suzi Blu set you liked the best. You'll have a chance at winning your favorite set!


Now, for my question of Suzi~

Do you have a place you have visited that really inspires your art?


I always get inspired when I go to galleries. Now not all art inspires me, I have to visit a few galleries sometimes before I find something that gets me excited. Mixed Media is a new art form and it is just beginning to enter the gallery world. When I find a work that is adding layers it always makes me want to rush home and work.

*****

And now for my project!

Raise your hand if you saw Linda's INCREDIBLE project using Suzi Blu's Creative Girl?  Now, try to image the overwhelming sense of "OMG, I was going to use the same image!! How am I suppose to come up with anything that will even be remotely as good?!!

I couldn't.


BUT!! I really like how my project turned out! When I first saw Creative Girl, I knew immediately that I wanted to use metal somehow.  And, with Halloween just around the corner, I started thinking about purples and greens.  And goth girls. 

But I still couldn't get an idea to gel.  So, once again, I called in the BIG GUNS (aka. The Toad).  As usual, he had some creative ideas, just not ones that I had time to take seriously (Toad:  Why don't you do a TOTAL Halloween card?  Paint her up like a dark, goth girl, or vampire type girl.  Cut off her arm and have it all bloody?) Then he came up with the idea to show a Goth Girl and a Hippie Girl. hmmmmm.....maybe!

 I also started pondering the saying around the frame of the image:

I am a Creative Girl.
I have the right to make my mark.
I deserve a rewarding creative life.

And this is how my Three Faces of Suzi came to be (The individual color combinations of the Color Girl and Quiet Girl were chosen by The Toad


The Color Girl


The Goth Girl


The Quiet Girl


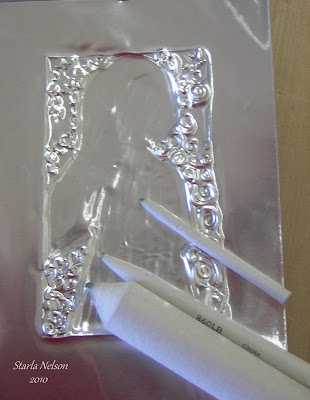
I tried to remember to take some photos along the way to show how I did the metal work. I promise that one of these days, I'll make a more detailed tutorial.   I used a scrap image (I usually stamp new images on scrap paper to play around with different ideas) and traced the portion I wanted to use onto a piece of Poison Ivy metal using a refiner tool.


You'll notice from this photo that I only used a portion of the image, leaving off the frame.  I love the saying around the frame, but it did not fit into the direction that my Three Faces of Suzi was developing!


Then flipping the metal from side to side, I used the refiner and paper stumps to emboss or deboss certain elements.


After I had the image embossed how I wanted it, I used a sanding block to sand away the color from the raised portions, revealing the aluminum underneath.  


You'll noticed that I puffed out the main outline of the girl.  I wanted to lift the actual image from the background when put together.  Puffing the outline eliminated me having to use foam tape to pop the image.

The three images were stamped on Pure Luxury card stock with Archival Jet Black ink.  I used sponges and Distress Inks in Fired Brick, Dusty Concord and Black Soot to color the different tones of hair.  Copics were used to color the dresses.  I deliberately did not do any shading on the dresses.  I wanted to achieve a more stark look to the dresses with just the faint impression of fine pleats.  I was also afraid that if I shaded, my shading would be different enough on each image that it would take away from the uniform look I wanted in all three images.  Each of the heart pendants were also covered in glossy accents (which does not show up in the pictures at all!!)

The images were cut out and matted onto black card stock.  I then used more Poison Ivy metal as my base layer.  All three images were then placed into a frame that had the larger white mat inset.  I debated adding something else to the white mat, but I rather like the stark clean and simple frame around the darker metal and images.  This will hang in my creative space.  Who knows?  Maybe one day I'll get the creative hair to add more too it.  Or just let it be.  Guess it will depend on which Creative Girl is residing at the time!!

Supplies:  Stamps:  Creative Girl by Suzi Blu for UnityPaper:  Pure Luxury (Gina K), Basic Black.  Inks:  Distress Inks in Fired Brick, Black Soot and Dusty Concord.  Copic Ciao markers.  Accessories:  TenSecondStudio's Poison Ivy Metal, refiner, paper stumps, sanding block and decorative wheel.  Glossy Accents and Tombo Mono Metal Liquid Glue.  Other: frame

I hope you have enjoyed all the wonderful projects that the E-Team created along with Suzi Blu!!  Thanks for dropping by again today and remember: 

You are a Creative Individual
You have the right to make YOUR mark
You deserve a rewarding creative life!!

And a very special Thank You to The Toad:  once again you bailed me out!

Till next time.........


Thursday, October 28, 2010

Check It Out!!

Do you remember this FINDING THE JOY card?  (sorry.  I still haven't had time to find all my previous works on the external hard drive since my computer went on strike, so I can't re post the actual picture of the card).  Well, shortly after I made it, Julie Tucker-Wolek, contacted me and asked if she could feature my card on NIKKI SIVILS blog!!

Uhhhh, YAH!!

Well, today is the day!! I'm so excited that my little card is actually featured along with some other wonderful creations on Nikki's blog!! (this is the actual link that features my card!)

Just thought I'd take a moment and toot my own horn (after I get done patting myself on the back!)

I'll be back tomorrow with one of the projects that I've been working on!!  Till then.......

Tuesday, October 26, 2010

Good News/Bad News

Good News
I'm back on the Internet!  The Toad had to take my computer back to the "out of the box" status to do so, but I'm back!!

Bad News: 
"Out of the box" means that all my blog links, favorite sites, etc were lost.  Which means I have not been able to visit other people's blogs

Good News
The Toad backed everything up to an external hard drive

Bad News
Haven't had time to sit down and move stuff back to where I can find it!!

Good News
Been busy being creative

Bad News
Can't share anything yet

Good News
I'm BAAAACCKKKK!!

Saturday, October 23, 2010

The Problem with Technology

The problem with being "hooked" up through technology is that when said technology decides to quit working properly, one either has the choice of having a nervous breakdown because she can't have her daily dose of reading her favorite blogs or take a deep breath and actually spend the time getting much negelected chores done.

It would appear I took a deep breath.

Ironically, it would be my high tech phone that is somewhat saving the day. I can obviousy make a post. But adding pictures to a post is another matter. Somehow, I don't believe my mediocore photography will improve using my phone. Especially since I have no access to basic editing tools to enhance my lack of skills.

The Toad is very much aware of my distress. But he is busy muttering words that I will not share with you in regards to a leaking shower faucet that has decided not to release from the wall. I don't think I will add to the vocabulary lesson my children may be learning.

Till then, I'm cleaning my craft area in hopes that I'll actually be able to share something soon.

If you hear a anguished "Nooooooo!!!!!" later in the day/week, you'll know that all attempts at bringing back my stupid computer failed.

Deeeeeep breaths

Tuesday, October 19, 2010

I am NOT a photographer (sigh)

Hey People!! I'm still around, but life is just crazy around here and is not allowing for much paper creativity.  I have spent the last couple of evenings at my oldest kiddo's middle school varsity volleyball games.  It has been kind of a tough season for this year's team as they only have two 8th graders.  The rest of the team is made of  6th and 7th graders.  There is a HUGE difference between a 6th grader and an 8th grader. But, all the kiddos have improved and have managed to win a couple of games.

My oldest also happens to be one of the editors for the school's elementary/middle school yearbook.  Last year was his first year working on the yearbook and he and the other co-editor (both very involved in the middle school sports program) decided that they wanted to add the middle school varsity sports in the yearbook.  Only one little, itty, bitty problem.  When you are playing the various sports, it is rather hard to take pictures of the sport activities!!  Enter Mom.

Now, while I don't mind taking photos of the various sports activities, there are a couple of problems.  The major one being I only have a point and shoot camera.  One that has a very looooong delay.  Not ideal for taking action photos.  So, being chummy with the computer/yearbook teacher, I asked to borrow the yearbook camera to take photos.   Now I'm trying to take photos with a camera that I have NO idea how it works.  And still having to anticipate the shot as this camera doesn't have the "hold the button down for a continuous sequence of shots" feature. And I have no idea how to adjust for the glaring lights of the gym. But I thought I'd share my (sad) attempts at being a sports photographer.  Because this blog is all about EXPLORING creativity.  And that means trying something new.  And having a really STEEP learning curve.


Concentrating hard on the serve.  Not a strong point in the Kiddo's game


Bump, get ready to set......


Who says white boys can't jump?!! hehe


It would appear that Mom needs to adjust the focus just a tad!!


While these photos have a LOT of room for improvement, I am now making a list of requirements that I would like to have on a SLR camera.  And am open for any suggestions that you may have in this department too! 

And.....I figure that the Kiddo got what he paid for in the photographer.  I'm suggesting that he kick in to the fund for a new camera for Mom so that she can practice a LOT more.  And maybe a new photo editing program would help mask some of the amateur mistakes that Mom made.  Yep.  The Kid needs to pony up some moolah to the "Help Mom be a photographer" fund. 

Remember~~exploring creativity is all about trying something new or out of your comfort zone. 
Till next time............

Friday, October 15, 2010

Rose Parade


Happy Friday People!! Just wondering how many of you tune into the Rose Parade each year?  Can you believe that even tho we live in Southern California, I have NEVER been to the actual parade?!  No parking, too many people, better view on the TV!!  LOL!

BUT! Today the E-Team is putting on our own parade using T!m Holtz's Alterations Paper Rosette Die!! This die is so fun and has so many possibilities!!  And I'd even wager that if paper was allowed on the actual Rose Parade floats, you'd see this die in use!!

I played around with lots of ideas but the one I'm sharing today is my FAVORITE!


I'm seriously considering making this for my Christmas place settings.  Can you just imagine making some dipped cake pops sprinkled with edible glitter and placed at each setting?  OH YEAH!!

Ok...enough about my Christmas decorating!! On with the details of this!!  I pulled out my hoarded BoBunny Snowy Serenade Crystal paper and using my Big Shot (sandwich was the Essentials Platform, extended cutting plate, die (foam up), paper and another extended cutting plate) I cut (2) 2" x 12" strips with the die and 4 center pieces. I did the mountain/valley fold thing and used Scor Tape to connect the two ends. I would recommend NOT placing your tape on one end before making your mountain/valley folds.  Unless you are much better than I am about knowing which way the ends will finish.  Just saying.    The written directions that come with the die are very easy to understand with step by step photos to clarify.  I attached the center pieces on each side of the Rosette.  Then I added some extra sparkle along the edges with some Glossy Accents and Doodlebug Sugar Coating glitter. 

I then pulled out my Spellbinders Create a Flake 1 dies and cut and embossed enough snowflakes from Pure Luxury cardstock  so that I could make the topper and the hanging snowflakes double sided (that way the topper will look pretty from the front and the back!).  After embossing the flakes, I used large sponge daubers to add Distress Ink in Faded Jeans and Broken China to the alternating layers.  I then smooshed the entire flake into my Tsukineko Glue pad and sprinkled more of the Doodlebug Sugar Coating glitter on the top.  OOOOOO!!!    Here is a close up which might give you a little better idea of all the sparkle that this has in real life!! Yes, I still need to upgrade my photo equipment.  Or hire someone with more photography experience!! 


I used some silver cording (retired from SU years ago) to hang the smaller snowflakes off the large topper.  I then used a combination of Scor Tape and glue dots to connect a lollipop stick in the middle of the two large toppers. 

Did you notice the matching base for the topper?  Believe it or not, that was made using the Rosette Die too!! I knew I needed the base to be more sturdy to hold the topper and the truffle/cake pop that the topper would be placed into.  So I taped two 2"x 12" strips of DCWV metallic paper back to back and ran them through the Big Shot with the same sandwich as before.  This is a tighter squeeze with the second layer of paper, but it worked several times with no consequences with my machine! You could cut each piece separately, but then you would have to line up all those little scallops perfectly to tape them together.  I'm lazy!   I had to pull apart the scraps of paper from the cut image a bit in spots, but again, it was no big deal.  Instead of flattening out the rosette completely, I placed more Glossy Accents along the bottom ridges and held it against a 1 3/4" punched circle base made from the same paper until the glue set (very quick).  I then took a 1 3/8" punched circle and adhered it to the inside of the cup with thick dimensionals that I had from past scrapbooking days.  Wah-Lah!! I am now able to make custom cake pop holders for what ever occasion I might need them!!

Now, not that I don't think all of you are worth the effort of making homemade cake pops or truffles, but time did not allow me to go to that effort.  Instead, my "cake pop" treat is actually the tip of a small Styrofoam egg that was painted/glopped with what several different blue shades that I have in my stash of craft paints. I then sprinkled with Martha Stewart's Carrara Marble Coarse Glitter while the paint was still wet.  CUTE base without baking!! Something to keep in mind if time gets crunched!!


Supplies:  Paper:  BoBunnySnowy Serenade, DCWV, Gina K's Pure Luxury.  Inks:  Distress Inks in Faded Jeans and Broken China.  Accessories:  Paper Rosette die, Big Shot with Extender Platform and platesSpellbinders Create a Flake 1, SU's 1 3/4" and 1 3/8" circle punches, Tsukineko Glue Pad, Scor Tape, Glossy Accents, SU's retired silver cording, DoodleBug Sugar Coating glitter, MS Carrara Marble Coarse glitter and lollipop stick.


Just FYI:  some other materials that I was able to cut with this die include:

TenSecond Studio Metal~~by itself and taped to a paper backing.  Again, the double layer sometimes  required some separation of the cut from the paper in a spot or two,  but not a big deal.  Paper snips or just a firm tug did the job each time!

Double layers of paper

I'm experimenting with one of the Toad's old oxford shirts.  The die gives enough of an impression that you can see the perforations and could use the impression to cut around the outside of the die shape.  But I need to see if adding a stiff backing would work better so that the folds will hold.  And maybe cut better.  I'll let you know how that turns out once I have time to experiment more.


Now, you don't want to stop looking here!! Make sure you check out what other inspiring creations the E-Team members came up with using the Rosette Die!!

And Me~

After you've checked out all the eye candy, head on over to the eclectic Paperie blog and leave a comment telling which project(s) was your favorite!  There is going to be a give away with Rosette Die in it!!


Thanks for dropping by again today!! Let me know if this parade of Rosette's inspires you to create something with it!! I'd love to see where YOUR creativity take you!!  Till then~~

Wednesday, October 13, 2010

Lots of Colors and Swirly Things

Hey People!! I hope you are having a great evening! Yes, I'm writing this rather late in the evening.  That would be how life is around here!! 

This afternoon, when I picked up the Kiddos, the youngest told me that it was Mrs. B's birthday today and he had to finish the card he was making her.  He said he told her he would give her "her present tomorrow, for sure, because he didn't have time to finish it today". He described to me that it was taking forever because he was writing "Happy Birthday" in block letters across the entire card.  He then proceeded to pull out the card from his backpack.  And the "OH NO!!!" was one with much dismay! It would seem that the Kiddo, not only shoved the card into his backpack (thus crumpling the card), but he also shoved his LEAKING water bottle on top of it. 

After finishing his homework, he came into my office/craft area and said he needed to make a new card.  I figured he would want to just make the same version, just round two.  NOPE.  He thought that he might like to stamp.  Ok.  What kind of stamp did he have in mind?  Did he want to color?  Did he want flowers?  After a few minutes of pondering, he came up with "I don't want to color, but I want a lot of color and swirls and stuff".  Oooookkkkkaaaayyyy. 

So, I did what any wise mother does when put in that situation.  I pulled up SCS's resource  page and started looking at possibilities!!  And one of the first to jump out at me was the Alcohol Ink Faux Bleach technique that my friend Sherry wrote up.  My kiddo has played around with my alcohol inks before and liked them.  He was very excited when he saw Sherry's example and thought that would be perfect. 

He chose which "swirly" stamp he wanted to use and stamped it with Versamark ink and sprinkled clear embossing powder over it. Then concentrated very hard on melting the embossing powder


Then he chose which inks he wanted to use.  We had to have a sample of different ink colors and then he chose which ones he wanted to use.  I caught myself in time from suggesting a "color" scheme.  I believe his final choices were: Stream, Raisin, Wild Plum and Butterscotch. 


I then placed a scrap piece of computer paper over the inked image and melted off the embossing powder with my iron.  We tried several different die cuts on the front to place his sentiment, but he didn't like the fact that they all covered up his "swirls".  He started looking at my punches and pulled out SU's Designer Label.  He hand wrote the sentiment with SU's Elegant Eggplant marker and sponged the label edges with Distress Dusty Concord.  I suggested maybe some type of "bling" beneath the sentiment and pulled out some glittery brads and itty bitty self adhesive pearls.  He went with the pearls and colored them with the same alcohol ink colors he used on the background.  I then asked if he wanted a ribbon under the label.  After looking at it, he decided yes ('cause it didn't cover too much of his swirls).  Then he decided to add a bow.  After much frustration on my part to tie a decent bow with "legs", he said that the "fake" bow I showed him first, would be fine.  Gotta luv that kid!! "Fake" bow made and topped with another self adhesive 1/2 pearl. 

The results:


*Have to share.  While adding my "watermark" to this photo, the kiddo says "uhhh, where is "Card by C?!!" 

During this entire process of making this card, the Kiddo kept asking if I thought Mrs. B would like it, because she wasn't expecting something like this.  

I don't think she is going to like it.  I think she is going to LOVE it. 
 Supplies:  Paper:  Gina K's Pure Luxury, SU glossy paper.  Inks:  Ranger Alcohol Inks, SU Elegant Eggplant marker, Distress Dusty Concord, Versamark. Stamps:  Tattered Angels "Regal".  Accessories:  Clear embossing powder, 1/2 back pearls (from my stash), black ribbon, Designer Label punch

Thanks for dropping by again!!  Remember~your creativity can be the inspiration for someone else!!

Sunday, October 10, 2010

Finding the Joy

Morning People!! The weather has decided to be perfect here. Decided to start the day right and went for a nice long walk with the Toad.  Windows are opened and the dust is gathering on my furniture!! Love it! hehe

I have spent my weekend creating.  I have several more of these cards that go to the teachers/staff of the school for their birthdays in the process of being assembled for this week's birthdays.  I also squeezed in a couple of other projects that I actually liked the final outcome!! About time, if I do say so myself!! Today I thought I'd share a clean and simple card that came together really quick!


Oldest DS had the nerve to take his camera (the one I usually use) yesterday and left it at his grandparents.  I have NO idea how to use the Toad's camera.  And this picture show it!!

I started with a A2 (4 1/4" x 5 1/2") top folded base made of Gina K's Pure Luxury cardstock (have I ever mentioned how much I love this paper?!).  Then using one of my new favorite tools, the Fiskers Stamp Press, I lined up this totally cute Unity Itty Bitty stamp, Find the Joy, on the press grid and inked with Memento Tuxedo Black ink.  I pulled my colors from the Nikki Sivils Flaming Butterfly 6x6 mini pad.  I colored in the Christmas bulbs with various copic markers.  I traced over the toppers and bows with a metallic gold pen.  I then covered the bulbs in glossy accents to give them some shine and dimension.  To "ground" the bulbs, I custom cut the elements that I wanted from one of the mixed collage sheets from the Flaming Butterfly pad   This was done with another one of my new favorite toys~the Fiskers Sure Cut paper cutter.  This cutter has a wire where the blade will cut.  Using the wire as my guide, I was able to cute EXACTLY along the fine lines of the different collage elements that I wanted to isolate for my bottom border.  The portion with the 1/2 circles was one element.  Then the stripes came from another portion of the paper.  This would have been so incredibly frustrating to try and line up my blade perfectly on my other cutter (which, btw, is also a Fiskers), but with the wire, I could see exactly where my blade was going to cut!

I have to say I really like the non traditional colors on this card!!  Kind of a fun, funky, retro look. 

*************

Blog layout question for you all:  What do you prefer in my post layouts~~a)  listing all the supplies in the post body with a link  b) listing all the supplies at the end of the post with a link or c) list supplies in the post body and again at the end with link?  I would really appreciate you letting me know what you prefer.  Thanks in advance!!

*************

I appreciate you dropping by again!!  Remeber to make time for some type of creativity in your day!! I'm going to work on a year book layout for the oldest kiddo!! YIKES! I haven't "scrapbooked" in, ohhhh, about 10 years!!
Till next time~~~~

Thursday, October 7, 2010

BRAWWWWWKKKK!

Ok. Seriously People.  I have had ideas just oozing out of my brain.  AND NOT ONE STINKIN' ONE HAS BEEN WORTH A HOOT!!  I had to empty my trash can TWICE this week. 

I have resorted to playing with pom poms.  And even that was a bust. 


BRAAAAWWWWKKKK!! 


Sunday, October 3, 2010

Everything is Coming up Roses

Hope everyone is having a fabulous weekend!!  Still having my creative quandary, but I thought that today I'd share the beginnings of another project that I'm working on.  I'm now having to wait for some more supplies (sigh....) but I just felt the need to prove that the mojo is flowing....it's just caught up in some mud and weeds right now.

This summer my Aunt and Uncle celebrated their 50th wedding anniversary.  I was unable to attend the celebration party, but have had an idea floating in my head for some time.  Decided to jump off the bridge and start putting it together yesterday. This is the beginning of my Golden Roses


Aren't these just GORGEOUS?!! These were made using TenSecond Studio Metal in Gold Nugget and Pearl, a pointy, refining tool, and some wheels, hummungo tape, design paper from TCP Studio (found at my LSS), PaperArtsy Hot Pick 04, coordinating die and Stazon Gold Metallic Ink.   I used Leandra's tutorial on the metal flowers that can be found on her side bar of her blog


Here is my sad attempt at a more "artsy" photo:


I made these late last night and the lighting is TERRIBLE in my craft area, so I did not take "how I did it" pictures.  I PROMISE I will take more step by step pictures on the next go around (hopefully, in the next day or so!!).  Unfortunately, I REALLY need to step away from my craft area/computer and spend some quality time cleaning at least one layer off the various surfaces of what used to be my house. 

Till then~~Thanks for dropping by and remember to add some creativity into your day!!

Friday, October 1, 2010

Creative Quandary

It would seem that I have reached a quandary in my creativity.  This is not to be confused with a lack or missing mojo.  My mojo is coming up with ideas left and right.  My quandary is this:  While I like and sometimes, even love, the individual elements of my ideas, I am NOT liking the combination of the elements onto one project.

I have been trying to come up with something for the 300th Sketch Challenge on SCS.  Since Wednesday.  In case the week has passed you by, it is now late Friday night. I had the idea.  I got the parts made.  I DO NOT like the parts as a whole.  I walked away for a day.  I changed the color tone.  I cleaned off my desk.  Still don't like the parts as a whole.  I even tried leaving the sketch portion out of it and just "go with the creative flow".  Zip.  Nadda.  Still don't like it. 

So.  Here I sit, staring at the parts. 

I think I'm going to just put this off to the side of my desk.  And let it haunt my dreams.  And move onto the next idea that has been brewing for several months.  Or maybe I'll just pout and go blog hopping.  Again.