Friday, January 21, 2011

Ramblings.........

It seems that I am falling into a rather bad habit of taking off "creative time" after a surge in the brain waves required of me to create for a blog hop.

Or maybe I just get lazy. 

When I create, I tend to do a lot of "What  would happen if I try this?" or "Oh wait!! What about this?!"  This last creative binge (can one participate in a creative binge like a 20 something year old goes on a drinking binge? Heaven knows my creative space looks like I went on a month long binge after I'm done!) was no different.  I have so many ideas running through my noggin' just waiting for the chance to be brought to life. 

So, where are they?

Well, first excuse would be I have recently found that I have to have my area cleaned up between projects.  Which I have NO idea where it stems from.  I have never had a problem creating in a mess before.  But, my area is clean, so that is not the problem.

Maybe that is the  problem.  It's clean.  And I'm feeling too lazy to mess it up again.

Second excuse would be that I totally immerse myself into bigger projects.  I will literally dream about what I want to try on a  project or how come up with another idea/angle that I think might be better.  Needless to say, I then tend to push  all that other REAL life stuff  to the side. You know, like cleaning, laundry, grocery shopping.  And, luckily for me, the Toad puts up with it.  But, there comes a time when I start to feel guilty about ignoring my mother/wife duties for my creativity.  Mind you, not guilty enough that I tear into getting all those jobs done. Just guilty enough to pretend that I'm getting them done. 

Third excuse.  Work.  Ok.  Not really an excuse.  I know that there are those of you who work 10 hour days and still manage to crank out the creativity.  But, I'll just stick with the disillusion that I use up some of my creativity coming up with exercise programs for patients all day long.

Yeah. I don't buy it either. 

But during my "recharging" days I've spent  watching video tutorials on photo editing and on how to do digi scrapbooking with Photoshop elements (for those of you, who may be like me and have NO idea about this stuff, may I highly recommend Jessica Sprague's online workshops?!  Step by step VIDEO instruction, that you can watch at your own pace.  And practice again.  And again.  And if you are me, again.).  I tell myself that I am being creative.  I'm exploring something new.  I'd like to think that these newly creative outlets will find their way into a project soon. 

'Cause I have a bunch of ideas just waiting for the chance to be made. 

Till then................


Tuesday, January 18, 2011

Chunky Art!!

Today is eclecticPaperie's 4th Anniversary and the E-Team is throwing a blog hop party that you will NOT believe!! We are going out of the box and straight to the wall studs on this one!! Are you ready for it?!  Chunky Tags!!


Now for those of you who have never heard of Chunky tags, think 2 x 4's.  Yep!!  Those scraps of wood are being transformed into works of art!!  To add to the celebration, Daisy is offering something new on the store site, CHUNKY KITS!! 

Look at all those wonderful goodies!! Each full kit will retail for $25.  WARNING!  There are only 25 kits available, so if you want one, grab it early!!

Also available will be a "Just the Wood, please" kit.  It will retail for $5. 

It gets even better! Daisy is also offering not ONE, but TWO $25 gift certificates to a couple of lucky winners!!  All you have to do is make sure you drop by each of the design team blogs within the next 48 hours and leave a comment.  Daisy will choose the winners from all the comments left and post the winner name's Friday, January 21, on the eP blog.

and

I have been wanting to do one of these tags ever since I first saw them on Sherry's blog several months ago. 
 And let me tell you~~this will not be the last of these you will see from me!!  I had soooo much fun creating this:

The "Wanted" photo is one from a stack of  pictures on tin plates the Toad's father found in his parent's belongings when he was helping them move to a nursing home.  No one has any idea (or has the memory of) who the people are.  This particular photo was just perfect for my "Wanted" poster!

and this:


along with this


and lastly, but not least, this


Here's a couple of close up shots of the flowers.  I wish  the photographer (ahem) had the skills to show how the light catches the different embossing lines on the petals.  In real life, the light reflecting off the metal just adds another element to these embellishments!!


 this next flower is probably my favorite!!


The Toad didn't quite get the connection between the western theme of "Wanted" and all the flowers. My way of thinking was this:  Outlaw Art.  It's creating something that is different, but appeals to ME.  These metal flowers appealed to me!  Aaaannd.....the story in my head was that the "Wanted" poster had been up on the post for a long time.  It is frayed and weather worn.  The wild flowers have grown up and around the post in the years that it has been up.  Adding a soft touch to the rebel outlaw(s). 

Now, I'm all for giving credit where credit is due and these metal flowers were totally inspired by Lin of Yoursartfully!! She has the most wonderful tutorials on the right side of her blog for making different flowers out of metal. Of course, I added my own little twist here and there! 

Rather than spend all day giving step by step on the making of this tag, here are several helpful hints or insights:

A)  I did not do any special preparation to the wood to prepare it for altering.  I painted (no primer) the sides and edges just enough to give me coverage just in case my paper or metal did not completely cover.


B)  I used Claudine Hellmuth's matte multi medium to glue my paper to the chunky tag. 

C)  To change the tone of the Barn Red metal and to add color to the plain aluminum, I used alcohol inks. 
      To make a darker shade, just let the first application dry and apply some more ink until it is the color you
      like. The TenSecond Studio colored metal is colored on one side and plain aluminum on the   other side.  If you run out of a color, or, if you are like me, lacked the color you wanted to use, grab another sheet of metal, flip it to the aluminum side and  just make your own custom color!                                            
                                                                           
                                                       Before the ink is applied


and after

yes, after this photo was taken, I realized that I had missed a spot on the "daisy".  Which worked out fine, since I wanted the color to be more intense and added another layer of ink!!

D) Do any metal embossing BEFORE you alter with alcohol ink, otherwise you may rub off the ink with the pressure of the tools

E)  I adhered my flowers together with E6000.  You can use a hot glue gun also, but remember!!  You are  
      working with metal, and metal can become VERY hot!  I did use a hot glue gun to adhere the completed
     flowers to the chunky tag.  I was just too impatient to allow the E6000 to dry. 

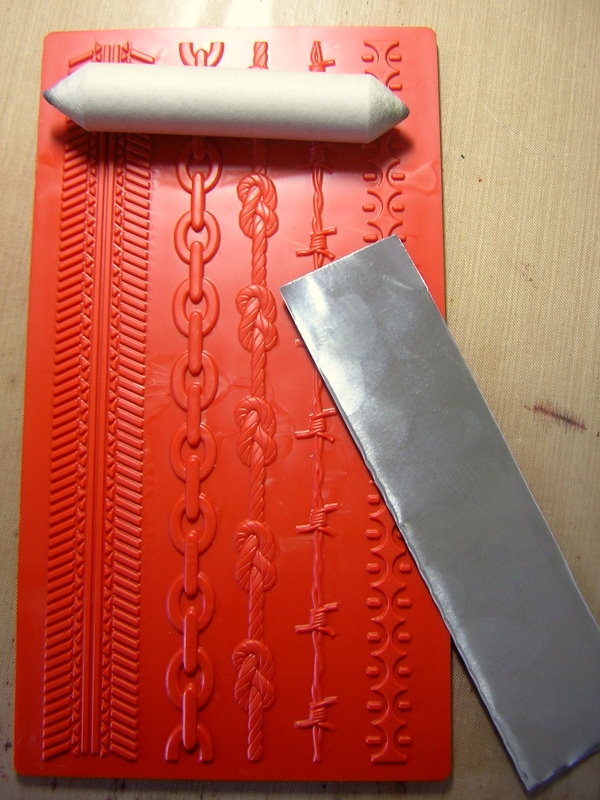
F)  The sides of the tag were done using a mold.  I used a paper stump to bring out the image, then a refiner
      for the details.  I then applied acrylic paint and let it try about 30 seconds before wiping off with a paper
      towel.


G)  I used Hummungo sticky tape to adhere the metal to the wood.  It will NOT move, trust me!! Tombow liquid metal glue was used to adhere the "Wanted" and "Rebel" lettering to the metal. 

H)  I'm a computer dunce and could NOT figure out how to download a font that matched the Vintage Market strip die.  So I enlarged the letters by 200% on my copier/printer.  pfffffllllltttttt.  Whatever it takes to make it work!! LOL!

Supplies:  Stamps:  SU's Wanted. 
                 Inks:  Distress Ink in Vintage photo, Old Paper, Antique Linen, Walnut Stain.  Alcohol inks in Espresso and Latte.
                 Paper:  Como Cricket's Wanted, TenSecond Studio metal sheets in Barn Red, Gina K's Vanilla Pure Luxury. 
                 Accessories: 2 x 4 block of wood,  TenSecond Studio metal tools and Kubuka mold #13, Tattered Angels Glimmer Mist in Old Lace, Alterations dies Vintage Market and Elegant Flourishes, and Tattered Florals.   Claudine Hellmuth's matte multi medium and Sable Brown paint, Folk Art Licorice acrylic paint, Vintage Photo Distress embossing powder.  Paper "barbed wire" from personal stash.  Hot glue gun, E6000 glue, Scor-tape, Tomobow liquid metal glue and  Hummungo Sticky tape

I just have to say that this piece of art churned my MoJo into high gear!!  I seriously cannot wait to make more of these chunky tags!! 

Till then....................make outlaw art!!

Saturday, January 15, 2011

Two of 52.........and a sneak peek!!

These last couple of days, the MoJo has been flowing out of me like crazy!!  Maybe it's the bright 70ish degree sunshine reflecting off the snow capped mountains (that are at least an hour away!!).  Maybe, it's the fact that I'm walking closer to leaping off the cliff.  Who knows?!  I'm just enjoying the adrenaline rush!!

Thought I'd give you another peek of the project that I've been working on.  The Toad mentioned that I should be taking pictures of some of the steps as it seems you all like that.  While I was taking this picture, I rather liked the angle that I just happened to shoot it. 

One b/w conversion later (and a quicker photoshop element edit this week), here is picture 2 of Focus 52


Curious?  Mark your calendars for January 18.  The E-Team is gearing up to celebrate eclecticPaperie's 4th anniversary!!  Trust me.......this hop is part of the reason the MoJo is in over drive.  You DO NOT want to miss it! 

Just sayin'.

Till then.....................

Thursday, January 13, 2011

Creative MoJo

I know it seems I've been slacking again in creating.

But really, I've been busy.  

I just can't share yet.  But just to keep you all happy, I created this. 

Just for you.

Till then....................


Monday, January 10, 2011

Mojo Motivator: Vintage Sage

Happy Monday People!  Did you hit the floor running?! 

Last night I happened to look at the Techniques Lover Challenge on SCS:  Mojo Motivator.  Hmmmm.  Sounded like a good kick in the pants for me!!  The challenge was to pick a challenge from a previous technique challenge, a color challenge and a sketch challenge that was presented over the last year.  I picked a couple that I thought I might be interested in and then put it all together this morning after walking the annoying pooch. 

Here is my Vintage Sage card:  TLC 263, Very Vintage, CC300 (pick a combination from the previous 299 challenges.....I chose CC168 of chocolate chip, very vanilla and sage shadow, and the sketch was SC227). 


I tried something new in photoshop.....quick fix.  Uhhhh.  I need to continue to work on that skill!!

Card base is a 5x5 Pure Luxury Vanilla.  Design paper is from Cosmo Cricket's Wanted mini deck.   The middle strip is a mat of SU's Sage Shadow that was distressed and a piece of Chocolate Chip that I stamped the smaller of Tim's Fabulous Flourishes on using chocolate chip craft ink and clear embossed.  The image panel is more Vanilla Pure Luxury that I did the wrinkle free distress technique on using Distress inks in Antique Linen and Old Paper.  Instead of misting with water, I added a slight shimmer to the panel by misting the inks with Tattered Angel's Glimmer Mist in Old Lace.  The main image is from Tim's Flights of Fancy stamp set.  I inked the image with SU's Sage Shadow then re stamped again, without reinking.  The edges were lightly sponged with Distress ink in Vintage Photo. 

The lace trimming was lightly died using a mix of Sage Shadow reinker in my small mister.  I sprayed, hit it with my heat gun, and spritzed again to get a bit more color.  Last but not least, I pulled out my forgotten Hodgepodge hardware from SU days gone by and attached a bit of chocolate ribbon. 

That's it for me!! I gotta kick it into high gear and get some major house cleaning done as I took longer than expected on this card!! 

I hope you will find something today that gets your Mojo Motivated!!  Till then..............


Saturday, January 8, 2011

Focus 52

Hope you are enjoying your weekend!   If you are looking for the E-Team's Let's Get CRAAAAKIN' hop, you can find it here.  You have through Sunday to leave a comment and be eligible to win the goodies from the eP blog, which will be announced on Monday, January 10.

*****

  One of my aspirations for the New Year included exploring some other creative worlds besides paper crafting.  One of my  past adventures included a introduction to photography while I was still an art major in college.  I was given a great Cannon camera from my folks at that time that gave me the option to have the camera do the work automatically or I could manually choose the settings.  Great beginner camera.  I still have it, stored on the top shelf of my craft area closet. 

Only one problem with it.

 It uses film.

Does anyone even make film anymore? 

So, until I can prove that I am worthy of a digital SLR (wait.....I'm WORTHY of the digital SLR!! I just need to be able to justify the COST of it!!) I am still taking pictures with my kiddo's point and shoot cameras. 

Because my kids have all the digital fun toys and I am still stuck in the "camera with film" age.

I got the inspiration to go back and explore photography while looking at all the photos taken by  The Pioneer Woman (Ree Drummonand) and her readers. Oh my!!  There are some incredibly talented photographers out there!!  And some very cool photo editing!

It so happens that one of those readers and photo contributors would be Gail of Louisiana Belle.  Last year she challenged herself to Project 365. Yep, a photo a day.  She did it too!!  Way to go Gail!!  Somewhere along the line, I commented on one of Gail's photos and we have since began, what I hope is, a good cyber/blog friendship. 

This year Gail has decided that Project 365 was a bit much. Who can blame her?  Instead, she is going for a Focus on 52 photo project.  I asked if I could join her in this new challenge and graciously, she said yes.  I figured it would take me all week just to figure out how to edit my photos at this point, but give me the push I need to stick with the slow learning curve I seem to have when it comes to computer stuff.

 The Toad, being the Prince in disguise that he is, bought me Photoshop Elements 9 recently for my birthday.  So, one of the cliffs I'm taking strides to LEAPING off is learning PSE 9 while improving my photography skills. 

This would be a HUGE cliff.

Today I thought I'd share the my first photo in Focus 52.  Nothing fancy in the editing here, folks!! I consider myself pretty lucky that I still have the original photo intact!! LOL!

First up:  Photo of the only willing subject in my house at this time:  Rusty, our lovable, annoying, sassy, but loyal, Australian Cattle Dog.  This dog SERIOUSLY needs to live on The Pioneer Woman's family ranch.  Of course, being the city dog he was forced to become, he'd probably get the bejeebies kicked out of him by an angry cow. Or by Charlie, the Basset hound, wannabe cow dog.

ANYHOOS!! Here is the photo straight out of the camera


And here is the edited version


The basic editing (that took me all morning, I might add) allowed me to bring back the color and detail from my over exposed shot.  The Toad thinks I added a bit too much color, as Rusty's collar is no longer that vivid shade of turquoise.  I say "pfffffllllltttt" and that it's not bad for my first "real" attempt at editing!

Baby steps.  That's all I've got for now.  Baby steps.  But each little baby step will bring me a bit closer to the edge of that cliff. 

I'm off now to help one kid add detail and color to his mission report that is due on Monday.  And to listen to the other kid whine that his Algebra homework isn't due until Tuesday "so why do I have to get it done now". 

Then maybe I'll have to give myself a pat on the back for those little baby steps and reward myself by  working on another project that is on my desk. 

Or realistically, I'll tackle the laundry that is growing by leaps and mounds in the baskets. 

Glad you stopped by again today!  Remember.....the first step in trying something new is the biggest one.  Baby steps will still get you closer to LEAPING. 

Till then........................explore some creativity

Friday, January 7, 2011

Let's Get CRRRAAACCKKIN'!


Hey People!!  The E-Team has another fabulous blog hop for you today!!  Daisy challenged us to pull out some of those goodies that we all have stashed away and GET CRACKIN' for the New Year.

Of course, Daisy also has some wonderful goodies for two lucky blog hoppers!! How's this:

TWO winners will receive a BOX FULL of Paper, a sampling of Distress Stickles & Rock Candy Crackle Paint!

It's easy peasy to get your name in the drawing!  Just visit each of the gals listed below for some wonderful eye candy and leave a comment!! Daisy will visit each blog and winners will be chosen from all the comments. 
 
 
You will have all weekend, though Sunday, to visit and leave your comments on each team member's blog and Daisy will chose the winners and announce them on the eP blog on Monday, January 10th.  
 
Today I'm sharing a an oldie, but goodie technique.  Cracked glass.  BUT!! With a little different spin on it!!


You can find a wonderfully written tutorial on Cracked Glass on my favorite resource site, SCS.  But, I thought I'd share my twist on today.  Disclaimer (you knew that was coming, right?  The author (aka ME) takes no responsibility for the blurry pictures of the following abbreviated tutorial. It would seem that SOMEONE was more interested in doing the actual project than worrying about how the photos might look!!)
 
I began with a piece of transparency (I used Office Depot's Write On Transparency) and covered it with Versamark ink.  You could also use embossing ink....this is just what I had on hand.  Cover with Ultra Thick Embossing Powder. 


Carefully melt the UTEE with your heat gun.  I kept my heat gun close enough to melt the powder, but not too close as to melt the transparency.  Repeat the above steps 3-5 times (I believe I actually repeated 4 times).  Your transparency now has a thick coating on it.  ETA:  I had a comment stating that the transparency would curl when heating.  Yes, it does a bit, especially the first layer.  But, for me, the added layers of UTEE provided a coating and made the transparency thicker and decreased the curling. 


Then stick the coated transparency in your freezer for 3-5 minutes.  Don't panic if the transparency "curls".  Trust me that it WILL flatten out again!! 
 
Immediately after removing the transparency from the freezer, carefully place it in Tim Holtz's Cracked embossing folder and run it through your Big Shot or Cuttlebug or what ever die cutting machine you use.  Don't worry about any cracking that happens to the frozen transparency while trying to put it in the folder.  It will just add to the cracked look.  The result is a clear cracked window!! 
 
How about a close up of that cracked "window"?!


Just ignore that glare off that "glass", haha
 
You would not have to run the transparency through the embossing folder if you didn't have it.  You could carefully crack the frozen UTEE with your hands.  But those "cracks" will tend to be finer cracks and I was wanting a more dramatic look......as if the winged heart had broken the glass. 

*****
 
Now for the details on the rest of the project.  I started with Wendy Vecchi's Art Parts rectangle frames and randomly applied acrylic paint in black and "maple syrup" brown.  I did this in a more haphazard fashion, not smooth lines.  After a couple of minutes of letting the paint dry, I stamped the smaller of Tim's Fabulous Flourishes with Versamark ink onto the frame and sprinkled Ranger's clear embossing powder over it and heated with my heat gun.   Hindsight:  I should have stamped in black and embossed in black so that the flourishes would show up more!


I then used my rinsed out paint brush (bristles still wet) to apply a light wash randomly over the embossed frame with "butter pecan" (tan) acrylic paint.  I immediately wiped off areas with a wet paper towel, so it wasn't so bold. 


The heart and wings were a discarded element for another project. I do know that they were cut using Tim's Winged Heart Alterations die.  The required (haha) metal piece is TenSecond Studios Spiced Rum that was die cut then embossed with Tim's Patchwork embossing folder and lightly sanded.  The heart was attached to the frame with a double layer of dimensionals under the wings. 

The sentiment, from Tim's Just Thoughts stamp set, was stamped with SU's white craft ink and embossed with Ranger's Clear embossing powder.  I added the Locket and Key with Claudine's Multi Matte Medium.

Have I mentioned that the Multi Matte Medium is becoming my favorite go to glue?  OH MY.  It takes a bit to dry, but when it does, NOTHING is going to move.  Just sayin'. 

I used my cropadile to punch a hole for the hitch fastener and wrapped some craft wire around it to hold the key.


The two panels were connected to each other with strips of grunge paper that have some Distress Vintage embossing powder and Distress Vintage ink and Black Soot ink rubbed onto it.  I used a stapler to attached them to the back of the panels.  

And the final project once again


I love the sentiment on this project!! I think I'll clear a space off my work area so that it can be a visual reminder to me to LEAP.

I hope you pull out some of those forgotten supplies and get CRACKIN' on some of these techniques the
E-Team has shared today!! 

'Till then....................remember to LEAP into some creativity!!