Sunday, November 16, 2014

Route 66

(Tap, tap, tap.  Is this thing still on?  Hello?  Bueller?  Bueller?  Anyone?)

It has been quite a while since I last posted. Really, I have no excuses, unless you would like to consider both kiddos in cross country, the Oldest Kiddo simultaneously in flag football, working everyday and just all around general fatigue that makes taking and editing photos seem more like a chore than a joy to share, haha!!

I'm really not complaining. I'm enjoying every minute that I can of the Oldest Kiddo's last year in high school. I've just put blogging in the freezer for a while!!

A couple of weekends ago was the annual fall fair. This year, the Youngest Kiddo's teacher made a friendly wager with another classroom mom that her class would win the "Best Fall Fair Booth".

Ha!  No pressure to come up with an awesome design. The teacher kept saying it was all in fun and she didn't care what the out come was.

Did I mention that this teacher has also coached for many years and EVERYONE knows she is competitive, lol?!!

I was recruited to help determine the booth's theme. This year's theme was Route 66  The internet and Pinterest gave lots of inspiration.  We decided to base our booths on this old gas station.
We placed both our booths side by side and made a false front with large sheets of cardboard.  Two old window frames were wired onto each side of the "door" (basically, a screen door leaning against the front of the facade).

I painted two large gas tanks to go in front of the gas station. These were about  6x2'.  I snapped a few photos of the creative process:  All these photos were taken with my phone.  I don't know why I never actually grabbed my camera. Too lazy, I suppose!! LOL! So. less than stellar photos ahead.  Bad, bad blogger. I was also too lazy to transport the pictures and do some basic editing.  BAD, BAD, BLOGGER. On the other hand, I did take photos that I am sharing, and figured you'd rather actually have me post sooner than later, lol. YAY me!! One or two points in my favor!


Youngest Kiddo giving the thumbs up for the job finally completed

This picture shows a bit of the "windows" that we used for taking orders.  Anyone for an ice cold root beer, churro, pretzel or shaved ice?!


The facade door can be seen in this shot. The roof tarp and name of the gas station can also be seen in this photo.  After the initial set up on Saturday night, I decided that the pumps need that last final touch of the actual pump handle.  I think these little details really added to the completeness of this booth.  We also swapped out that little gas can for a larger one.  


Notice the Mobilgas horse and the Coco-cola bottle on the front of the booth?  Those were done by one of the girls in the Youngest Kiddo's class.  I informed K that she is going to do help out more with the painting embellishments in the future!! She did an AWESOME job!!


The Toad got into the spirit of things and was willing to don a pair of borrowed overalls, sit on the bench with his oil rag and a bottle of root beer, playing the part of  "Willard " (the namesake of the "gas station" )

And yes, we won the contest. An extra $50 from the Home and School were added to the classroom coffers.

Next up, the Youngest Kiddo outshines both his parents with his photography skills.  Stay tuned!! 


Sunday, September 21, 2014

Falling for Inspiration

I think fall is my favorite time of year.  Day time temperatures are warm but not melting.  Evening brings open windows and thoughts of light sweat shirts to ward off the chill in the air.  Colors that are rich, warm and golden.

For the past two weeks, fall has been but a dream. Triple digits temperatures that only fell to the upper 90's at night.  Humidity that is rare for this part of California.  

Basically, weather that zaps all energy, smiles and creativity.  So, once again, I turned to my Pinterest inspiration board when the need arose for a birthday card for the Toad's grandfather (aka "Big Papa").  This card caught my eye due to the fall theme I was craving.  

My version:


Supplies: 
Paper: Gina K's Pure Luxury in Ivory
Stamps:  CHF 6x6 Vintage Text, Tim Holtz: Falling Leaves, SU Warmest Regards
Inks:  Distress inks, Memento Rich Cocoa

As I finish up this post it would seem that possible the first signs of fall are here!! Cooler temperatures and open windows today! 

'Till next time....................enjoy what makes you happy

Sunday, September 7, 2014

Geometric Gelli Print Card

Hi All!!

Just a quick post tonight.  Our day was spent in HORRIBLY HOT, HUMID weather (with included a downpour) while watching the Oldest Kiddo play flag football.  While I only watched from the sidelines, I am drained!! LOL! How these kids can play 2-3 games in this type of weather is beyond me!!

I realized while looking through the cards I have yet to post (YES!! Believe it or not, I'm actually behind in my postings!! You might want to look out your window to see if pigs are flying!) I realized that all the cards that I have shared lately have been birthday cards.  While one can never have too many birthday cards on hand, I find it a bit sad that my creativity of late has been dictated by need versus free flow creativity.

It is what it is.

Another quick card needed for yet another teen boy.  Pulled out my Possibility File (experiments that might have potential)  and found a few similar Gelli plate prints that I die cut into various square sizes.  A few snips, fussing over the placement and Wah-La!! Card was done.


Can I just say that the money I spent on the two sentiment dies from Cottage Cutz was just about the best investment I have made in a long time?!!! I am going to wear these dies out!!

Sorry for the lack of chatting, I need to get the cattle prod out for two Kiddos (and The Toad) who are busy talking about the games today instead of focusing on homework that needs to be done NOW. 

'Till next time................


Wednesday, August 27, 2014

A 5 Minute Card

Happy Wednesday!!  I've been trying to find the time to post since the weekend, but with the kiddo's now in school full time, time has been spent getting back into the groove of after school sport practices and then directing the focus on homework.

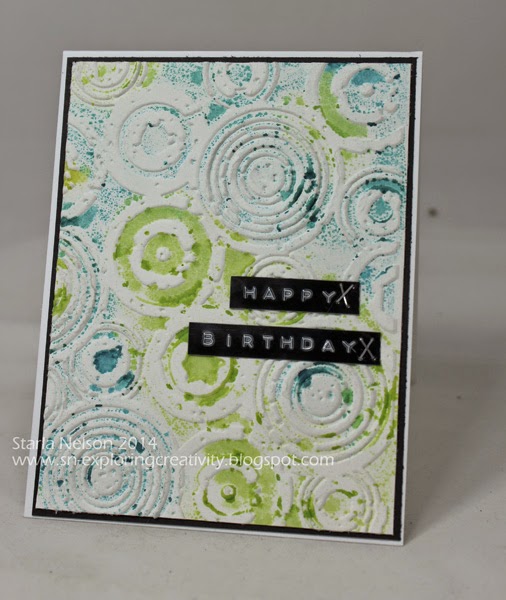
This card was literally a 5 minute card to put together.  Inspiration seemed to have left the building so when another teen boy card was needed at the last minute I went through the pile (quite sadly, that is a literal description) on my desk and came up with this rejected background that was made while I was playing with the stamping with embossing folders technique.   On this particular piece, I believe (ahem.  I am a TERRIBLE detail blogger lately!! I'm guessing here as to what I did!!) I used the Distress Stains again, but this time I actually ran the embossing folder through my Big Shot to emboss the image.  The stains seemed to dissipate, leaving a more blotchy, random look.  I grabbed the piece, trimmed and then using my "old style" label maker, punched out the sentiment and used the mini stapler to add a little extra to the simplicity of the piece.


For the LIFE OF ME, I cannot get a decent photo when I use this label maker!! I don't know if it is the shine of the tape, the shine and combination of the raised lettering, but my camera just can't seem to focus on the whole picture!  Apologies, but hopefully, you get the gist of the idea!!

A splash of color.  Embossed, raised background.  A simple sentiment/embellishment combination. A quick card but for a young teen who was probably more interested in the gift card inside.  Works for me!!  Maybe I should call this reality stamping, LOL!

A 5 minute card and a 5 minute post!!  Laundry and Back to School Night on the agenda now!!

'Till next time...................remember that some times rejections can lead to other opportunities!!


Saturday, August 16, 2014

Embossing with Distress Stains

Hey People!!  Can you believe it is the middle of August already?!!  This past week has been dedicated to trying to get this house under some type of order before the Kiddos start back to school next week.  Needless to say, I didn't get as much accomplished as I had hoped, but a couple of steps in the right direction will make the To Do List a bit easier to manage, I hope!!

I am sharing yet another card that uses the stamping with embossing folders technique  that I have used on the last three cards I have shared. On this particular card, I used Distress Stains instead of paint for my background medium.  I also went for a more masculine look, which, if I do say so myself, turned out quite well!

Due to an unfortunate idea gone horribly wrong, I was left with only a portion of my original stained print. I made the best of what I had left and went for a minimalist look.   Rather than leave the panel whole, I cut it into strips to break up the pattern just a bit.  The dies are from Cottage Cutz.  Clean and simple and perfect for a masculine card!!

I apologize for the slightly blurred picture.  Once again, my last minute photo sessions and not downloading immediately to check out the outcome has become my nemesis. 

That's it for me today. I have two cards that need to be made tonight; one for a teenage boy and a baby shower card.  No time to chit chat as one is needed by tomorrow afternoon and the other Monday afternoon.  One would think that I would quit this procrastination creating, LOL!! 

'Till next time...........................

Saturday, August 9, 2014

LOOK!! More Butterflies!!

Hello there!!  It's been a bit longer than I had planned between posts, despite the fact that I actually have a couple of cards that I have made and need to share.  Ahhhh!! The joys of being busy!! 

After my last card, it would appear that I had a rough time branching out from the butterfly genre.  I needed another teen card for a young lady mere days following the panic creating for the last birthday celebrations. Those creations can be found here and here, for those of you who may wish to refresh your memories or get a gander for the first time.  

I usually try to create cards that are not overly "girly" for the fairer peeps of my boys, as I would rather they not be embarrassed to give the cards.  

Not to mention that if one is going to embarrass their children, one should be able to see them squirm, am I right?!!

Despite my best efforts this card turned out to be a bit more "girly" than I was aiming for. BUT!! I used the last of my scraps from the papers made for the previous two cards and I got the card done fairly quickly, which in itself, is rather a miracle.


I apologize for the poor lighting of this card.  I took the pictures just before leaving to take the youngest kiddo to the party and didn't have time to download to make sure I had something presentable. You will just have to use some of your creativity to "lighten" the card to a brighter shade!!

As I said, the making of this was fairly simple.  I dug through my hoard and found a box of Glimmer Mist Masks and spritzed with a combination of light pink shades of Glimmer Mists. 

Would someone PLEASE let me know why I even own PINK Glimmer Mists?!!! It is driving me crazy as to why I would have purchased these colors!! But, apparently, I'm using them, so maybe I'm more of a "pink" type of gal than I want to acknowledge! 

The butterflies were die cut using a Tim Holtz die and a Martha Steward punch.  A bit of bling for the bodies.  Stamped the sentiment, adhered the butterflies with rolled glue dots down the center of their bodies so that the wings could be bent and popped up for "flight".  The front panel was cut slightly smaller than the card base and popped up with some dimensionals.

Easy peasy.  

I promise that my next couple of cards will NOT have butterflies, LOL!! In fact, I'd say they are at the opposite end of that spectrum!  

'Till next time................................

Monday, July 28, 2014

Winged Birthday Wishes

Hey there!! Today I thought I would share the second card I made using the same background technique I shared in my last post  but in a different way.  If you followed the link to the video of the technique  you will recall that it was recommended to use water color paper for the background. Call me a rebel a curious soul, but I wanted to see how the technique looked on different papers.  I used a heavier paper, (sorry, I think it was from Walmart.  I no longer have the info on it as it was a NEED STURDY PAPER NOW purchase and I was willy nilly in throwing away the information), along with the water color paper to compare the outcomes.

Recommendations are a good thing.  I liked the outcome of the technique better on the water color paper.  Much crisper image, but if you are looking for a more "water colored" or slightly more imperfect image, try it on card stock.  I'd be interested to see how the images compare from heavier weight to lighter weight card stock too.

Anyhoos!! I decided to use the results from the card stock paper with some punches.


I wanted a very light background paper as the butterflies added quite a bit of pattern on their own.  Again, the card size is a bit larger, 5x5.5" (?).  And I have NO IDEA what retired paper pack I used from my stash on this card as I had pulled out just about every pad I own trying to find a subtle background that wouldn't  distract from the butterflies.  Geesh.  I'm really slipping.  Obviously I'm not pushing any specific products, LOL!! I'm quickly becoming the antithesis of a design team member!!  I DO know that the punches are a combination of Tim Holtz, Martha Stewart and retired Spellbinders.  And the sentiment is retired SU.  Inks are the same as the last card: 
Distress Paints in Fired Brick, Spiced Marmalade and Wild Honey.  A mixture of Glimmer Mist Pearl and Luminarte Radiant Rain Pearl Blue. Embossing folder Sizzix Tropical Paisley.

I tried to get a photo of the shimmer on these winged wishes, but I couldn't capture the subtle shimmer. 

More shimmer to come!!

'Till next time.........................I hope you have a fabulous and creative week!! 


Sunday, July 20, 2014

Using my Inspiration Boards

How many of you utilize Pinterest?  I LOVE, love, LOVE Pinterest! It is a smorgasbord of unending inspiration and ideas.

And, believe it or not, I actually make recipes from ideas pinned and use my inspiration boards for ideas when creating.  Now if I would actually use the organization and cleaning pins!! snort!!

This past week, I have had to make a total of FOUR  cards in a span of a couple of days.

Four cards.  In a span of a couple of days.  People, I haven't created four cards in a MONTH in a very, veryveryvery long time!!

I needed two cards for office birthdays that we were celebrating the same day at an office lunch.  And, I got asked to make the cards the day before the lunch.   Of course, my creative mojo decided it wanted a vacation.  My Pinterest Inspiration board to the rescue!!

Basically, I took the easy way out and CASEd (copy and stole shared everything) of this fabulous card by beesmom on Splitcoaststampers. , but I had to do it with a twist as I couldn't find a die large enough to cut a frame to fit the  enlarged card size needed for all the office to sign and hold the gift certificates.

And I had a slight problem cutting down on the background!! I REALLY liked it! LOL!!


I wish you could see the shimmer on the background.  Very slight, but eye catching in person! I popped up the main images with dimensional tape to add an extra pop.

Details:  Cards size.  I honestly don't remember. I believe the base was 5"x 5.5".  Distress Paints in Fired Brick, Spiced Marmalade and Wild Honey.  A mixture of Glimmer Mist Pearl and Luminarte Radiant Rain Pearl Blue. Embossing folder Sizzix Tropical Paisley.  Dies: Tim Holtz's Garden Greens, Sizzix Bird w/Leaves and Flower.

The technique video that I used for the background can be found here.

I will share the second card I made using this same technique but in a totally different way in a few days! 

Until then................use those inspiration pictures and create!

Tuesday, July 1, 2014

Saying Hello and Goodbye

Hello?

Hello?

(tap, tap.  Is this thing on?)

HELLO THERE!!

I know it's been awhile since I last posted.  I actually have projects to share, I've just lacked the time, and even more so, the energy, over the last month to sit down and edit photos and write up a blog post.  In the weeks I've been "gone", I've made 16 graduation gift bags (mass produced), 22 graduation cards (again, mass produced), attended graduation ceremonies over 4 days, co-hosted a graduation party, made  a birthday card and a goodbye card for a co-worker.

Nothing that should have prevented me from posting sooner.

BUT!! Not included on that little list was attending a week long basketball tournament (kids were there for up to 10 hours a day.  Me---several hours a day) followed by increasing my work hours due to two co-workers moving on to new jobs and now 2-3 games per week for summer league basketball.

Have I mentioned I seem to be lacking in the energy department lately?!!

Seriously, life is good, but I have pushed crafting and blogging to the way side to attend all my kiddo's games and just spend down time together as a family.  This year's graduation ceremonies smacked me over the head that my Oldest Kiddo will be leaving our little nest a year from now.  I have days, not years, left of him being home full time and I'm determined to grasp every last second I can!

I digress. I'm sure you did not stop by to be bombarded with our over booked schedule details! Let me share the card I made for one of the co-workers who recently left our office.


This card is about as far from my original idea as A is to Z.  Let's just say my original idea has good potential, but I need to work out some bugs in the actual creating of it.  That will be for a later time!! haha!!  I spent so much time on my original idea the night before the good bye party, that I actually asked The Toad if he could buy a card for me the next morning that I'd pick up on my way to the good bye luncheon.  

Then the guilt set in.  This gal is one of the co-workers that has always appreciated the effort put into cards I've made for work festivities.  I started pulling out every designer paper pack I have hoarded, grasping for any inspiration the paper might provide at 9:30 pm.  By the way, panic tends to set in at 9:30 pm.  Not so much inspiration!!  

If I recall correctly, this was actually inspired by another sheet of design paper that I ruined by slightly crooked stamping.  Of course, it was the last sheet of that particular paper that I had.  Go figure.  I pulled out some older Spellbinder dies (Daisy), rummaged through my paper scraps and figured out my basic lay out.  Hauled my tired rear out of bed the next morning at 5:00 am to cut, sponge and put together the card before I had to get myself ready for work. 

Clean. Simple.  Made. Not bought.  Mission accomplished.

I'm going to fail you right now and not list all the specific details.  One:  I don't remember what paper pack I used, other than it has been in my stash for a while and I'm too lazy tired to walk down the hall and figure out which one it was.  Two: The flowers were cut from OLD SU paper that has literally been in my stash for years.  Like before I labeled more specifically beyond the general color families.  Inks used?  Distress Vintage Photo is usually a good guess.  Rusty Hinge?  Old Olive?  People, I was just grabbing supplies left and right hoping something would magically come together.  

It seems the paper crafting gods decided to grant me this blessing.  I'm just going to be ever thankful and attempt to do better with details the next time around!!

I'm hoping that the little upheaval in my crafting and blogging will soon settle to a more manageable hectic.  I am hoping to put together a little tutorial on a fun technique that I played around with for the birthday card I made!! 

'Till next time................cherish your families. Be thankful for what time you can spend crafting.  Enjoy the moment. 


Wednesday, May 28, 2014

Patterns

Believe it or not, I have been trying to get this card posted for over a week now!!  

It would seem that my secretary tends to overbook the calendar. I really need to fire her.  

Oh wait.  That would be me. 

Can one be fired from a job that one doesn't get paid for?

Sigh.

At any rate, I made this card for a fellow paper crafter, who just happens to be our office PR gal. We celebrated her birthday last week.  

I originally had just planned to use another print from this particular paper pack that had these wonderful flocked/raised flowers on it.  I was running short on time and was going to let the paper do all the work for me.

Then, I had a brain freeze and decided to embellish the card myself.

 No, I prefer to think that I took advantage of the excuse of needing to make a card to carve out a bit more creative time.  

Or, I had a brain freeze. 


The 5 inch square card base is Gina K's Pure Luxury 120# in Ivory.  I then ruined utilized several pieces of black paper in my attempts to try and punch out the decorative border, keeping a straight line.  I obviously failed and after the millionth attempt, (only a slight exaggeration, I assure you), I gave up and figured no one would notice the uneven framing of the patterned paper (from an old DCWV paper pack) but me.

The flower was die cut from some bright, rich red metal that a friend gave me.  I could not capture the actual color with my photo or correct with my limited photo editing skills.  The flower was die cut using the Tattered Florals Die.  I used a decorative wheel and the Cuttlebug Swiss Dots embossing folder to make the pattern and lightly sanded with a burnishing block.  

I had figured out that I could stamp on the ribbon BUT! Alas, another brain freeze attacked and I adhered the flower (with E600 glue, no less) prior to the stamping.  That rendered my trusty stampamajig useless as I could not bend up the petals enough to place the jig where I needed it to make sure my stamping was straight.  After several failed attempts to fashion a more narrow jig from Legos that actually worked correctly, I finally stamped on some velum paper and adhered with velum adhesive to the ribbon.

Note to self:  DO NOT USE YOUR PRECIOUS METAL FOR CO-WORKER'S CARDS!!!  It would seem that when other co-workers are signing the card, they don't appreciate the the delicacy of embellishments.  This poor flower was smooshed, smashed, bent and crumbled every which way!! 

That's it for me today!! I now need to change the creative gears and try to come up with a card for the Oldest Kiddo.  It would seem he needs a b-day card by Friday!!

Nope.  No panicking here!!

'Till next time!


Friday, May 9, 2014

She's Making Lists......

.......and more importantly, CHECKING off on the lists!!

Order invites for Newest Kiddo's graduation party:  CHECK

Individual Senior Boys Baseball collages put together and ordered:  CHECK

Coach's and Team Baseball collages put together and ordered:  CHECK

Teacher appreciation gift card (yes, I admit that that I caved to the convenience of a gift card. Survival is what we are aiming for in the month of May!):  CHECK

Cute presentation Teacher's Mug to give gift card:   CHECK, CHECK, CHECK!!  

Thank heavens for those paper crafter's who are willing to share their talents and templates online.  It is those saintly souls who make harried mom's like me not look quite so lame in in our gift giving.

Traci Cornelius has a wonderful video that demonstrates how to make this cute little mug. Since she did such a fabulous job, I skipped the step by step photos. This is truly easy  peasy to make!! You can find her video here.  


It actually took me longer to figure out what papers I wanted to use then the making of the mug itself.  The gift card peeking out the top will give you an idea as to the size of the mug.  It's tiny, but CUTE! 

I made the mug and handle out of Gina K's pure luxury 120# card stock as I wanted the cup to be more sturdy. You will notice in the last picture that the handle started pulling off the mug due to the stiffness of the paper.  I had used Scor-tape originally to adhere the handle, but had to resort to TenSecond Studios Humungo Killer tape to get the job done correctly.  The decorative papers are from Graphic 45's An ABC Primer line.  

Using up hoarded paper stash:  CHECK

I'm off to try and accomplish more check marks off my list before an afternoon of watching the Oldest and Newest Kiddo's baseball game.  To all you wonderful and under appreciated Teachers:  a HUGE THANK YOU!!

And to all you mom's (harried or cool, calm and got it together) HAPPY MOTHER'S DAY!!

'Till next time......................

Monday, May 5, 2014

The End is Upon Us

The End of the YEAR is quickly approaching!!

Oh wait!  You didn't think I was referring to anything else did you?! (wink).

This time of year gets CRAZY with having 3 teen age boys. Baseball is cramming in 3 games a week. Senior recognition for baseball that will require me to go through 680 pictures multiple times in order to put together photo collages for the senior boys and their coaches.  Teacher's are cramming in as many last quarter  projects that might be possible to complete without parents hiring a team of hit men. Music performances are doing double services at the local churches, not to mention the spring concerts that will be upon us soon.  Award banquets.  Teacher appreciation days. School golf tournaments.

A family wedding to attend.  Oldest Kiddo's birthday coming up.

And let us not forget graduation and the party announcements that still need to be made up and sent out. And graduation cards for classmates.

Cloning. That may be the only answer to get all of this done.  

To add the final cherry on top, the Youngest Kiddo decided that it would be the perfect time  to break his wrist.

The Toad suggested he get a white cast so that I could custom paint it for him.  The first idea was to do the Terminator look with mechanical parts bursting out of the skin.

Uhhhh.  Nope!! It would seem that when mom has not drawn or painted in a loooong time, such skills required for that type of detail are no longer an option.

And yes, I did try.

Next option, Ironman.  As simple as this should have been, it took me several tries.  This cast has more paint on it than the Sistine Chapel.  


You may have noticed that I didn't share the top of the cast.  It would seem that became my nemesis. While it doesn't look bad, per say, it just doesn't look as good as the palm.  It looks like it went through a battle to get painted and it won.  Oh well!! The Youngest Kiddo has informed me that I'll have the chance to have another go at it in a couple of weeks.  Yes, this Kiddo will have the pleasure of multiple casts as he fractured the scaphoid bone in his wrist, which just so happens to have the poorest blood supply.  This meaning more x-rays in a couple of weeks to make sure it is healing.  

It goes without saying that further posting will be sparse over the next couple of weeks!! I hope the month of May finds you with plenty of time for creativity! Enjoy a few extra moments for me!!

'Till next time......................


Thursday, April 17, 2014

Another Throwback Thursday

I pulled out all the throwback stops on this card.

Two, not one, but TWO old SU stamp sets.

Using inks and masking to create a scenic background. Remember when that technique was all the rage?!

And to complete the throwback?  I used old SU colored card stock in ?Summer Sun?  Does this color even exist in SU's color family anymore? Anyone?  Anyone? Bueller?

I did fail in making this card totally flashback by using Distress Inks vs SU retired inks.  Sorry. Distress Inks just blend soooo much nicer, in my humble opinion.


This card is for a young man who just turned 16.  He loves the mountains and hunting.  I thought that creating this scene was appropriate for the occasion. I must have been on target as he proclaimed "this card is so cool".

Card details:  Size 5.5" square.  
Papers:  Gina K pure luxury black and ivory (for the scene panel).  SU ?Summer Sun?
Inks:  Distress Inks in Ripe Persimmon, Black Soot, Mustard Seed, Spiced Marmalade, Fired Brick, Gathered Twig, Walnut Stain. Memento Tuxedo Black
Stamps: SU's Lovely as a Tree, Nature's Silhouette 


'Till next time..........


Saturday, April 12, 2014

Positive Teen Role Models

I may have mentioned before that my kiddo's attend a small parochial school.

Did I mention that the school is small? As in, barley 300 kids (if that) from grades K-12, kinda small?!

There is advantages and disadvantages to attending such a small school.

Advantage: everyone knows your name.

Disadvantage: everyone knows your name.  

Advantage: class sizes are small so teachers are able to give more undivided attention to those who need a bit more help.

Disadvantage: class sizes are small so teachers have undivided attention! It is much harder to get away with "stuff" (wink).

Advantage: you are able to participate in extra curricular activities that you might otherwise get "cut" from at a larger school.

Disadvantage: with such a small talent pool to pull from, there are times when coaches, friends, teachers and parents will BEG you to play a certain sport so that the school can field a team. 

Disadvantage: sometimes those teams are made up of player and coach combinations that are toxic.  There is such a negative vibe that underclassmen are not inclined to join the team and previous team members decide not to play rather than endure another miserable season. 

For the last couple of years the baseball team, unfortunately, fit into that last disadvantage category.  The end of the school year saw those personalities graduating and coaches moving on, but in the wake, was left a program that had gained a very negative reputation. 

The surviving players begged, pleaded and recruited enough players (just barely) to field a team.  Of the 12 players, keeping in mind that 9 players are required to be on the field, SEVEN of the players are a combination of freshmen and players who have either never played or have not played since middle school.

Needless to say, there is a whole lot of newbies on the field during the games. And, heaven help us, when one of the more experienced player's gets injured because it then becomes a shuffled deck as to who will play what position to cover.

But, despite the disadvantages, this team has shown a HUGE advantage.  

The leadership of the upperclassmen. 

With the encouragement and understanding of the coaches, as to the inexperience this team has, the senior boys, (including one who has never played), has kept their attitudes positive and have gone out of their way to work with and encourage the younger guys. 

And the boys who were so reluctant to to join the team initially are having fun. 

This has not gone unnoticed by the  parents.  Several parents wanted to make sure that the older boys knew that their positive outlook and attitude towards the new players was appreciated. So often we tend to only point out the negative and what can be improved versus commending the good and positive.

Yesterday, we commended the five seniors for the good and positive.  Goodie bags filled with fun goodies such as Lifesavers and Rolo candies with the tag "Thanks for being such good "ROLE" models", "Doughnut" we'd do without you" on the bag of doughnut holes, "High Five for a job well done" on a back of Five gum.  Bottles of GatorADE for the aide given and plastic Big League Baseballs filled with candy for being "big league leaders". 

 We have known, and The Toad has coached, four of these boys since grade school.  And the fifth? The Newest Kiddo that joined our family last year. We felt that a personal note to each boy was warranted.


Inside was the quote: 

"The strength of the group is the strength of the leaders"
--Vince Lombardi

I took this photo before the game started.  As I was walking out of the dugout to get a better angle, I overheard the Captain (one of the Senior boys) talking to the rest of the team.  His words?  "No matter what, let's have fun out there".

And then, he pulled them in for a team prayer.


Positive Teen Role Models.

After the game all five of those boys went to each parent and gave them a hug of thanks.

But that wasn't the best part. The best part was the discussion among next year's upperclassmen of needing to keep the positive attitude going for the new guys joining the team.

Positive Teen Role Models.


Thursday, April 3, 2014

Flashback Thursday

Notice how the newest craze on FB is to post flashback photos on Thursday?  Today, I'm posting a birthday card that flashes back in using an oooold SU stamp set, Time Well Spent.

Actually, this card uses some old SU card stock colors also.

And the combination gives a retro, bright, 60's-early 70's look.

I'm just rocking the flashbacks today!!


The pink paper is either SU's Pink Passion or Pixie Pink. Who knows? I never labeled my paper colors and I actually had to look at my SU inks to get the possibilities.  The orange is Only Orange.  

I needed a card for a classmate of  Youngest Kiddo.  This particular girl is new to the class this year and I really don't know much about her personality to give me a clue as to what style of card I should go with. 

 This card took life with the determination to figure out how to use ink sprays (in this case, Tattered Angel's Glimmer Mist in Tuscan Sun and S.W.A.K.) besides just spritzing for general overall glimmer.  I taped down the honeycomb stencil from Heidi Swapp and tried to keep from being too heavy handed or too close with the spraying.  Then I dug through my paper stash and tried to find papers that matched the Glimmer Mists.  

Just a side note.  I am beyond curious as to why I even own a pink colored Glimmer Mist.  It is a well known fact that I am not a "pink" type of gal.  I cannot recall why I would have purchased such a color.  I must have needed it for a specific project. Who knows?!!

I then stamped the flower image from Time Well Spent three times using Memento Tuxedo Black ink.  I colored with Copics and cut each layer out and adhered with dimensional tape.  A epoxy dome was place over the center and bling added for extra pop.  The sentiment is also from an old retired SU set; It's Your Birthday.  I used the same Glimmer Mists on the sentiment flags to tone down the intensity of the colors just a bit.  A bit of a clear mist was then spritzed over the flower to tie it all together.


A bit brighter and much more "girly" than I usually make for my boys to give to their female friends, but, in this case, the Youngest Kiddo didn't flinch (much) when he saw it.  

Now to see what I can come up with for yet another female classmate's birthday this weekend!!


Saturday, March 22, 2014

Lessons From an Art Journal Chapter Two


Chapter Two 

Validating Fears of Ruining a Project

One of my biggest fears is creating a base for a project that I absolutely LOVE and ruining it.  I think that is why it takes me FOREVER to complete even a simple card; I am afraid that I will have finally put together the "perfect" elements and ruin it.

Lesson Number One: You WILL ruin the "perfect" background.  Time and time again.  Get over it.

I have yet to bite the bullet for a larger Gelli plate.  I have a 6x6" plate, which I LOVE!  It is rather ironic that I can smear paint on that plate and make mono prints all day without stressing about ruining the prints. It is probably the only time I let go and let the process just take over.  Of course, that does not apply to actually USING the prints! HA!! There I still have the overwhelming fear of ruining the prints. 

Since my mixed media journal is 9x11" I decided to experiment with an idea that that I hoped would give me the look of a mono print.  What I achieved was almost better! A mono print with texture.


I wish I could capture the amount of texture on this page!! The ridges are actually raised.  I could run my fingers over it all day, just feeling the rise and dips of the paint.

I started this page by putting a layer of Gesso down. I then randomly put globs (such a artistic, technical term) of Claudine Hellsmuth paint and Liquitex Gloss Gell on the page.


Using a brayer and a Martha Stewart paint tool, I spread out the paint and added the textured lines.


Just for your information:  I bought this paint tool from Home Depot.  There are three different textures tools in the pack.  I think I spent $10.  CHEAP and gave me the texture I was hoping for!


Lesson Number Two:  There is no rule that says you cannot have a journal page of just lovely paint and texture.  There is an extensive amount of art hanging on gallery walls that exists of just paint and texture.  If you create such a piece that makes you happy, don't feel pressure to add to the piece.  

Lesson Number Three: If you choose to ignore Lesson Number Two, then don't be shocked and disappointed when you ruin that lovely piece of textured art.

I admit it.  I ignored Lesson Number Two, despite that nagging voice that was yelling in my head to just leave the piece alone.  I got greedy and thought to my self that adding some wonderful embossing paste through a stencil would give me even more wonderful texture.

Totally ruined the piece.  All those lovely ridges of paint do not make for a good surface to place a stencil over and achieve a crisp image. When I pulled the stencil, I had GLOBS of embossing paste that had slipped under the stencil.  

Lesson Number Four:  Learn from your mistakes. 

I decided that I would try again, but with a few deviations from the original background.  First:  I did not Gesso the page.  Actually, I just forgot this step. Interesting outcome was that my textured base layer did not have as high of ridges.  I'm not sure if this is because the paint and gel soaked into the paper more, or because I did not use as much as much paint and gel as I did the first go around.  

Second:  I used the stencil again, but instead of using embossing paste, I pulled out various artist markers to fill in the stencil.


The stencil is the center skull and flourishes from the TCW.  The stencil is only a 6x6".  It was swallowed up by the larger page so I free handed the "roses" in a style I hoped complimented the stencil. 


Highlights were done with a Sharpie Paint pen


Not quite as much texture, but maybe that enabled a crisper image from the stencil.


Lesson Number Five: It's okay to feel uncertain with the outcome of a piece. This piece is a bit busier than I usually create.  The texture adds another dimension in reality that I cannot capture with the photo.  I like the fact that I pushed my creative boundaries.  I'm a bit iffy on the amount of "activity" the piece conveys.  

Lesson Number Six: Try to relax and enjoy the creative journey. 


Sunday, March 16, 2014

Lessons From an Art Journal...Chapter One

Chapter One

Letting Go


In case you haven't noticed, mixed media art journals are all the rage.  Everyone seems to be getting out all their ink sprays, stains, paints and stencils and creating layer upon layer that somehow comes together as a whole.

I bought a new mixed media journal at the beginning of the year.  The original plan was that I'd try jumping on this creative band wagon and see what all the hoopla was about. I had the over zealous idea that I would let my creativity flow at least once a week and let it meander where ever it decided it needed to go.

But what I am finding is that I am struggling with the question as to whether or not this type of journal art fits me.  Or, if the struggle I'm having is a result of not having done this type of creating previously and I am lost in how to make it happen.

When I look at journal pages I have one of two reactions.  First reaction is "Whoa.  Waaaayyyy too much happening on this page".  My mind/eyes don't know where to focus as there are too many layers, colors, dots, dashes, words, zig zags.

The second reaction is "Whoa!  I like this! How does this person put together all these different elements that draws my eye to seek out the details in all the layers?"

My first attempts at an art journal page enlightened me to a few personality traits that I'm not sure fit this type of art form.  For one, I apparently have the compulsive need to control where and how inks, paints and sprays apply to the paper.  I don't like, or perhaps, cannot foresee how the blotches of the above mentioned mediums will look like a cohesive work of art.  This is more than likely due to my lack of skill using stencils and inks in this manner.  I have used stencils for many years to assist in painting of murals.  But, those stencils were to facilitate a more realistic piece of art.  Not a free flowing "let the splatters land where they may" type of art.

The second annoying trait would be that I over think each and every placement of the different elements.  This should come as no surprise to me, as I have over thought each and every element on every card I have every made.  But, when one is trying to have a random, flowing of creativity, this does not work in one's favor!

As a result, my first page looks exactly like what is is:  an over analyzed, stay within the lines, stiff piece of work.


Please don't take me wrong!  In reality, I know that there is nothing really wrong with this page. It is just not the page that I was hoping to create.  This page, unfortunately, just does nothing for me, except bring to mind the feelings of frustrations, disappointment and a major "Eh. Whatever", attitude.  

Instead, this page will be a page of lessons learned from my vast amount of mistakes.


I began my page by applying Gesso over a 9x11" multi media journal page.  I then randomly smooshed (technical term) Distress Inks over the page and moved them around with a watercolor brush that had been dipped in some water. 

Lesson One:  I need to figure out how to use spray inks.  I don't know if it is because I did not adhere the stencils down securely or because I held the inks too close while spraying.  What I do know is, I was left with just a blotches of ink, pooling under the stencil. 

Lesson Two:  It is just paper.  The ink spray splotches were beyond my tolerance.  And before I even thought to try and salvage the piece, I redid the background.


 Which is where my compulsive need to control the inks came in.  I replaced the stencil and used a variety of inks to give the background leaves a definite outline.  The edges were still a bit fuzzy due to the fact that I was too impatient to let the wet paper dry completely before applying the Distress Inks.  Which, if you have never used Distress Ink, react with water and spread out.  

Lesson Three:  When one is applying Wendy Vecchi's black embossing paste through a stencil, one needs to be aware of the smudges of black that are being spread around in the haste to apply more paste instead of properly cleaning the stencil between flipping it from front to back.  


Lesson Four:  Yes, Gesso covers mistakes. But, sometimes, covering the mistake with Gesso makes a larger mistake.  

To my dismay, I discovered that Distress Stains and Inks do not completely cover Gesso.  The resulting color is muted, as if the Gesso absorbs the ink, leaving areas that do not "match" the rest of the background.  No matter how many layers of ink you apply.

Lesson Five: Walk away.  Sometimes you just have to walk away and let the stewing simmer to a less frustrated level.

  At some point, you have to acknowledge the fact that the page is never going to turn out like you had hoped it would.  So, grab another stencil and experiment with using Copics through a stencil.


Lesson Six:  Review Lesson Five and walk away.  Several days (okay, a couple of weeks later) grab some random paints and try to fix the leaves one more time.


The leaves still don't match.  But they aren't as muted as they originally were.  

Lesson Seven: Take to heart the words Kenny Roger's sang so long ago in The Gambler


You got to know when to hold 'em, know when to fold 'em,
Know when to walk away and know when to run.
You never count your money when you're sittin' at the table.
There'll be time enough for countin' when the dealin's done.


I'm walking away.  

'Till next time...................