Friday, December 31, 2010

Reflections

2010


Pushed myself to explore more out of my little, comfy, creative box.  Still working on jumping completely out of it, but liking the fact that I have the flaps wide open.

Left one design team and found new creative juice with another.

Started to re visit some of my "old" creative haunts.  Remembering why I enjoyed them the first go around. 

Made some wonderful cyber friends through this crazy blog world and am so grateful that I joined in. 

Personally,  life was life.  Some good, some not so good, some grand.  Wouldn't change most of it.  And would only modify some of it to a little more to the positive side. 


2011

Been giving some thought to what direction I'd like to take in 2011.  In creativity and personally.  I'm not going to set Resolutions.  Those just seem too "final".  I don't think they give room to take another path or allow for life curve balls.  Instead, I'm going to make Aspirations. 

But we will have to wait until 2011 for a glimpse of those. 

Till then............
*******


Be safe.  Be Merry.  Let's ring in this New Year like no other!!

Monday, December 27, 2010

First Bloom

Hey Peoples!  I hope you all had a wondrous Christmas holiday (or long weekend!!).  Our Christmas was good.  Believe it or not, even with working full time last week,  I got most everything done before the family came over for Christmas Eve dinner (who cares that the floors didn't get mopped again? Food just gets spilled, right?!). 

The Toad once again proved that he is a Prince in disguise.  He bought me a wonderful present to feed into my creative side.  He got me a Bamboo Fun tablet and pen.  He thought it might be something that I would enjoy sketching with and possibly could use with the Photoshop Elements 9 program he recently got me for my birthday.  I have snuck a few hours on the computer watching the tutorial videos on the tablet.  Tonight, I decided to jump in and see what I could do with it. 


I have to say, that for my first drawing on the computer, I am pretty dang pleased on how this turned out.  I obviously need lots of time figuring out the different mediums that can be used to draw and the pen pressure to get the different amount of shading and textures.  Drawing looking up at the screen versus down at the "paper" is different too.  And figuring out what type of file actually saves it looking like the "original" file.  But I think that I will have lots of fun with this.  I haven't really sat down and drawn for more years than I care to remember.  Maybe this will be the nudge to get back into that area of art that I've neglected.

2011. A whole new year to explore something new.  Or the chance to go back and explore something old in a new way. 

Till the next adventure...............


Saturday, December 25, 2010

Merry Christmas

How ever you chose to celebrate this season, I hope that you will take the SPIRIT of the holiday to heart. 

Thought I'd share a CREATIVE take on the Christmas Story!!


Thanks for keeping me company over this past year.  I REALLY look forward to all the creativity the New Year will bring!!  Till then............

Friday, December 24, 2010

To Our Soliders on This Silent Night


I'm sitting here with tears running down my face.  "Nough said.

Nope.  One more thing.
Thank You to the men and women who ensure that we ALL can have a Wonderous Holiday.....no matter how we chose to celebrate it.

Monday, December 20, 2010

Decking the Halls

Since I know you are expecting my countdown panic moment~~~you have FOUR more days till Dec. 24.

I'll spare you my hyperventilating.

Instead, I thought I'd drop in and share another CAS card I did for the oldest kiddo's teacher.  This is for a male teacher and I copped out and got him a gift card to Home Depot.  Really, I thought it was a thoughtful gift as he and his wife just moved into a new house and you know how may times you have to run to Home Depot with a new house?!! Or an old house for that matter!!

Anyhoos!!  Here is the card:


I started with a 5 x 5 1/2" base from Gina K's pure luxury paper.  The sentiment was computer generated.  I then ran some Barn Red metal over the Kabuka 11 mold through my Big Shot to save time versus doing the embossing/refining by hand.  It should be noted that these molds are NOT made to go through the various die cutting/embossing machines.  Not to say you can't use them in this matter.  Just be aware that there is no absolute "sandwich".  I believe my sandwich was the multi purpose platform, the mold with the metal on top, a silicone mat, a piece or two of paper and then the texture plate.  But don't hold me to that!! This was made several days ago and in panic mode.  Who knows what I actually came up with!!  Also, be aware that you do risk breaking either your machine or mold.  My advice:  if it seems REALLY tight, don't force it.  Adjust your sandwich and try again.  A little snug is ok....fighting to get it cranked through is probably increasing your risk of breakage.

I cut out a frame around the images and ran a decorative wheel along the edges. Gently sanded off the color on the raised areas with a sanding/burnishing block   Used some Hummungo Killer Adhesive and adhered it to a black mat.  Used some Scor Tape to adhere to my card.  Colored some self adhesive pearls with my copics, stuck them on and called 'er done!!

Thanks for dropping by again today! I did want to say that things will probably be pretty quiet around here as the Christmas and New Year holiday kicks into full force.  I am having to work full time for the next two weeks, covering for the boss and another therapist who wanted time off.  And I really feel that when I get home, I should devote time to the Toad and the Kiddos, as this is what the season is suppose to be about:  FAMILY. 

With that thought, I'd like to make sure and say now (and will probably say it again in another few days):
I wish you and your families the best of Holiday Wishes.  It doesn't matter how you celebrate the season~just know that I appreciate you dropping by, your comments and the "friendships" that I've made this past year through this blog.  And I wish you a wonderfully, creative NEW YEAR!!

Till then................

Saturday, December 18, 2010

12:45 AM

I was up until 12:45 AM Thursday night. 

I haven't deliberately seen 12:45 AM in years.  So why did I venture into that time zone this week, you ask?


Because I keep thinking that I have an  inner Martha Stewart inside of me, when I'm really more of an
Erma Bombeck type.
Because of the fact that since I am more like Erma vs. Martha, I got off work then went grocery shopping so that I could feed my kids something besides cold cereal for yet another meal.

Because once I got home I had to clean up the kitchen in order to make room for a new mess.


Because before I went grocery shopping I forgot to actually check to see if I had all the ingredients for the cookies and icing.  Therefore, I had to shove the creamed butter and sugar into the fridge, pick up the kids from practice, run back to the grocery store, and go through the drive through for dinner (hey!! Something new for dinner this week!!).

Because I'm a huge sucker for big brown eyes, who looked up at me and requested "some type of special cookie" for his classroom party treats.

Because even though a certain 13 y/o boy didn't ask for "special cookies" for his classroom, I didn't want him to think he wasn't worth the time to make "special" cookies for.  Or worse, that he is too old to have "special" cookies.


Because my hands began to get tired and sore from using a squeeze bottle to lay down the icing as it would seem I do not have tips #1, 2 or 3 in my measly collection of decorating tools. 

Because it was worth seeing the grin on the Kiddo's face when he saw the cookies in the morning.


If you are looking for incredible inspiration for decorating cookies (or baking period), a wonderful sugar cookie recipe and tips for doing it yourself, may I strongly recommend you check out
Bake at 350.  Her (Bridget's) sugar dough recipe and tips made me look like I knew what the heck I was doing on these cookies.  Go check her out.  And print off the cookie recipe and tips here.  Then you'll be able to impress your Kiddos or their teachers with your artistic creativity too!!

'Till the next adventure...................

Wednesday, December 15, 2010

All Tied Up.....

......with String!! 

Hey People!!  The E-Team has another great hop for you today!!  In case you've missed my countdown, it is now NINE more days until the Jolly Ol' Guy comes knockin'!!  Daisy challenged the E-Team to come up with some quick and easy wrapping ideas using some yummy twine from the TwineryAnd to help you in those last minute wrapping moments of your own, on Friday, Daisy will chose a lucky winner to receive a package of some twine and other wrapping goodies.  Sound good?  Just leave a comment on each of the E-Team members blogs.  Daisy will randomly choose a winner from all the comments left on the blogs.  She will announce the winner on the eP Blog on Friday (along with some other sale goodies!!)


I actually have three different wrapping ideas to share with you today.  All are based on using brown paper.  I used brown wrapping paper and paper bags.  Grocery bags and lunch bags would work too.  To me, the twine is a perfect compliment to this more rustic look.

First up. 

 When the youngest kiddo went on his class field trip to the Mission San Juan Capistrano, I found a wonderfully illustrated book with a short history of all 21 missions.  I thought it would be perfect to give to his 4th grade teacher as a gift for her to use in the classroom each year when the students study California History.  The kids are also doing a book exchange among themselves as part of their Christmas party so this will fit right in with that theme!!

After wrapping the book, I had the youngest kiddo help me hold the Maraschino Red twine while I positioned it where I wanted it.  I used a smaller  piece of twine to wrap around the point where all the lines intersected to hold it in place.

I painted a piece of grunge paper on both sides using Jenni Bowlin's Chili Pepper paint dabber (I think it has found a permanent place on my desk top!).  I spritzed over the paint with a mixture of Tattered Angels Glimmer Mist in Tuscan Sun and Candy Apple Red.  I then used Tim Holtz's Tattered Florals and cut out two of the largest flower and one each of the others (the daisy was not used).  I based it on Tim's tutorial on turning the Tattered Florals into a poinsettia ,but I made two large layers as I wanted a more full flower. I glued the petals onto a punched circle for my base.  I knotted more of the twine through one of his idea-ology accoutrement buttons and used a dab of hot glue to adhere it in the middle. 

The leaves were also done from grunge paper.  I used Distress Pine Needle ink directly onto both sides of the paper.  I then spritzed a couple of layers with Tattered Angels Glimmer Mist in Meadow Green.  The leaves were cut out using the Tattered Leaves die.  I glued the leaves onto the back of the base, then used another punched circle over the top to help hold the leaves and to give the back of the flower a finished look, just in case the teacher would like to use it again.  The flower was adhered over the twine with glue dots. 


Next is my Boss's gift.  Now, in all honesty, he is not likely to appreciate the effort in making a poinsettia!  So, I decided to go pretty simple. 

I started by doing the wrinkle free distress technique on a vanilla tag using  Distress inks in Stormy Sky, Broken China and Faded Jeans.  Instead of misting with water, I misted with Tattered Angels Glimmer Mist in Pearl.  I then used the textured fade embossing folder Tall pines.  I used a sponge to go over the tree with a mixture of Distress ink in Pine Needles and Peeled  paint and the trunks were done with Walnut Stain and Vintage Photo.  I used the Seasonal Salvage stickers for the wish and placed it on dimensionals for an added pop.  The package was wrapped with Cappuccino twine.  I snipped a bit off a garland that was in my stash and added the pine cone and used a dab of hot glue to adhere it to my tag. 


Last but not least!! 


 I decided to wrap all the ornaments (which can be found here, here and here) in brown paper bags.  I cut 1 1/2" strips from the music sheet from Tim's idea-ology Seasonal Paper Stash pack and cut them with the Rosette die.  I then cut out some small images from the same paper pack and matted it on a scalloped rectangle that I had cut with my Spellbinders die.  I used the Sakura Quickie Glue pen along the edges and sprinkled fine galaxy glitter along the edges.  I sandwiched the twine between the back supporting circle and another punched circle.


I hope that you got some ideas for wrapping those last minute gifts!!  Don't forget to leave a comment on each blog to increase your chance of winning your own wrapping goodie prize!!

Thanks so much for stopping by again today!!  I still have a few more cards and gifts to wrap for the Kiddo's classroom parties!!  Till then.....................

Tuesday, December 14, 2010

Eleven....

....more days until Christmas Eve. 

I know that you are all aware of the calendar days racing by.  But I hate to be in a panic all by myself.  That's why I keep sharing the obvious with you.

This weekend I cranked out more teacher/co worker gifts.  I thought I'd share two of them with you today.

First up.  Another frame.  Are you sick of these yet?!! I'm pretty sure this is my last one, LOL!


Once again I started with Wendy Vecchi's Art Parts and painted the edges with Jenni Bowlin's Chili Pepper Paint dauber I obviously had not cleaned up my desk from the last frame!!  I covered the frame in yet more Holly Jolly dp from My Mind's Eye and lightly sponged some Vintage Photo Distress ink along the edges.  Since I hadn't put away the Grungeboard Mini Elements away, I pulled out the numbers and the swirl and gave them a coating of brown acrylic paint.  I then smooshed (that would be the technical term) them into my Glue Pad and sprinkled with some Doodlebug Sugar Coating glitter in brown.  The elements were adhered using Claudine's Multi Medium (this is quickly becoming my favorite glue).  Once again, I cut a piece of transparency to make my "glass".  I made a loop out of my ribbon and placed it between the layers.  I adhered everything together with Scor Tape


***********

Next up.  A gift card set for one of the youngest Kiddo's teachers.  Mrs. B was his teacher last year and she takes over the classroom in the afternoon for the basics of handwriting, spelling and Bible since his primary teacher is only part time (the hoopla our small school jumps through to avoid combining smaller classes together without straining the budget even more).  Mrs. B also happens to be a stamper (though she doesn't get much time to play anymore!) so I wanted to make something CAS (clean and simple), yet with a bit of a pop.  This is what I came up with: 


I pulled out some oldies but goodies from my SU collection to make this card.  The base is a piece of Vanilla Pure Luxury from Gina K with a top fold (I use my scor buddy to make my score lines.  It is one of those tools that make me look better as a stamper.  I have eliminated my crooked cards to almost NEVER!! Mind you....the Scor Pal or Scor buddy only give straight lines if you make sure your paper is butted up against the edge.  Just sayin'. ).  I cut and embossed the rectangles using Spellbinders Classic and Scalloped rectangles from Pure Luxury Vanilla and Black.  I stamped the music block from Darci's Cardinal Ornament set with Distress Antique Linen ink.  I then stamped the silhouette from SU's Garden Silhouette using Archival Jet Black Ink. 
I then took my Versamarker pad and went over the entire image and used glassy glaze enamel to do the Cracked Glass technique.  After cracking the glaze, I sponged lightly over the top with some Vintage Photo Distress ink to give a bit more contrast.  I then stamped the sentiment from SU's All Year Cheer I using the Archival Jet Black ink. 

I made 6 of these, all the same and boxed them in a clear box with some envies.  I figure the sentiment on these could be used for sympathy, birthday or missing you cards.  Even thank you cards could be squeezed out of them if needed!!

Thanks for dropping by again today!  I still have a couple more projects that need to be completed before the week's end so I had better get to crackalackin'!!  Till then............

Sunday, December 12, 2010

Christmas Bunny

Hey Peoples!!  I was just finishing the boss's Christmas card from all of us at work and lo and behold!  It actually fits the Try a New Technique Challenge!!  The challenge was to use sponging on our card.  Easy! I  have not had time to do a challenge in FOREVER so I'm going to make this short and sweet!


Inside:  To Wish you a Very Merry Birthday!!
Sorry, forgot to take a picture of the inside.  And I'm trying to get to bed at a some what decent time so I'm not going to take the time to set up again for an inside shot.  The inside sentiment is layered like the outside sentiment.

Ok!  Let me explain this Christmas card!! My boss ALWAYS gives us the wrong holiday card (like Christmas or Easter) for our birthday's.  Sooo, he will get a Easter/Christmas/Birthday card from all of us at the office!!  Twisted and Demented.  The BEST type of cards!! hehe

The details:  Once again, Bugaboo Stamps comes to my rescue for twisted and demented!  I sized the image and printed it off on Georgia Pacific 110# paper as my cheapo printer HATES my preferred Pure Luxury paper!!  I colored the image with copics.  I then used Breezy Blue sparkly fluff on the bunny jammies and slippers. I have to tell you that the Sakura Quickie Glue pen was PERFECT for this!! It is not like other glue pens where you have to push down or squeeze the body of the pen to get the glue to come out.  This pen literally just "writes" the glue!! Wonderful for smaller areas like the sleeves on the jammies! I used the same glue pen and some white fun flock (I have had this stuff for YEARS in my stash!!) for the tummy and the puff balls on the slippers and the tail. I sponged around the edges with Distress ink in Stormy Sky.

The sentiments on the outside and inside are computer generated.  I cut  and embossed the sentiment layers  using Spellbinders Classic Ovals.   While the sentiment was still in the die, I sponged the center, leaving a white border.  The front sentiment is adhered with dimensionals.

The base of the card is a 5 1/2 x 5 1/2 top folded piece of Pure Luxury.  The design paper is Basic Grey's "Mellow" that I have had in my stash for a couple of years, I believe!

I'm so excited I got to participate in the challenge!!  I'll be back again with some other projects that I worked on over the weekend. Yes, my holiday to do list has gotten a tiny bit smaller.  Till then.......... 


Saturday, December 11, 2010

Thirteen Days............

........until December 24. 

Let's all just take this moment to inhale a niiiiice deeeeeeep breath.


ACCCCCCCKKKKKKKK!!!!

I will spare you the list of things I still need to get done that I haven't even started on.  I will spare you the details of my racing heart beat and elevated blood  pressure.  Instead I will share (quickly) another ornament that was made for one of the gals at work.  *L just got me her picture this week.  Needless to say, by this time I did not have time to order more of the Darci Ornament frames or time to resize the  picture.  So instead, I used some of Wendy Vecchi's square and rectangle art parts to create my own dimensional frame.


I started by painting all the edges of the chipboard with Jenni Bowlin's Chili Powder paint dabber.  I covered both the front and the back of the rectangle with MME (my mind's eye) Holly Jolly Paper.  I then stamped Tim Holtz's Fabulous Flourishes (very aptly named, btw) in the corners rather randomly with Distress Bundled Sage and then used clear embossing powder to add a bit more pop.  *Just in case you weren't aware:  The Distress inks stay "wet" longer, making them ideal to use as an embossing ink.  Just one more reason to loooove these inks!.  Added a bit of Vintage Photo along the edges to add a more shabby look. 

Pulled out my forgotten (shhhhhh) Mixed Minis Grungeboard elements and painted the J and Y with more of the Chili Powder paint.  Then used some distress stickles in Fired Brick on top to add some sparkle. 
Cut and embossed the Spellbinders Snowflake on some scrap ends of the design paper and covered with some Rock Candy distress stickles.  While the stickles were still wet, I sprinkled some Art Glitter vintage glass glitter on top.  


 I cut a piece of transparency to fit the frame and layered it over the picture to give it a finished look.  I used Scor Tape to adhere the ribbon between the frames and to hold the frame together. 

I have to say I'm very pleased with how this turned out!  Which is a good thing, because I don't have time to NOT like it!!

I am so glad you dropped by again today.  Believe it or not, I am going to spend most of the day at a basketball game with the family.  I'm going to try VERY hard to enjoy the family time and not think about what I need to get done in the NEXT 13 DAYS.  Because in all reality, this time is suppose to be about family.  Not about the gifts.  Not about the decorations.  Not about a clean house. 

Deeeeeep breaths. 

Remember~~ during this busy time, find the joy in creativity.  Try not to let it become a burden. 
Till next time.............

Sunday, December 5, 2010

Decking the Halls

Well, the weekend is almost over, which will bring us another week closer to Christmas. 

AAAAAACCCKKKKKKK!!!!!!!!!!!!!!!!!

Now that I've gotten that panic attack out of the way, I thought I'd share more of the ornaments that I have been making for the office girls.  All of the ornament frames are from Darcie's acrylic ornament frame line.
**I'm going to try and keep the details pretty basic, as I have a limited time factor here. 

First up:  Another frame that was covered in Ten Second Studios Barn Red metal.  Can I just insert here that I ABSOLUTELY LOVE THIS COLOR?!  It is so rich IRL, and is perfect for the holiday season!!

I also love this photo!! What a great shot! Too bad I wasn't the one who took it! hehe

Once again, the metal was cut out and embossed with a Cuttlebug folder.  I sanded off the color off the embossed areas to show the contrast of colors. The edges were painted with some Folk Art metallic pure gold acrylic paint.  I used a combination of Claudine Hellmuth's multi medium and Tombo Metal Liquid glue to put this all together. 

The back side: 

Next up is another one done in the same Barn Red metal but this time I painted the edges silver with a Krylon Silver leafing pen.  Did I mention how much I LOVE this color of metal?!!


Basically, everything the same just a different ornament and a different Cuttlebug folder.

Next a couple of smaller ornaments that were altered using MME (my mind's eye) Holly Jolly Paper and Accessories kit


I lightly sponged around the edges with some Distress Fired Brick ink.  Some Martha Stewart Snow glitter on the inside.  Used my Spellbinders Create a Flake to cut and emboss the snowflake from Pure Luxury card stock.  Sponged lightly with more Distress Fired Brick and Bundled Sage ink.  I then misted the snowflake with Tattered Angels Pearl Glimmer Mist, giving it a slight shimmer IRL. 

For some reason, I had the HARDEST time getting a decent picture of the next ornament.  Have no idea why.  Just something to throw me into a tizzy, I guess. 


Again, the paper is from the Holly Jolly Kit.  The Fun element I added to this one was to alter some of Tim Holtz's Foliage Findings.  I wish I could say I came up with this clever way to alter these, but alas, Tim was kind enough to share on his blog last year and I just happened to remember it in my mental file cabinet and pulled it out.  I first covered the flower and leaves in some paint (Jenni Bowlin Chili Powder was used for the flower and along the edges of the ornament.  The leaves were a couple of different Folk Art paints I have in my stash).  I then covered the flower in Fired Brick Distress Stickles and the leaves in Peeled Paint Distress Stickles.   The center brad was also covered in the Fired Brick Stickles. After it had dried, I just snipped off the prongs and adhered everything with a drop of E6000 glue. 

Close up (blurry, but a close up) of the flower


That was how most of my weekend was spent!!  Two of the girls have yet to send me pictures and may end up with some other little trinket instead! 

I'm off to find my desk again so I can start on the next item to be checked off my list!!  Thanks for dropping by again today!!  Till next time.......

Thursday, December 2, 2010

A California History Lesson

Oh MY!!  Another week flying by bringing us closer to Christmas.  And me further away from getting all the items on my list done!!

Earlier this week, my youngest Kiddo began what is a tradition for thousands of 4-5th grade students in California.  The tradition of learning of the history of the 21 missions that are along the El Camino Real, or the Royal Road.  The missions stretch from San Diego to Sonoma.  While the first two missions established (Mission San Diego De Acala, 1769, and Mission San Carlos Borromeo De Carmelo, 1770, were a substantial distance apart, the chain was soon filled in with stations that were only about a day's ride apart.  This allowed the already established missions to supply manpower, livestock and supplies to fledgling colonies. 

Mission San Juan Capistrano was the seventh mission, founded twice; first by Father Lasuen on October 30, 1775, then by Father Serra, who became known as the Father of California, on November 1, 1776 (which makes this mission as old as our country). 


While some of the original brick and adobe has had to be restored, this area is as it was over 200 years ago.


Construction took over 10 years, and it had been in use for only six when the earthquake of 1812 struck, destroying the cross-shaped, elaborate stone church (the largest structure this side of the Mississippi at that time) and killing over 40 worshipers.  Also contributing to the history of the mission were fires, epidemics, droughts and an attack from the pirate Bouchard.

This is just one of the elaborate silver pieces that were used at the mission for worship (the awful lighting and glare would come from this being displayed in a dark room and in a glass case). When the mission was attacked by the pirates, the families of the mission hid the treasures, some being buried, some taken and hidden in their homes, until they thought it was safe to bring them out again. The glare right above Christ's head is actually a bullet hole. There is no record as to how this piece got the hole.  Or the story behind it.  My imagination loves this type of thing!!

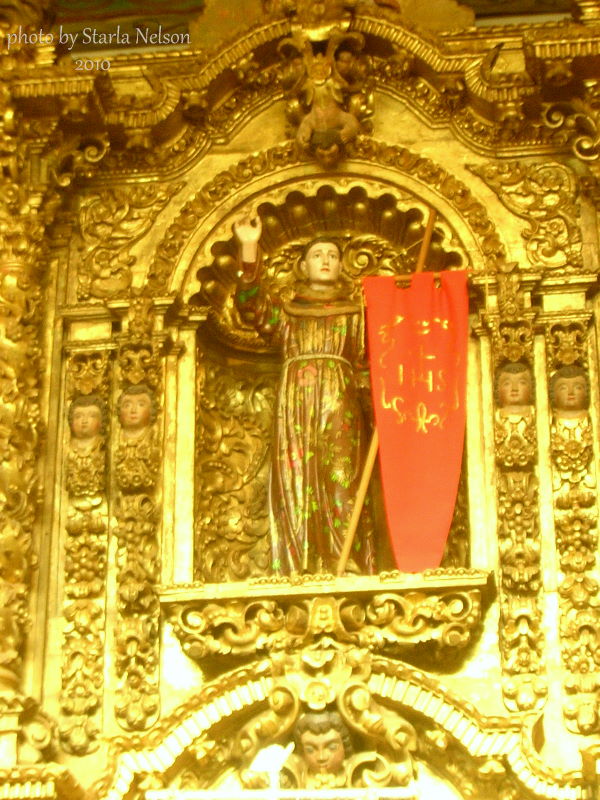
This was a "small" chapel that was used for the private worship of the priests and the first followers.  The Golden Alter was made in Barcelona in the mid-1600's and was given as a gift to the mission in 1906.  It was delivered in 10 crates with 396 puzzle pieces!!  No one knew how to put it together.  The Father laid it out in the quadrant and by chance, someone said they had seen an similar alter in their travels.  The alter was  pieced together from a memory.

The dark pillar on the left side of the picture would be the pulpit that the Father had built after the alter was done and he realized he had no place to preach from.  The "crown" over the pulpit is actually a sounding board.  When the priest would stand under it and give his sermon, his voice would bounce off the "crown" and propel to the worshipers.

Notice the different ceiling heights in the first picture.  The area over the seating is lower than the alter area.  It would seem that when the alter was near completion, the workers realized that the height was higher than the current ceiling.  Solution:  raise the roof, literally just inches above the top crest.


 Notice the paintings around the niche.  The natives would paint fresco decorations along the walls and ceilings, using symbols from their own beliefs to make the worship area (and living areas) "beautiful". 


A niche over an outside door painted with a religious symbol.


This is the gate to the courtyard to one of the side doors that leads to the only original room left of the  Great Stone Church. 


Bells across the same courtyard.  These bells are still used today for special occasions.  Bells were very important to the missions. They were the form of communication.  Depending on how they were rung, the community knew when they were called to worship, when there was an attack being launched or other codes.


What is left of the Great Stone Church


This is just off to the right of the church. The bells are the ones seen previously in the courtyard photo.


This is corner wall between the wall that has the bells and the Stone Church wall.


This is the original center quadrant fountain of the mission.  Of course, the quadrant is now a lovely garden, but originally would have been used for different activities needed for daily living. 


My parting shot of the bell tower in the quadrant

I personally love history and found the opportunity to visit this piece of history fascinating!!  I hope you enjoyed a bit of California history!! I would like to acknowledge the book California Missions by Londie Garcia Padelsky.  It is a book I have in my home collection and was used to refresh my memory of some of the history details.


Tuesday, November 30, 2010

Boxing Up a Blue Christmas


Hey People!!  It is another exciting ride with the E-Team today!!  The Team was challenged to alter one of T!m Holtz's configuration boxes.  OH MY!  These are like a never ending puzzle!!  So many different possibilities!!  Of course, all these different possibilities mean that you will not want to miss what the other
E-Team members came up with!!  AND to add to the 'liciousness (that is a word, I'm sure!) of this hop,  you will want to leave ONE comment on each blog within the NEXT 48 HOURS (starting at 8am EST today) as Daisy will choose 2 winners from all blog comments by random draw for a Configuration box of your choice, plus lots of paper crafting goodies to enjoy with it.   The winners will be posted on the eclecticPaperie blog on Dec. 3!


I absolutely love Christmas!! Even with all the added stress I put myself under, it is about the only holiday I go all out for as far as decorating.  I have different themes for each room.  The TV/family room is done in primary colors with Nutcrackers being the focal point.  My formal room is done in cobalt blue and white with my small collection of white/Silver (or cobalt blue) Santas as  the focal point.  My project today was inspired by a white and silver Nutcracker I found and the "Winter Wonderland" I try to create with my formal decorations of white/silver and bright blue. 


Now of course, this looks NOTHING like the idea I had in my head!!  But as I started creating, things just kept taking a different turn than I had planned.  I started by painting the 6.75 x 8.75" configuration box and the largest cube the brilliant blue.  I then used a crackle medium on the main box.  Once dry, I went over it with some spring white acrylic paint that had been thinned with some glaze. 

While the box and cube were drying, I cut off the top of a Styrofoam cone and wrapped the Lavish Trimmings around it.  A combination of Glossy Accents and straight pins held it in place until it dried. Just a note:  if one was to get involved in another project and walk off and leave the straight pins too long in the Glossy Accents, one just might have to twist and wiggle the straight pins loose from the dried Accents.  Just sayin'.  It would seem that I did not take into consideration any tree topper I might have wished to add to this when I cut the cone.  Soooo.  I  just cut off a couple of the ribbon flowers and glued them on top of each other for my "topper".  The garland was found in the "mini" ornament section of Michael's. 


The large cube was wrapped with the Symphony Tissue tape.  I used Spellbinders Create a Flake One and cut the second largest flake from some Pure Luxury  card stock and from a piece of scrap aluminum metal. I layered the two dies and topped with an Accoutrements Classic Button.  I used some Glossy Accents in the center and sprinkled some ultrafine Canadian Blue Art Glitter over the wet Accents.  I tucked in a French Horn ornament and  some Christmas picks, including a couple of Maya Road crystal trinket stars that were originally suppose to be my tree topper!  The stamped music sheet was a discarded scrap from Darcie's Cardinal Ornament that didn't make the cut on my previous project.  I covered the stamped image with Distress Rock Candy stickles. I used Glossy Accents along the edge and sprinkled with SU's chunky white glitter.  


More Spellbinder snowflakes were cut out of scrap metal.  For the larger die used, one must carefully remove the image from the metal and the "arms" are finely detailed and want to stick!!  While the metal was still in the die, I used a paper stump to emboss the details.  The flakes were adhered to the back of the box with Tombow Metal Liquid Glue.  


 The final touch was to paint another of the cubes the same shade of blue and wrap along the top and sides with the Snowflake Tidings Tissue tape.  I painted Distress Crackle paint over the cube and tissue.  I then used my Cuttlebug "Olivia" alphabet dies to cut out the letters from Claudine Hellmuth's Sticky Back Canvas, with the tape liner being the "front".  I removed the liner, exposing the sticky and covered the letters with SU's fine silver glitter.  I then used the still wet crackle paint as my glue.  I topped off the cube with another snowflake made of Pure Luxury cardstock.  I used my Glue Pad to apply a sticky layer and more SU fine silver glitter to the alternating layers. 

After 10 attempts to get a decent picture of the snowflake on top or a focused picture period, I admit defeat.  This will give you a general idea. 

Supplies:  Tim Holtz configuration box, idea-ology products, Claudine Hellmuth canvas, Ranger signature products all found at ecleticPaperie. 

I think these configuration boxes have soooo many fun possibilities!!  I'm already thinking of some other "themes" that I just might have to explore!!

Thanks for dropping by again today!!  I hope you ejoyed this ride with the E-Team!! Till next time.....

REMEMBER TO TAKE TIME TO EXPLORE SOME TYPE OF CREATIVITY IN YOUR DAY!

Monday, November 29, 2010

Grab your Ticket..........

And get ready for another rockin' ride with the E-Team tomorrow, Nov. 30. 

I hear tell there are some awesome goodies to be given away too!!

Mark it on your calendars.

Just sayin'. 

Saturday, November 27, 2010

Ornaments

Good Morning!!  I hope those of you who celebrated the Thanksgiving holiday have recovered!!  I spent yesterday in my little cave working on projects.  With the Holiday season upon us, I really need to kick it into high gear!! 

Today, I thought I'd share a quick gift idea.  Ornaments blinged out in metal!!


I asked all the girls to send me a favorite picture for the year.  So far, everyone but *L, has picked up on my procrastination habit!  But that's ok!  *L gets the privilege of having her ornament done with undivided attention to detail!

I started with Darcie's Ariana Acrylic Ornament frame.  I painted all the edges, including the acrylic edges, with a Krylon Silver leafing pen.  I then traced the ornament twice onto TenSecondStudios Poision Ivy metal. I carefully cut out the metal using paper snips and then ran both pieces through the Big Shot with a Cuttlebug Christmas tree embossing folder.  QUICK and EASY way to emboss metal!!  Plus, with the clear folders, you can see exactly where the embossing image is placed!  I then sanded the color off the embossed areas. 

Now I "layer" the pieces different from the directions that come with the frames.  The frames use metal clips to hold everything together, but I like the cleaner edge of just gluing the pieces together.  Here is my layering order:  Acrylic frame covered on top with metal/paper.  This is glued to the backside of  two chipboard frames that have been glued together.  My photo, originally printed out as a wallet size, was reduced by 70% on my printer and cut to fit into the recessed frame area.  Then I fill with some Martha Stewart Snow Glitter and glue the second acrylic frame on top to "close" the shadowbox.  My top cover is the last piece of chipboard with the metal/paper. 

Here is a picture of the back side that shows off more of the embossing!


GORGEOUS!  I'm telling you!!  The Toad gave this the ultimate compliment of saying "This looks very professional or factory".  

I used Tombo Metal Liquid Glue to glue the metal to the acrylic and chipboard. The Humungo Sticky Tape is wonderful as far as not budging the metal from the surface you stick it too, but it also does not allow for fiddle room to line the edges up.  After waiting for the glue to dry (the hardest part of this whole thing), I burnished the edges of the metal with a paper stump.  I then touched up any missed spots along all the edges with the Krylon leafing pen again. 

All the girls will be getting a variation of this once I get their pictures, ahem!! 

Thanks for stopping by again today!  I will be back with more gift ideas later!!  Till then............REMEMBER TO TAKE TIME TO EXPLORE CREATIVITY IN YOUR DAY!!