Friday, March 30, 2012

While the Boss was Away.....

.......I had NO TIME TO PLAY!!

This has been a CRAZY, crazy week at work and after putting in full days and bringing home a couple of hours of more paperwork, my mojo, energy and gumption crawled under the covers and hid!! I'm totally bummed that I couldn't (ok, chose to give myself a break) participate in the E-Team's latest blog hop today.  I'm still hoping that maybe I can come up with something this weekend (note the bold maybe).  BUT!! Make sure you feast your eyes on the lovely works the rest of the team came up with!!


And....don't forget that leaving a comment on each team member's blog will enter you for the chance to win one of two $25 vouchers to the eP store!!  Comments may be left from today, Friday, until Sunday, April 1.  Winner's will be announced on the eP blog Monday, April 2.  Good luck!!

I'm soooo glad it is Friday and the weekend is just ahead!  This cranky, over worked girl needs a break, hehe!!


Saturday, March 24, 2012

Pigs are Now Flying

When I create a card I tend to over think.  I agonize over the colors, layout, embellishments and technique.  It is only once I start the actual creating that I will let things flow.  And then I tend to get sidetracked with thoughts of "WAIT!! Maybe I should try this!! NO, WAIT, this other idea would be better!! AHHA!! This LAST idea is the best yet!!"

Needless to say, creativity does not get completed quickly here.  I would say hours versus minutes is more the norm.

But!! Today, I went off that beaten path and created a card in under 15 minutes, with at least 5 of those minutes attempting to get a decent stamped image. 

And so Pigs are now flying as I NEVER thought I could actually make a card this quickly.

Layout:  Simple
Colors:  only two
Technique:  Fun and could easily become addictive

Result: 
Don't know what is going on here.  My edited photo is in focus.  When I click on this photo for a larger view, it is in focus.  This is NOT in focus.  I highly suggest clicking on the picture for a in focus view!

Details:  Card base is top fold, 4.25 x 5.5" of Pure Luxury.  The next layer is SU's glossy card stock that I dripped Alcohol Inks in Sunshine Yellow, Red Pepper and Butterscotch on and blasted with some canned air to spread out. I then embossed the inked paper in the Alterations Rays embossing folder. FYI:  the texture fade folders on CRAZY SALE at ep!!  The circles were cut and embossed from SU's Summer Sun and Real Red card stock using Spellbinder's Classic circles.  The sentiment is from SU's retired set So Many Scallops. I used Summer Sun, Real Red and Basic black markers to ink up the image and stamped onto a scrap piece of Pure Luxury. 

I'm thinking that I need to stop over thinking!!

Tuesday, March 20, 2012

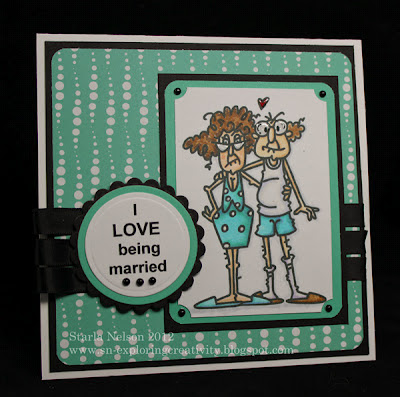
Married....

.....for 18 years today!  Yep, the Toad and I have managed to put up with each other's quirks for 18 years.  Actually, longer.  More like 22 years. 

Geesh.  That is like, FOREVER. 

And not.

When I say 18 years,  it sounds like forever, but when I think 18 years, it doesn't seem as if it has been that long. 

I've decided  I prefer the thinking of 18 years versus the saying of 18 years.  Saying it makes me feel old.  Thinking it I can ignore the reality that I am getting older and can just pretend that I'm still that young, 20 something year old who was in shape.  And had abs.  And had actual muscles. 

ANYWHOOS!  I digress (once again!).  This weekend I decided that the Toad deserved a card for this occasion.  'Cause, supposedly, that is what I do, make cards.

Now, one thing you have to understand about the Toad and I is, we are not a mushy, googoo eyes at each other couple.  We are snarky.  And obnoxious (he, more than I, of course).  That is how we show affection and love.  Hey!  It seems to have worked for 18 years + so far!!  So, this image from Bugaboo stamps was perfect.


Inside:

It's great to find that one special person you can annoy for the rest of your life!!


BWHHAAAA!!  If you only knew how perfect this was for us!!

Card details:  5 1/2" square base from Gina K's pure luxury.  Design paper and colored mat paper from S*E*I Black Orchid (this has been in my stash for a while, not sure you would be able to still find it).  The image was resized and  printed out on Georgia Pacific paper since my printer hates my preferred paper of Pure Luxury.  Colored with Copics.  According to the pile of markers on my desk, that would be seventeen different copic markers.  Sorry, I'm too lazy to list all of them!! 

The sentiment actually comes with the image, but I had to type it out on my computer because for the life of me, I couldn't figure out how to edit it to fit the circles.  I'm sure it is not that difficult for anyone who has one teeny tiny bit of computer savvy.  That person would NOT be me, so it is just less frustrating to type it out again.  Spellbinders Classic circles and scalloped circles were used to cut and emboss the mats and the sentiment panel was popped up over the looped ribbon with dimensionals.   The inside sentiment was matted the same way, but used Spellbinders Classic rectangles and scalloped rectangles for the shapes.  SOMEBODY forgot to take that picture of the inside and it is too dark to get a decent one now!!  Some self adhesive 1/2 pearls from Want2Scrap cover the fact that I grabbed the wrong punch when I meant to round the corner versus ticket punch the corner on the main image.  A touch of Glossy Accents covers the glasses and the heart. 

So, Happy Anniversary Babe!  Here's to another 18 years!!

Thursday, March 15, 2012

Part B of Why I Don't Have a Cooking Blog: I am NOT Bakerella

Today I'm continuing the saga about why this blog will  never be one of those fabulous cooking blogs that I stalk read regularly.

If you read Part A of this series, you will recall that creativity in the kitchen was last weekend's theme. In addition to the Flourless Peanut Butter Cookies, on the menu was making some fabulous "OH WOW" treat to end the season of city league basketball for the Youngest Kiddo and his teammates.  Since cupcakes were "soooo last year" (insert rolling eyes here______), I asked the Kiddo if he voted for Awesome Basketball Sugar Cookies or Bakerella's Basketball Cupcake Bites? 

Cupcake Bites won hands down. 

Once again, reality decided to smack me on the forehead and shouted in my face (quite loudly, I might add) that I am not Bakerella.

Everything started out fine.  I made a gluten free cake mix.  Found out that there is a reason the largest pan size was a 9x9.  Betty Crocker's Gluten free doesn't appear to rise as much as Betty's other cake mixes.  But, that didn't really matter.  You just crumble the cake anyways.  So, cake crumbled, frosting added and cake balls formed. 

Here would be my first clue that maybe I should PRACTICE this "fancy" treat thing more often.  It would appear that while I thought I was forming cake BALLS, what I really was forming was cake semi circular shapes. 

Second clue:  Obviously Bakerella, aka Angie, has made hundreds, possibly even thousands of cake pops and cupcake bites.  She even wrote the Cake Pop cookbook that I was following along with for the directions.  If Angie thought it worked best to pour the melted candy coating into a squeeze bottle in order to fill up the candy mold, why, why, oh why, would I think I'm so much smarter and try to save washing another dish and pour directly from my spouted measuring cup that I melted the candy in?!!  BIG HINT:  follow the directions.  Trust me.  The squeeze bottle allows you to control the flow of the candy and the amount being poured into the molds.  A spouted measuring cup is not so easy to control in that manner.  I will give myself a very small pat on the back for the fact that I realized my mistake fairly quickly and poured the rest of the melted candy into a squeeze bottle.  A leaky squeeze bottle, but a squeeze bottle!

And when you discover you have melted WAAAYYY too much candy coating, you can always practice writing your alphabet.

Like the glob "I"?!!  That's what happens when you squeeze the bottle too hard!!

The results of my semi circular cake balls and wonky pouring of the candy into the molds produced some funky looking basketballs.  And my dipping skills need a bit of practice.  A LOT of practice.  Some basketballs got a double and triple dip in my attempts to cover up gaps between the oblong cake balls and the nesting candy coating.

Wisely, I decided to use an edible paint marker to make the lines on the basketballs versus more candy coating.  Of course, trying to draw neat lines over bumpy candy coating can be a bit of a challenge.  And I really need to figure out what center is.  Out of the 50 cake bite I made, I'd say that maybe FIVE looked like Bakerella's/Angie's.  Five.  That is probably being generous to myself. 

But the kids gobbled them up.  The moms thought that the treats were "just too cute!!" . Dads were popping them whole into their mouths. 

 I think that  after eating a couple of these sweet treats, you'll give yourself enough of a sugar high that you won't care what they look like anymore!!


Onward to the next creative adventure!! 

Monday, March 12, 2012

Why I don't have a Cooking Blog, Part A

While my creative motivation seems to be either on strike or vacation, the "creating" has not stopped.  It has just ventured onto a different path.  This weekend it was all about creativity in the kitchen. 

The Youngest kiddo informed me that he would like to do the demonstration speech at school that was for extra credit.  GREAT!!  Then the Kiddo came up with the idea of pizza.  Uhhh, okaaaay.  Not exactly an easy demonstration project, but we'll work with it.  But!  Then he mentioned that *A, a classmate with Celiac disease, would not be able to eat the pizza.  Maybe we could find a recipe that she could eat too?  This  sweet child  makes his mama so proud!!  So, the hunt for an easy, demonstrative and gluten free recipe was started.  Found one that seemed to fit the ticket perfectly!  After a conversation with *A's mother to confirm that all the ingredients were allowed (did you know that even Vanilla can have gluten in it?!!), the Youngest Kiddo and I set up to make Flourless Peanut Butter Cookies.  

This is where I came upon the realization that I'm a failure at food blogging.

When blogging, it is to your benefit to take good pictures.  Notice the background, which may distract from your focal image.  It is also imperative that your main image is in focus. 


Only I could manage to get all pictures out of focus!!  I'm off to a fabulous start on this blog post!!

Another important consideration in blogging is to photograph step by step illustrations, if applicable.  Blog posts on cooking or say, art techniques, require this step to engage your audiance.

Yeah.  Okaaaay.  It would seem that someone, who shall remain nameless (cough, me, cough), got caught up in the actual making of the cookies and forgot to PHOTOGRAPH the steps. 

 I could have easily enough "re staged" this whole cooking episode with the Kiddo (in focus), the kitchen spotless, and each and every easy little step in the cooking process photographed.  But I didn't. Why?  Despite the demise to my "cooking blog", I'm just too lazy.  And this is my real  life.  Unedited.   Photos out of focus. The kitchen a mess from another baking project.  It is what it is. 

But the cookies still tasted good!

Flourless Peanut Butter Cookies
adapted from a couple of recipes on the www

Ingredients
1 cup natural Peanut butter
3/4 cup to 1 cup sugar
1 egg slightly beaten
1 teaspoon Vanilla (gluten free, if needed)
Corse sea salt (optional)
Hershey's Kisses (could be optional, but why?!!)

Place oven racks in the upper and lower third of the oven. Preheat oven to 350 degrees.  Prepare cookie sheets with parchment paper.

Mix all the ingredients together in a medium bowl.  Roll into 1" ball (approximately) and place on prepared cookie sheets.  Use a fork to make cross hatch pattern.  If using sea salt, sprinkle on cookies now.  Bake 10-15 minutes, switching cookie sheets half way through baking time.  Bake until slightly golden at edges (which, is a bit difficult to tell, since the cookies are already golden in color!).  Remove from oven and let cool on sheets for a couple of minutes, before transfering to cooling racks.  Place Hershey kiss in middle of warm cookie.  Transfer cookies to cooling racks to finish cooling process completely.  Makes about 18 cookies. 
ENJOY!

Stay tuned for Part B:  I'm not Bakerella.  


Sunday, March 4, 2012

CAS--Military Style

Have you ever had one of those projects, while perfectly fine and acceptable, just doesn't tickle your fancy?  That would be this project.  I have spent most of the day debating whether or not to even post it.  But, obviously, posting won out.  Here's why:

1) While everyone "oooo's" and "ahhhh's" over the WOW cards/projects, not all projects are meant to be WOW projects.  Take, for instance, cards for 11 year old boys.  Let's be realistic here.  This is a card that is going to be lucky to survive 5 minutes after being opened.  The gift card will be snatched up and the card, if lucky, will be tossed onto a messy desk, only to be noticed again when said child is threatened with a life grounding from his Xbox if he does not clean his room to his mother's standard. 

2) There are days when the MoJo is just not up to par.  Par being what ever realistic or unrealistic level one has set.  Yet, much like the real world, sometimes MoJo just has to suck it up and still produce. 

3) The card had the Youngest Kiddo's approval.  And since he is the peer of the birthday boy, one has to accept that the card, (and MoJo) met to his level of Par.  And when it comes down to it, that is all that matters.

OK!  Enough rambling!  Here are the essential details needed for this card:  1) 11 year old BOY.  2) Birthday theme Call of Duty/Military. 

Creative musing while making this card.  Three stars---like a "Three star General".  Pearls, like buttons on a uniform.  CAS--like it or not, the military is precise, orderly and CAS. 

Card base:  Stampin' Up Chocolate Chip card stock cut to 5.5" square.   SU's Sahara Sand is lighter layer.  Cameo paper is a scrap from my stash. Pretty thin paper.  My guess is I found it at Michael's.  Stars were die cut and embossed with Spellbinder's Stars Five.  Sentiment is from Papertrey's Faux Ribbon set and was stamped with SU's Chocolate Chip ink.  Pearls are from Want2Scrap.


Template for gift card found here.
Blank strip on the base is where Youngest Kiddo can write his birthday message. 

The Youngest Kiddo came home with cupcakes in cameo liners.  Kudos to MoJo for remembering the cameo paper!!