Sunday, September 25, 2011

Trying to Rock Kraft

Are you sitting down?  Yes, I'm actually posting a new project today!!  I'm still fighting the lack of mojo, but seeing as I had yet to make the youngest kiddo's thank you cards for his b-day, it was time to grit my teeth and try to buckle down. I used the sketch challenge on SCS to launch myself off the cliff. 


I always admire those who can use Kraft card stock.  I have a really hard time getting it to "work" for me.  So, of course, just to add to the frustration of not having any mojo, I pulled out my pack of Kraft card stock.  HEY!  I figure if I'm going to go down in flames, I may as well do a good job of it! LOL!!

I started by smooshing Distress Inks Vintage Photo, Shabby Shutters and Tumbled Glass in a random way on my craft sheet.  I misted heavily with Tattered Angel's Glimmer Mist Pearl.  Then I layed a piece of Very Vanilla card stock in the beaded ink to make my Wrinkle Free Distress Background.  The "glare" on the last guitar panel is actually the glimmer mist!  I then stamped the guitar from Tami Mayberry's Live Life Loud set using the new Gathered Twigs Distress Ink.

Allow me to interrupt here:  Let me just say that this now my most favorite brown ink in the Distress Ink line!  It is the ink that was missing between Vintage Photo and Walnut Stain.  I am already panicking that there are no reinkers for the new seasonal Distress Inks. What am I going to do when this ink pad has reached it's saturation limit?!!  Hello, Ranger?  We NEED the reinkers.  This is the ink that MUST be added to the Distress Line.  Just sayin'.  Thank you for listening to little' ol' me.

Back to our previously scheduled post.

After stamping the guitars (I did mention that I LOVE the Gathered Twigs ink, right?!), I distressed the edges of the panels with my distressing tool and then inked the edges with Gathered Twigs ink.  The sentiment, from the same set, was stamped and two score lines added with my Scor-Buddy

This is a bit more involved than what I usually like to make for mass produced cards.  But, seeing as I only had to make 6 cards, it wasn't too bad on the time.  As far as the Kraft card stock~~not bad, not great, LOL!

That's it for me today!  Have a couple of other projects that I need to get crackalacin' on!  Till then..........

Friday, September 16, 2011

Bea A. Ware!!!

Hey People!  Remember me?!  I know that my posting has been very lacking lately.  I'll spare you the long version excuse and cut to the chase:  LIFE!! Not enough hours or energy in the day/week and the creativity time is the first to go!!

BUT!!  Lucky for you, Mz. Daisy has issued another challenge for the E-Team!!


 And no E-Team blog hop would be complete without the chance of winning some awesome goodies from the eP store!  Daisy is putting together an "Tag/ATC" goodie box that will have a variety of tags and tag surfaces, some Twinery Samples and other eP goodies!!  Three randomly selected winners will be chosen from the comments left from TODAY UNTIL SUNDAY, SEPT. 18, on each of the participating Team member's blogs. 

BUT WAIT! There's more!!  Leave a comment on the eP blog about your favorite Halloween treats and another lucky person will win a $25 eP voucher!!

The E-Team
and ME!
Micki and Latrice are not able to join in today, but make sure you stop by and let them know they were missed!!

 Ok!! Onto the fun stuff!! 

My project started out with this little guy:


It's an M&M mmmmMUMMY!! This little guy was so quick and easy to make!  I started with one of these plastic tubes.(this is the smaller of the tubes).............


.............cut 1/2" and 3/4" strips of Sticky Back Canvas and haphazardly inked the edges with Distress Tea Dye Ink.  Randomly wrap the strips of canvas around the tube and across the top and around the lid, glue on some googly eyes and MUMMY!! You've got yourself a cute little treat holder that your kids can make for their entire class or neighborhood!!

But then my brain got to thinking (yes, it hurt),that all Mummy's deserve a nice home to haunt.  So I got out some Distress Ink in Weathered Wood and Pumice Stone.  Randomly squished it on my craft mat and spritzed with Tattered Angel's Glimmer Mist in Pearl and Patina and layed a piece of Pure Luxury card stock in the pooled ink (this is my version of Wrinkle Free Distress). A little selective shading with my Copic markers, using C1, C3, C5 and C7, a little dry embossing along one edge.


I REALLY wish the shimmer from the Glitter Mists showed up in the picture!  It is just enough shimmer to make the tombstone look like granite!

Of course, it's the little decorating details that make a home stand out.  Since I currently lack the Raven and Branched Tree dies in my collection, I had to resort to drawing my own!  The great thing about ravens and barren, dead trees, is~~ they are suppose to look bad!! BWHAHAAAA!! I drew out my rough ideas on scratch paper and then traced the templates onto Black Pure Luxury card stock.  I spritzed the raven with Tattered Angel's Glimmer Mist in Cinder, which added a great blue/black shimmer.  I deliberately left my pencil marks on the raven to add a faint definition of detail, with so much black!

The tree was embossed with the Texture Fade Woodgrain.  Paper easel's were made to hold the leaning tombstone and tree.


After I was all done with the mummy's home, my kiddo's informed me that Mummy was too "cutesy" for the grave site!! Siiiigh.  If you ask for constructive criticism, you better be willing to listen to the answer!!

So, Mummy will not be moving into this particular grave site.  He will just have to haunt some cute little kid's candy bucket instead. Or, he would make a great ghoulish party favor!!

As for Bea A. Ware's final resting spot~~I think it would make a great table name tag setting.  Change out the name for a guest's name.  Or make each tombstone have some funny play on words.  Both would be just SPOOKTACULAR!!

Until next time...........................


Sunday, September 11, 2011

We Remember

We Remember.

Today marks the 10th anniversary of that fateful day of 2001.

We Remember.

The Toad calling me from his office, which was a financial institution that was headquartered  in in the Twin Towers, shortly after 6:30 am stating that a plane had gone into the First Tower....then the shock expletives that came as he watched the second plane hit on the news feed on his computer.

We Remember.

Waking up our guests from Alabama, sitting in front of the computer, trying to understand, trying to figure out fact, fiction, rumors.

We Remember. 

The immediate action of local firefighters standing on every corner holding out the boot for the money they unfortunately knew would be needed for the families of the brave men and women who would give their lives in hope of saving someone else. 

And in the middle of all that horror and destruction a new life was born.

*******


My neighbor gave birth to a healthy baby girl on that day.  Life continued to go forward. 

But We Remembered.

Shortly after, I was talking with the grandmother of that baby girl and congratulated her on her growing family.  The grandmother started to cry, depressed that the baby had been born on that awful day.  All she could focus on, was that for the rest of her life, that little girl's birthday would be associated with that horrible day.  There was absolutely no joy in this grandmother for the birth of that little girl.  Only sorrow and despair.

I looked at her and said, "You're wrong.  This baby is a symbol that life goes on!  In the middle of a horrible, horrible day, a perfect little being was born.  Life did not stop.  She PROVES that they did not win!  We, as a country, stood together!  And we are still moving FORWARD.  They did not stop America! "

The grandmother just looked at me in shock.  Then she said that she had never even considered that angle.  For the first couple of months of her grand baby's life, all she saw was the destruction of life.  She never saw the continuation  of life. 

I read the People Magazine article featuring some of the children born, just shortly before or after, to the families that lost a loved on that fateful day.  These children are 10 years old.  None of them remember the parent they lost.  But they laugh.  They play.  They cry.  They live. 

WE REMEMBER.


Saturday, September 3, 2011

Glitter on my Skull

Hey People!  I hope you are taking the time for some creativity over this long holiday weekend!  As for myself, I get to reminisce how I was in actual labor with the Youngest Kiddo.  Yes, the Labor Day jokes get over used every year!

Staying true to my procrastinating nature, I am just now finishing his card.  But, hey!!  In my defense, I was called into work every day this past week, which makes my mojo go into hiding.  Aaaannnd!! I did get the card done before the family party this evening! WhooHoo!! Bonus points for me! LOL!!

I usually have some idea as to what type of card I want to create for my kids on each milestone birthday.  This time around, I REALLY struggled.  I don't know why.  I just couldn't come up with anything.  Maybe it is my sub conscience way of trying to avoid the fact that my kiddos are bulldozing towards adulthood.

I finally decided to make a card based on one of his favorite things:  Skulls.  I have NOOOOO idea where he got that fascination (wink).  For those of you new to my blog~~I just so happen to like skulls.  And skeletons.  And no, I do not think that they are evil, satanic or morbid.  I think I found them incredibly fascinating while in Anatomy and many years later, I am still drawn to them. 

ANYHOOS!  I digress!  I have had TenSecond Studios Day of the Dead mold in my stash just waiting for me to buckle down and use it in a project.   Combine that with the inspiration from a project that Cheryl did for CHA last year, this is what I came up with:

Can I just say that I would have to use two of the hardest elements to photograph in this project; glitter and metal!!

I started by using a 3 3/4" x 5" piece  Rock Star Black metal with the Day of the Dead mold.  After embossing and detailing the image, I sanded off the raised sections with my sanding block.  I then used Glossy Accents to glue the various sugar coating glitters from Doodlebug Designs and Art Glitter into the recessed areas.  Because I was lazy, I chose not to fill the back of the image with Spackle or embossing paste.  I think that the way this particular image is created, I don't need to worry about the raised areas getting smashed down.  I then used Humungo Sticky Tape to adhere the image to a 4 1/4" x 5 1/2" top folding piece of White Pure Luxury card stock.  Tip:  though the metal is very light weight, you do want a stronger card base to keep the card from buckling under the weight.

And here is the inspiration piece that Cheryl made

Pretty cool, huh?!

I haven't forgotten that I still need to post my ideas and projects using Claudine Hellmuth's paints and canvas.  I just need to try and remove some of the glitter that would be in every nook and cranny of my office (and me).    Till then..................


Tuesday, August 30, 2011

My Colorful Life

Hey People!  It's time for another installment of the E-Team's series It's Better With Color.  Today the team is featuring Claudine Hellmuth Studio products.

 Of course, it wouldn't be an E-Team ride without some goodies!  Stop by all the E-Team member's blogs and leave a comment for the chance of being one of three winners who will each win a Claudine Hellmuth Mini Acrylic Paint Set along with some other EP goodies.   Then mosey on over to the eP blog and leave a comment for the chance at a $25 eclecticPaperie voucher. We would welcome any comments with tips and techniques using acrylic paints in your projects.  You will have until Thursday, Sept. 1st, to leave your comments.Winners will be announced on the eP blog on Friday, Sept. 2nd. 

ME!


Due to unforeseen circumstances of having to travel out of state this past weekend to attend a family funeral and the massive invasion of ants that are trying to claim my kitchen as their new home, I was not able to complete my project!  I did start playing with a couple of techniques that I can't wait to share with you, but it will have to be at a later date.  Bare with me folks.  As usual, life is moving at warp speed and I'm just hanging on by a thread! LOL!

 I am so disappointed that I wasn't able to participate today as I ABSOLUTELY LOVE Claudine's acrylic paints!  If you have followed my blog for a while, you know that I do some back drop painting, as well as murals and such, from time to time.  This means that I use acrylic paints quite often.  To keep costs down, and because I often am painting on cardboard,  I usually use the small tubes of paint that can be found in your local craft store.  These work just fine generally for these purposes.

BUT!  For my personal art projects I will be using Claudine's paints from now on!  These paints are wonderfully creamy and smooth.  There is no need to shake and mix the paint.  And the coverage is great, with a rich pigmented color.  Believe me, these paints are what you want for your projects! 

Ok.....I am going back to battle the ants (again..........I think I'm actually just feeding the little buggers.  They are having a feeding frenzy around the nice "snacks" that I've laid out for them!! ewwwww.  HATE ants!!)

Thanks for dropping by!  I hope to be back this weekend with my painting projects! 

Till then...................

Saturday, August 20, 2011

Leapin' Lizards!

Happy Saturday People!

Yesterday, I realized (quite belatedly), the the youngest kiddo has a birthday party to attend TODAY.  Somehow, I got it in my head that it was next weekend.  Doesn't matter.  What matters is, I had to come up with a birthday card PRONTO.  Which is a scary thought when my mojo and I are just holding polite conversation with each other versus chatting like old friends.

But!  We managed to come up with this card, that was inspired by the picture of the birthday boy holding some reptile, on the invitation to join him at the local reptile store for his party.

So help me if my kid starts begging for another reptile.  Been there, done that.  I do NOT miss hearing crickets chirp at all hours of the night, nor do I miss finding the escapees throughout my house. 

Anyhoos!  I digress!  Here is the card that I came up with!


I bought this lizard stamp years ago at a little stamp store in Santa Fe, New Mexico.  I bought is purely for the fact that the wood mount has the imaged carved onto the block!  It is a showcase of craftsmanship!  I didn't care if I never used the stamp.  The carving is an incredible piece of art.


See what I mean?!  I can't imagine the time it took to carve this incredibly small detail!

I stamped the image with Memento Rich Coco onto a left over piece of paper that I had done my version of Wrinkle Free distress. This means, I have NO idea what particular distress inks were used.  Or what Glimmer Mists I used.  I think that Antique Brass was one as some of the shimmer looked brassy.  I then had to fussy cut the lizard.  It would seem that someone really didn't plan the angle of her stamping correctly!  shhhh.  I think that might have been mojo.  But, heaven knows!  I don't want to tick her off by mentioning it!

The lizard was then adhered to another Wrinkle Free sheet that was Pure Luxury white based.  The inks that I ended up using were Distress Frayed Burlap, Weathered Wood and a touch of Shabby Shutters.  I spritzed the ink with a combination of Tattered Angel's Glimmer Mist in Antique Brass and Patina.  I then roughly sponged around the edges with Distress Walnut Stain.  I then ran the background piece through the Big Shot with an old Fiskers Leather texture plate, to give a subtle texture and added dimension.  The lizard was attached with a combination of Scor-Tape and a Quickie Glue pen (for those little toes).  I used my Copics, B45, C1, C3, to add some more shading around the lizard to make him pop off the background a bit more.  The sentiment is from SU's, It's Your Birthday.  I did some masking to have the words layered versus in a straight line as the stamp is.  The whole shebang is attached to a Ivory Pure Luxury 5 1/2" square base. 

That's it for me today!  But!! Before I leave, I wanted to remind you all that you have until tomorrow, Sunday, August 21, to add your creation to to the Egg-cellent E-Team challenge! 


 You don't want to miss the chance at a $40 gift certificate to shop all the new goodies that Daisy has in the eP store!!

'Till then..........................


Wednesday, August 17, 2011

Stamping and Metal

Hey People!  Can you believe it is Wednesday already?!  The family has been running around getting the last details ready for the kiddos to start school tomorrow.  I would swear that we just got out for the summer just days ago!!

Have another tutorial to share with you today!  Beate, from Splitcoaststampers, asked me to do another Wednesday tutorial using metal.  Now, what is seen in the tutorial is NOT my original idea.  It is just my version of a very common technique!  Because I am lazy, I am not going to do the step by step here.  I'm going to send you to the home page of Splitcoaststampers for the link.  I will share the picture of the project and the youtube link here though!!


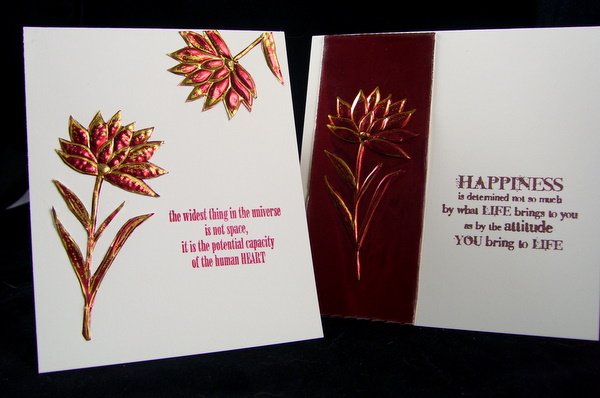
I used my stamped images two different ways today.  Both cards followed the stamping and metal instructions the same.  For my first card, I just cut out the stamped images after the backing paste had dried and I used them as metal embellishments for my card.  The second card keeps the stamped image on the metal panel. 

Here is the video of the technique


Ok.  Seriously.  I must have ticked off the technology gods sometime recently.  NOW Splitcoaststampers is also down, so I can't link to their site! 

What type of offering do you think the technology gods like?  Insert a looong, heavy sigh here_______.

Supplies:  Both cards use Pure Luxury Ivory cardstock as the base.  Both cards use Wendy Vecchi's Be Happy, Make Art stamp set.  Stazon Metallic Gold was used on TenSecond Studios Barn Red metal

If you are not inspired to emboss your image, just stamping on the metal is a fabulous look too!  I especially like the metallic Stazon on top of the metal.  Very rich looking!

I hope this inspires you to try combining your stamps and metal.  'Till then..............explore some type of creativity today!!