Sunday, November 21, 2010

Pioneer Woman....

I am NOT!!  LOL!  I just love Ree Drumond, aka The Pioneer Woman. I love how her sense of humor comes out in her writings.  I love her photographs of life on the ranch.  They remind me of growing up in Wyoming. With real cowboys and wild mustangs too.  I love how she showcases her cooking and does not apologize for using fat, beef, and the yummy stuff (and the fact that she takes all the photos herself).  To me, she is personable.  Not afraid to tell of her so-called faults and mistakes.  I am incredibly envious of the lodge kitchen and her own kitchen.  Both of which I envision to be larger than my entire house. 

But I thought I would try and channel her with today's post.  Let's just say that there are MANY miles between California (me) and Oklahoma (Ree). 

Remember the Denmark Paper Doll the youngest Kiddo had to make?  Well, along with the fact report and the paper doll, comes the "make an ethnic dish" from that country to share at the Ethnic Feast.  Once again I'd just like to thank Mrs. M. for assigning the Kiddo a country that uses common, off the shelf ingredients.  Mind you, all the food made also has to be vegetarian or made with meat substitutes.  Just to add to the fun!!
After some research, the Kiddo and I settled on Danish Peppernut Cookies to make. 

Ingredients you will need:


In a large sauce pan mix the sugar, corn syrup, milk and shortening. 


Bring to a boil and after it cools, add the spices and baking powder


Stir in the flour


Chill for a couple of hours.  Roll out a 1/4" rope on a surface dusted with powder sugar.  Ignore the part of the directions that say to cut the cookies in 3/8" segments and bump it up to 2" segments


Also ignore the instructions that say to bake on greased cookie sheet and use parchment paper.  That way you don't have to wash the cookie sheets!!

Sprinkle with some more powder sugar


And dress the Kiddo up to look like a darling Danish boy!!


I must say that these turned out pretty yummy!! They are a "hard" cookie. Like a biscotti. Or, that is how ours turned out!! I think they are designed to dunk in coffee or hot tea.  Maybe someone of Scandinavian decent could let me know.  Personally, no one in this family has had any problems just munching on them!!  The cardamom and anise give these a nice flavor. 

Danish Peppernuts

Ingredients
3/4 cup sugar
2/3 cup dark-colored corn syrup
1/4 cup milk
1/4 cup shortening
1 teaspoon anise extract
1/2 teaspoon baking powder
1/2 teaspoon vanilla
14 teaspoon salt
1/4 teaspoon ground cinnamon
1/4 teaspoon ground cardamom
1/4 teaspoon ground cloves
3-1/3 cups all-purpose flour
Sifted powdered sugar

1.  In a large saucepan combine sugar, corn syrup, milk, and shortening.  Bring to boiling.  Remove from heat and cool about 15 minutes.  Stir in anise extract, baking powder, vanilla salt, cinnamon, cardamom and cloves.  Stir in the flour until well mixed.  Cover and chill about 2 hours or until easy to handle. 

2.  Divide dough into 24 equal portions.  On a surface dusted lightly with sifted powdered sugar, roll each portion of the dough into a 1/4 -inch thick rope.  Cut into pieces about 3/8 inch long (or 2 inches like us!).  Place 1 inch apart on a greased cookie sheet (or use parchment paper)

3.  Bake in a 375 degree F oven about 10 minutes (5-7 min was better in my oven) or until lightly browned on bottom.  Immediately remove and cool on paper towel (once again, I just used my cooling racks).  Makes 8 cups of cookies (thirty-two 1/4 cup servings)

*****************

Now, I don't want you to think that I never take pictures of the oldest Kiddo.  He is at the age where he really doesn't care to pose for his silly mother.  But I did manage talk him into letting me take this quick photo of him kinda dressed as an Indian for his 8th grade Thanksgiving feast.  Basically, the kid wore brown shorts, a light tan t-shirt turned inside out to hide the graphics.  I kinda/sorta made an arrowhead he had into a necklace and a cheesy headband.  "Mom.  Could I be one of the Hopi gods tomorrow.  Me:  Dude.  It's 8:30 pm. Just how am I suppose to come up with an elaborate costume NOW?  "Yeah.  I  guess.  Can I have a large feather that looks like an eagle feather in the headband?  Me:  Bud.  It's 8:35pm.  I have some chicken feathers I think.  You get chicken feathers.  Deep heavy sigh...


Love, The Pioneer Woman Wannabe.  (snort)......


Monday, November 15, 2010

Darcie's Song

Hey People!! You are just going to LOOOOVE what the E-Team has to share today!!

Today I've TWO projects to share using Darcie's Cardinal Ornament and Darcie's Meghan Acrylic Ornament Frame.  Between the two, there are so many possibilities that my brain is about to blow a fuse!!


I'll begin with the card.  The base is a top folded piece of Pure Luxury.  The rich red paper is from My Mind's Eye Holly Jolly.  That is mounted on a small mat of basic black.  The frame was stamped with Stazon Metallic Gold unto TenSecondStudio's Pearl Metal,  I then used my paper stump and refiner to recess the back of the frame to add depth.  The music block was stamped onto a scrap piece of vanilla with Distress Ink in Antique Linen and sponged lightly around the edges with Distress Vintage Photo.  Using my stampamajig, I stamped the sentiment with Distress Fired Brick.  The sentiment panel was adhered to the metal using Sticky Tape. 

The cardinal was stamped onto another piece of scrap vanilla Pure Luxury and sponged with Distress Wild Honey on the beak (I just used the edge of a foam piece) and Fired Brick. The image was then clear embossed and cut out.  The branches are from a Martha Stewart punch.  The Toad (who is becoming my life line when I get stuck on cards) came up with the idea to add the white embossing powder sporadically on the branches to give them the look of having been snowed upon.  I used my Versamarker randomly on the branches and then heat set the white embossing powder.  Tiny 1/2 pearls were customed colored with my Copic marker to make the berries.  The elements were adhered to the metal using Tombow Metal glue.


Here is a close up showing the depth of frame and layers


The ornament is a "shadow box".  The base acrylic layer was covered in the same Holly Jolly paper as the card. I used Glossy Accents to adhere the paper to the acrylic.   I again stamped the music block from the Cardinal Ornament set onto vanilla Pure Luxury with Antique Linen.  I traced around the inside of the oval frame and cut and sponged around the edges with Vintage Photo.  The Noel sentiment was stamped using Fired Brick.  Two layers of chipboard and the other acrylic later were glued together using more Glossy Accents.  

The front (and back) of the ornament were traced onto more Pearl Metal and cut out using paper snips. I cheated just a bit on the stamping of the music.  The included music sheet in the stamp set was just this  much to small to go to the edges of the ornament and was lacking in length also.  So I pulled out a larger music sheet stamp, from Stampendous, that I have in my collection and stamped the notes again with Stazon Metallic Gold.  The metal was adhered with Tombow Metal Glue on the back and Sticky tape on the Front (I wanted to see if there was a difference in how they stuck the metal to the chipboard.  The sticky tape obviously sticks right away and doesn't leave much room for jiggle, if needed.  The glue seems to be holding just as well, but requires a bit of time to set.  If you try to rush it, the metal can slip off.  Ask me how I know!) 

I sprinkled some of Martha Stewarts Snow Glitter in the recess of the shadow box and then stuck the "cover" of my ornament over the top using more glossy accents.  The edges of the metal were then burnished with a paper stump.  I then used a combination of a black sharpie and marker to go over all the outside edges of the ornament to blend them together. 

The poinsetta was stamped with Archival Jet Black ink onto another scrap piece of vanilla and colored with Copics.  It was cut out and covered in Distress Rock Candy stickles. Again, Tombow Metal glue was used to adhere it to the metal.


If you haven't stopped by the other Team members blogs yet, you will want to head over there right away.  AND make sure you leave a comment on the EP blog!! I hear there is Darcie goodies to be given away!!

And! This is where the goodies would be!!

Thanks for dropping by again today!! I hope this little hop by the E-Team inspires you to EXPLORE some
CREATIVITY!!

Thursday, November 11, 2010

Kiddo Creations

Hey People!!  Not sure how it got to be Thursday already, but I'm glad that this weekend is almost here!!  I got a BIG BOX OF GOODIES and I cannot WAIT to start playing with stuff!!

There has been creativity going on here.....just not mine.  The Kiddos have had projects due and once again, Mom's "junk" adds those little "extras" that kick up the projects up a notch!!

First up:  Oldest Kiddo had to make a project from the Renaissance era.  Of course, being a "manly boy" he went for a weapon of war.  A siege tower to be exact. 


I'm not sure why I don't have any pictures of the actual work of creating this.  Heaven knows, all the Popsicle sticks, glue, felt, etc., were on my kitchen table for two weeks.  My best guess is it is due to the fact that this was a project that I had very little to do with.  The Toad helped the Kiddo design this and they worked on it together.  Sometimes while I was at work.  Or while I was making supper.  Whatever.  I failed to document the actual creating. 

This picture does not show the cool details on this project.  Like the drawbridge that drops down.  Like the floors between the three stories that have these itty, bitty little ladders that lead to the next floor.  I really should have taken more pictures of the project itself. But I'm lazy.  And it is 7 am and my hair is drying all funky because I'm trying to post instead of taking care of my looks.  Ahhhh!!  The sacrifices one makes for her blog followers!!  

Hehe.

Next project.  Each year at our little school grades 4-6 have an "Ethnic Feast" instead of a Thanksgiving Feast.  Each kid is assigned a country and must do a report of some type giving details of their country.  My Kiddo was assigned Denmark. Thank you Mrs. M. for not assigning my kid a country I don't even know how to pronounce.  In addition to a "fact sheet" on Denmark, the Kiddo had to dress this paper doll in the ethnic costume of his country.  


  I now know that I need a Big Bite.  My cropadile did not reach the center of this paper doll to place the jumbo eyelets that the kid was using as "buttons" on the vest.  Actually, the Kiddo is probably glad I don't have a Big Bite.  He had waaaaayyyy too much fun pounding the eyelets with the hammer.  Let me confess here that I have TOTALLY forgotten how to set eyelets the "old fashioned" way.  Didn't bother to look it up.  The Kiddo just smashed those puppers in the paper and got them to stick.  Works for me!

The finished project and the proud creator:


Well, that's it for me today!!  I get to spend the rest of my "day off" volunteering at the school, grocery shopping and trying to find an ethnic Danish dish that I can make for the Ethnic feast next week.  Oh yeah, and maybe sneak in some play time with my new goodies!! hehe!!!

Thanks for dropping by again today!! Remember that the day is not complete without some type of creativity!! 

Monday, November 8, 2010

MISTER Old Fart

Hey Peoples!! It's a dreary, rainy Monday here.  The moisture is desperately needed, so I won't complain (too much).

Thought I'd share the last of the cards I made for all the birthday's that we celebrated while in Solvang over the weekend. I'll share about the trip in another post.  Like I mentioned before, most of our friends and family tend to look at life from a snarky (but fun!) point of view.  Once again Bugaboo Digi's came to my rescue.  Here is my Old Fart for an old Fart!


Pretty self explanatory.   Sized and printed the Old Fart onto Georgia Pacific 110# and colored with my Copic Ciaos.  My printer liked this paper better, but I have to say, I much rather use Gina K's Pure Luxury.  What a difference!  This paper bleeds with copics, so it wouldn't do for a one layer card.  The texture is not as smooth (or luxurious, hehe) as the Pure Luxury.  BUT!! It did the job. 

The image was matted onto SU's Night of Navy.  The design paper is from Making Memories Just Chillin' pack.  Another mat layer of Night of Navy.  Base is a 5 1/2" square made of SU's Kraft (now called Crumb Cake, I believe).  The buttons are from Basic Grey's Granola line (I think.  I have had them in my stash forever).  They look much darker in this late night photo than in real life.  I added some hemp twine and adhered them with glue dots. 

The inside: 


Hate to cut this short, but I need to get my rear in gear and get ready for work!!  Thanks for stopping by again today!!  Remember~~make time for creativity.  It makes the world go round!!  Till next time......

Friday, November 5, 2010

Birthday, Shmirthday

WoooHooo!! This is card number 2 of the three needed by this weekend!!  I'm on a roll!!

I decided to show my true colors on this card and go with a snarky attitude.  Unfortunately, I don't have many snarky stamps.  Seriously, people.  This is a sorely lacking market in the stamping business.  Think Maxine.  Think Erma Bombeck.  There are those of us who think life is too serious as it is and prefer to lighten things up!!  Give me the demented, the snarky, the FUNNY stamps!!

Ahem.  Anyhoos!!  Since I have very few snarky stamps, I went on the hunt for some digital stamps that might fit the bill.  Found what I was looking for at Bugaboo Stamps.  Even better, Jodi is having a 50% off sell on all her digi's (I am not being asked, paid, compensated for this plug.  Jodi has a wide variety of digi stamps and I'm all about letting you know about good deals!!)  I will admit that with my limited computer skills, it took me a bit to get my images from one place to another, but if I can do it, ANYONE can.  It also helped that Jodi has a tutorial on opening her files into a word document.  If you need help, check it out here.

And this is what I came up with!! 


I printed my  4"x4" image out on Gina K's pure luxury (though my cheapo printer does not like the weight of this paper!!) and colored it with various copics (just a note for those of you who might be new to my little corner of blog land.  I know that there are those who list the markers that they use to color.  You will never find that on my blog.  I grab, scribble on scratch paper, lay down, pick something else, and in all honesty, have no idea what markers I finally used in my project!!).  The image was layered onto SU's Eggplant Envy. The sentiment was computer generated (this image actually comes with the sentiment "One tequila, two tequila, three tequila, floor", but I wanted to personalize this for the birthday gal!!), printed out on Georgia Pacific #110 paper (which my printer liked better).  I cut and embossed the sentiment and mat layer using my classic Spellbinders Circle Nestabilities.  Very light sponging was done along the edge of the sentiment and the main image using Distress Ink Dusty Concord.

The image and sentiment were then layered onto SEI "Black Orchid" paper. I couldn't get the black embossing on this paper to show up without a glare!!   My base is once again, Gina K's pure luxury, cut to a 5 1/2" square. 
Supplies:  Stamps:  Bugaboo Digi, computer generated sentiment.  Paper:  Gina K's pure luxury, SU Eggplant Envy, SEI dp. Ink:  Distress Ink Dusty Concord. Accessories:  Spellbinders Classic Circles, copic markers

I think once I figure out this digi thing, I could have lots of  fun with them!! It's nice to be able to resize your image to fit the project.  Explored something new today.  And that, my blog friends, is what it is all about!!

Thanks for dropping by again today!!  Off to switch the laundry and onto card number 3!!  Till then.......

Wednesday, November 3, 2010

Asian Inspiration

Hey Peoples!!  This week is flying by and I am sooooo behind! (yeah, I know....that is nothing new!!)

This weekend we are leaving to do a bicycle ride in Solvang, CA., with my in laws and some other friends. I am looking forward to the time away.  My only "hmmmmmm" on the ride would be I haven't ridden my bike for a couple of months. Life, weather and many other excuses just kept me from riding.  I know that I can bluff my way through the 25 miles we are going to ride with the Kiddos, but I'm not sure what condition my rear will be in!! LOL!

We will also be celebrating my mother in law's birthday and the birthday's of two of the other friends who are coming along.  It's Wednesday evening.  I have ONE card done.  We are leaving Friday after I get off work.  Nooooo stress here!!

I will spare you the over played song and dance about the lack of light in my office at night and the quality of my photography skills.  Just trust me that this card has much more POP in real life.

While panicking trying to find some inspiration for this card, I went to my favorites on SCS.  Immediately I came upon this INCREDIBLE creation by Anne Ryan.  This is my take on her lovely card:


The base of the top folded card is a piece of 6 x 4 1/4" textured black card stock.  The DP from 7Gypies' "Gypsy Market" was layered onto SU's Taken with Teal.  The vase was cut and embossed using my classic Spellbinders Circle Nestabilities. The circle was cut in half to make my vase.  I then placed T!m Holtz's mini flourish mask on the 1/2 circle and covered the entire piece with my Versamarker pad.  Black embossing powder was then sprinkled over the versamarker.  I carefully removed the mask and melted the embossing powder, giving me the tone on tone texture of glossy and flat finishes. 

I pulled out some REALLY old prima flowers that I have had forever and threaded them onto some black wire, twisting a flat loop. I deliberately flipped the flowers to the back side, so the petals would curl up versus down.   Black 1/2 pearls were then adhered to the wire using Glossy Accents as my glue.  I then bundled groups of the flowers together and held them with a strip of the 7Gypsie paper and score tape.  I used the unembossed 1/2 of the circle to make the "back" of my vase, and used score tape to place my flowers.  Foam tape and score tape were then used to place the "front" of the vase over the back.  Hint:  I usually color the edges of my foam tape to match the paper (in this case, black) so that the white doesn't "pop" out when the recipient is examining the card.  The final touch was to add the leaf trinket pins by Maya Road. I used my copic black marker to color the silver part of the pin black so it would blend with the wire.  I then raided The Toad's tool box and borrowed some wire cutters to cut the leaf off of one of the pins and adhered it to the back of the flower with a couple of small glue dots.
Supplies: Paper: 7Gypsies 6x6 gypsy market, textured black and SU's Taken with Teal.  Accessories:  black embossing powder, Tim Holz's mini flourish, Scor tape, Glossy Accents, Maya Road leaf Trinket pins, -all from eclecticPaperie.  Black craft wire, Hero Arts 1/2 black pearls. 

Thanks for dropping in again today!!  I'm going to clean up this mess so I can start another one!!  Till then....

Tuesday, November 2, 2010

Extreme Makeover

This past weekend was our little school's Fall Fair.  Each classroom, from K-12, is responsible for a booth (or as in the case of some classes, booths) that will provide either entertainment or food and hopefully raise some funds for the classroom.  The last couple of years, the Home and School has picked a theme for the fall fair and has asked each of the classrooms to decorate with said theme in mind.  This years theme was "Hawaiian/Luau".  And luckily, the weather decided to cooperate and give us a beautiful sunny day to enjoy!

This year the oldest Kiddo's class had three booths:  churros (which, by the way, were very yummy!), shaved ice and a sponge throw. 

One of the teacher's asked if I could update the sponge throw booth.  This is one of those booths where a "volunteer" sticks his/her head through the cut out in a piece of plywood and has the privilege of having someone pay to throw sopping wet sponges at him/her.  There was a board that had been used in years  past and all I needed to do was just update the theme. 

This is what I was given to work with (here comes the photo disclaimer again.  All of these were taken in the garage where I was painting.  The board was 8 ft. tall.  I leaned it up against the cabinets in the garage and had only about a 5-6 ft space between the cabinets and the opposite wall.  Not a lot of room to take decent photos):
 
This photo does not accurately show the horrible condition of this board.  While I saw it come out of the storage bin, it had obviously been left out in the elements for an extended time.  In addition to it being extremely dry with a wonderful splintered texture, it also had CHUNKS of wood missing.  I seriously considered sending the Toad out for a new piece of plywood, but given the fact that it would probably face the same fate as this one, I just decided to work with what it was.

The rattle can paint job was obviously done by the previous students who used this board a couple of years ago.  While I really do admire their skill with spray paint, I do not possess the same ability.  To be honest, I don't know if I ever even attempted to paint a "picture" with spray paint.  Objects, yes.  Picture, nope.  Don't think so.  One full quart of Kilz primer later.....
Then I painted the entire board with a base coat of light blue.  Let me just insert this one fact for anyone who is going to paint a project.  Whether it be a weathered piece of plywood, your living room or a canvas, you get what you pay for in the paint.  I bought the cheapest paint I could find at Walmart for the base.  And the clumps of paint that came out of that can prove it.  For years I have used a combination of the cheap craft paints and good quality paint to  paint murals. Mostly because the small containers are very convenient to haul to work sites.  And the large selection of colors.  But for my house, baseboards and such, I ALWAYS pay for quality paint. It makes a HUGE difference in the coverage and in the "workability" if you are doing any special faux or painting techniques. 

I found a piece of clip art as my inspiration and then drew the rough draft of my image.

Pulled out my drawers of cheap  craft paints and went to work.

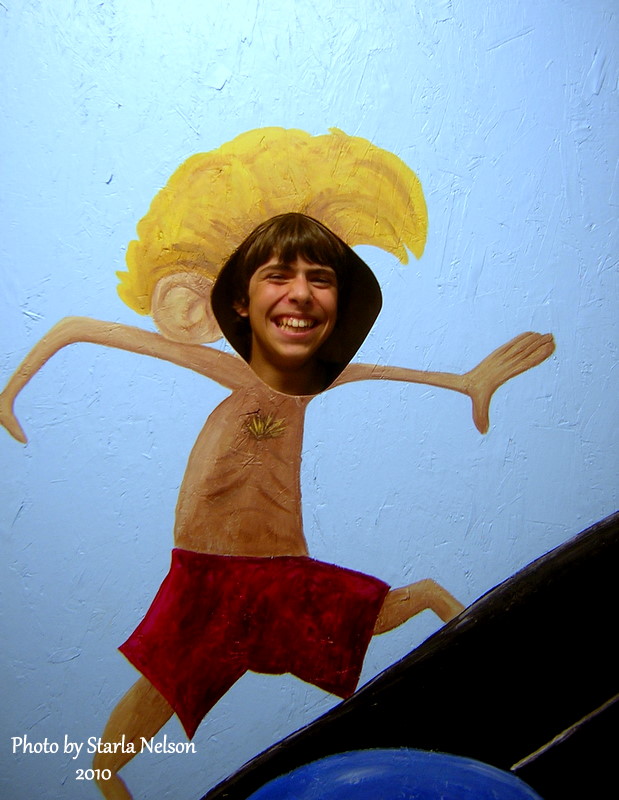
I had thought about going with a "buff" body builder, surfer dude, but thought it would be rather funny to use a scrawny surfer instead, given the fact that most of the "volunteers" for this booth would be 8th grade boys.  8th grade boys who think their bodies are getting buff, but in reality, are still scrawny.  Just a glimpse into my demented sense of humor!

The Toad giving his "gnarly surfer impression"


The youngest Kiddo giving his "cool surfer dude" impression


The oldest kiddo giving his "Do I have to do this" surfer impression

Then finally giving in to the stupid fun of it all

And The Toad's favorite part of the whole project:

The "gnarly" mess that I make when I create taking over his garage!!

I still haven't downloaded the actual pictures of the Fair.  That will be for another post!! Thanks for dropping by again today!!  Remember~~creativity comes in all different mediums.  Make sure you explore one today!!
Till next time.......