Wednesday, April 25, 2012

Inspired By

TODAY IS THE DAY!  The BIG reveal of the project you have all been anxiously awaiting! Just go with my disillusions here! hehe.   The E-team is starting a new series that I think we will all enjoy and hopefully grow from!

This new blog hop is featuring our own personal journals as we embark on a journal that is
INSPIRED BY WORDS.

Visit each E-Team blog participant and leave a comment between today, April 25 to Sunday, April 29th for the chance to win a $25 eP gift certificate.  Winner's will be announced on the eP blog, Monday, April 30. PLUS!!  Join the E-Team in our journal adventure and post your journal cover on the eP blog by May 4th and we will pick 2 people to join us next month for the next journal adventure!!

ME!

I'm really excited about this new series!  I have been wanting to do an art journal for a while, but just never jump off the ledge. Add my love of inspirational words and this series has become the icing on the cake!  I'm so glad the Daisy snuck up behind me, and shoved! LOL!

I decided to make my own journal book instead of buying one.  My thought is that this will allow me to add what ever type of base paper or medium I would like to work with for that particular entry.  And I can add as many pages as I can fit my binding rings around! haha.  For my journal cover, I wanted to combine a couple of my favorite mediums; paint, metal and most recently, Ice Resin.  I started with a couple of Zutter book covers and painted a base coat of TenSecond Studios Verday paint in Bronze.  

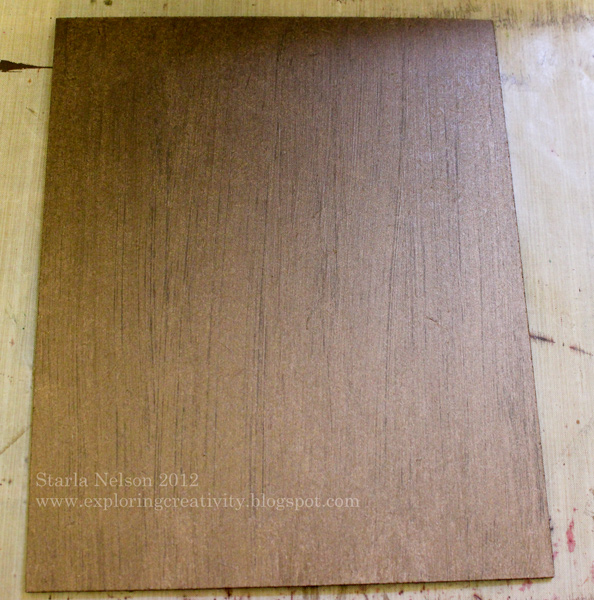
Tips:  shake the paint well before applying.  The Verday paint is an acrylic paint that has actual metal particles in it.  You want to make sure that those particles get dispersed from settling on the bottom of the bottle.  

After letting the base coat dry for a couple of hours, I took a rough sea sponge and lightly dabbed more VerDay Bronze paint randomly onto the cover.  Immediately, while the paint was still wet, I misted with the VerDay Patina.  I put my Verday Patina into a cheap, fine mist bottle (like "hairspray" bottle), found  in the area where travel sized accessories are at Target.  
Let the Verday chemically react with the paint overnight.


After drying, I felt that I had gotten a bit heavy handed with the sponging/VerDay and had too much patina. I then just took my course sea sponge again, dipped it into a bit more VerDay Bronze paint, dabbed off on a paper towel and "dry" sponged randomly on the top of the covers to add more copper

Here is a picture, deliberately angled so that you can see all the wonderful metallic bronze shine


I have to say, I hated to cover up all this wonderful patina!!  LOL!  But cover it up I did!  Here is the cover to my journal.


I die cut various layers from the Tattered Floral die and from Spellbinders Carnation Creations from TenSecond Studio's Barn Red metal. I ran some of the flower layers through the Big Shot with an embossing folder and some layers I just hand doodled squiggle lines and others I used a decorative wheel tool on the metal to make patterns.  I then intensified the color with some alcohol inks 


I then shaped the flowers and applied a thin layer of Ice Resin to both sides of the individual layers using a small paint brush.  I recommend wearing gloves for this step.  It gets rather messy and you will get Ice Resin on your hands while trying to paint both sides of the petals.  I left a small portion of the bottom of the flowers unpainted so that I could set them down on my craft sheet to dry.  I was hoping that the Ice Resin would harden the metal enough that the flower petals would be more stable and would not bend as easily.  The Ice Resin DID help stabilize the metal.  I'm thinking that if I were to add another layer, it would make the metal really solid.   After letting the Ice Resin cure for a couple of days, I glued the layers together with Beacon's Glass, Metal and More Permanent Glue.  This is the first time I have used this glue and I was pleased at how relatively quick it set. I would highly recommend using it in a well ventilated room though! It has a bit of a strong odor!

The leaves were die cut using a combination of Spellbinders Carnations Creations and Foliage from TSS's Peacock metal.  


Here is my tutorial , with a video link for making flowers out of metal.  

And a close up of my "first" journal entry.  


The journal entry was typed on the computer, then each word cut out and sponged with Distress Vintage Photo ink.  I cut off a flap from a cardboard box, saturated it with water and peeled off the smooth layer of cardboard, revealing the rough layer underneath.  Distress Stain in Picket Fence was randomly applied.  The words were then attached using glue dots.  

The final touch was adding some swirling bling from Want2Scrap.  

I also finished the inside of the cover. 


I like to think that the TOTALLY different look is reflective of what I hope to accomplish with this journal.  No preconceived ideas.  No limits.  Just go for it.

I first covered the inside with Claudine's gesso.  I didn't really worry too much about how thick the coverage was.  Since I was totally impatient, I heat dried the gesso with my heat gun.  I then dropped random spatters of alcohol ink onto the gesso and hit them with a blast of canned air, dispersing the inks.  A light mist of Tattered Angels Glimmer Mist Tuscan Sun  was added on top.  After drying, I stamped the sentiment from Wendy Vecchi's I Am My Art set, using Archival Jet Black Ink.  Tip:  I would HIGHLY recommend that you do the inside of the cover before completing all the dimensional work on the outside.  It would make getting a clean, crisp stamped image soooo much easier and you will be able to avoid having to go over the stamped image with a black Sharpie.  Just sayin'.  

I'm really excited about this new adventure!  I hope that you will check out all the other E-Team's journal cover's and be inspired to join us!!


Thursday, April 19, 2012

Monday, April 16, 2012

It's a VerDay

I have continued to work on my new project, but while waiting for parts and pieces to dry from various mediums, I decided to play around with some new VerDay paint and patina from TenSecond Studios.

I think I may have a new obsession.

This paint is an acrylic paint that actually have metal particles in it that will react chemically with the VerDay, giving you a wonderful patina, without having to do layers of faux painting. 

Did I mention that I may be slightly in love with this stuff?  Good.  Because I'm looking at everything in my house trying to decide what I'll be painting next. 

I started with a off white, faux rusted cross that I have had for a while.  I have a collection of crosses on the wall over my couch and this cross never fit in.  I bought it with the intention of painting it, but just never got around to it. 


I began by painting a base coat of the Copper VerDay paint.  After letting it dry for a couple of hours, I used a rough sea sponge to lightly dab sections of the cross with more paint.  While the paint was still wet, I misted with the VerDay

Then the hard part.  Walking away for 6-8 hours and just letting it react.  Once the waiting was over I lightly dry brushed more copper paint over the raised portions to highlight the edges.


click on the picture to enlarge

Did this not turn out fabulous?!!  Ok, I really should have waited to take a picture when the sun was up to show how awesome this turned out, but I was sooo excited that I couldn't wait!!  This even got the Toad's seal of approval without asking what he thought. 

It's looking like it is going to be a beautiful day here.  I'm going to take advantage of the lovely morning and head out for a long walk with the neglected pooch before I start my day of running errands all over So. Cal.

Before I leave, here is another sneak peek of the upcoming project


Did I mention that I'm obsessed?!! hehe

'Till next time.............enjoy the day and explore some creativity!

Saturday, April 14, 2012

Getting Inky

Hello?!!  Anyone still out there?!!

Yes, once again life has gotten in the way of crafting.  BUT!! I have some good news: I have been getting ink and paint all over my fingers today.

Of course, there is a slight downside to that:  this idea is not one that can be finished in a day. 

Or two days. 

Let's cross our fingers it doesn't go into next week. 

 I'm trying to let the creativity decide where this goes and when it is "finished".  Well, sort of.  It is for an upcoming blog hop with the E-Team.  But this is an idea that I have had brewing in my noggin' for a while.  It just took a little shove to get me started.

I'm liking it so far.  Paint. Metal, alcohol inks.  VerDay (more on that later).  Yep.  It's a new mixed media journey that I'm excited to start exploring.

 I'll share a little sneak peak with you.


Did I mention that I'm making a mess too?!! 

Stay tuned.  There is more to come soon!!

Wednesday, April 4, 2012

Eggstra! Eggstra! Read All About It!!

Did the fact that Easter is THIS SUNDAY take anyone else by surprise?!  Seriously, I'm not sure what is happening to the months, besides the fact that they are FLYING by!! 

This week was back to school after spring break.  The Youngest Kiddo's teacher got to spend her week off sick.  She actually missed Monday as she was still feeling below par, but managed to make it through the day yesterday.  We were suppose to get together to make baskets for the Kiddo's class to give to their kinder buddies.  Obviously, that never happened!  Due to overwhelming schedules on both ends, I told her I would just make the baskets.  I mean, there are only seven little guys in the kinder class, how long could it take to make seven little baskets?! Feel free to insert chuckles and major eye rolling here________. 

Sometimes, you just have to roll with the punches.

ANYhoos!!  Let's just say I am forever in debt to the wonderful, crafty ladies and gents who so kindly share their creations and templates for free on the Internet.  These people are a lifeboat to silly mom's like me who over extend themselves!  One such person is Claire Brennan, owner of Waltzingmouse Stamps. This wonderful lady so helpfully posted her free templates for different baskets on her blog this week, saving me precious time in searching. 

Claire, Thank you

I printed out the templates onto old, retired SU design paper that I had cut down to 8 1/2" x 11".  I did not feel that the paper was quite sturdy enough to hold the treats that were to be placed inside, so I used some full sheets of Hummungo Killer Adhesive to adhere two sheets of the design paper together before cutting out the template.  Despite setting my printer to grey scale printing, the lines were still pretty obvious so I chose not to tape down the little flaps of the basket. 


It was shortly after that I discovered that I do not own any Easter stamps.  Can someone please explain to me how, in all my years of being a demonstrator, stamping and crafting, that I do not own any Easter sets?!!  I finally found a couple of Easter sentiments in retired SU sets.  I pulled this on from Loads of Love Accessories.  The "eggs" were die cut using Spellbinder's classic ovals and Scalloped ovals. 


This shot shows not only the mess one can create when she has yet to clean up from the Boston Tea Party, but it also shows the inside of the baskets lined with the coordinating design paper.

there was another photo of the unholy mess.  I'll spare you.  You can thank me later.

  Template can be found here. 

I hate to post and run, "but I've got my country's 500th anniversary to plan, my wedding to arrange, my wife to murder and Guilder to frame for it. I'm swamped".  Name that movie!! hehe

Sunday, April 1, 2012

The Making of the Boston Tea Party

This weekend was creativity of a scholastic nature.  The Youngest Kiddo has an American History diorama due this week.  He chose the Boston Tea Party as his subject. Since this project pretty much took over my work space, I thought I would share the makings of the Boston Tea Party with you all today.

Scor-tape.  A ship builder's best friend


Notice the concentration.  The tongue makes several appearances, hehe
The Tongue modeling tea boxes out of clay

Yep, this was a two day project.  Inking the raised wood grain embossed paper
Painting of the ship's masts
This Big Shot is harder than it looks
Making funny faces helps!
The tongue appears again while pounding "nail heads"
Such concentration...hehe
This would not be the youngest without some extra "acting"


 Closer shot of the work
Three ships were involved in the Boston Tea Party, the Beaver, Eleanor and the Dartmouth. 
45 tons of tea (or 342 containers) were thrown into the ocean the night of December 17, 1773.
The colonists disguised themselves as Mohawk Indians so that they could say they weren't involved in the protest (even though the British knew better).

The proud artist

I should make it known that the template for the ships came from Brenda Quintana (Qbee).  You can find the template here.  I cut out another of the ship's base and flipped it over to make a platform for the colonists to stand on (otherwise, the boat  was too deep). 

Monday will be another day of a different sort of creativity.  The Youngest is part of the Lego Robotics team and they have their competition on Monday.  From what the Toad has said (he went with the Oldest Kiddo when he was of the same age), it is a lot of standing around waiting.  I guess I need to download a new book!!