Sunday, February 27, 2011

Metallic Birthday

Yesterday, while in the middle of the cleaning attack on the house, the youngest Kiddo comes up to me and says "MOM! Where are my pants that I wore Thursday?  You haven't washed them have you?!" Not likely, as that would require the laundry to be DONE.

Come to find out, the Kiddo has in his pocket an invitation to a birthday party for one of the girls in his class.  A party that is TODAY. 

This fact is given to me late in the afternoon.  There is no time to run to town to buy the easy cop-out gift card present as it is about time to get ready to go to the same Kiddo's basketball game.  There is no time to make a card. 

So being the Prince of Toads that he is, The TOAD runs down to town early this am to buy the gift card and purchase a card.

Yes, I sent my husband to BUY a card. 

But then the phone call came.  "Have you seen the cards for girls?  Happy Birthday "Princess" .  Fru-fru stuff.  Not a card here that would come from a boy.  You're going to have to make a card."

Ooookaaaay.  Remembered a card I made in the Sizzix class.  Pulled that out.  It was met with less than enthusiasm.  I will admit, that it was not made from colors or papers that I would have chosen myself.  But I was desperate!

Called the youngest Kiddo into my craft room and started  pulling out dies.  And this is what he and I came up with:


The base is a 5 1/2" square piece of Pure Luxury.  The pink layer is SU's Pink Pirouette. Dark Chocolate and Kiss Me Pink metal were die cut with the QuicKutz cupcake die and embossed using Cuttlebug's Swiss Dots and Swirls embossing folders.  The candle is from the personal baking stash.  I personally would have chosen another color.  But the card isn't from me.  It's from the Kiddo.  And that's how it should beHis choices, not mine.  The sentiment is from an old SU set. 

CAS.  Done. 

I thought I'd share the attempts at getting a somewhat decent photo of the Kiddo.  Yeah.  Let's just say it took about as long to get one decent photo as it did to make the decisions on the card.

Whatever you do, DO NOT crack a smile


But feel free to crack yourself up!


You said SMILE!


I'll get what I can take!

I hope you all enjoy what is left of your weekend.  I'm headed back to the cleaning.  It would seem that two tornados also tore up my craft room. 

Sigh.

"Till then......................Explore some creativity with someone special.  It's sooo worth the mess!!


Saturday, February 26, 2011

It's Time

This past week has been crazy in this household.  And, unfortunately, it is becoming a typical week. I worked more hours than was scheduled.  My mornings were greeted with cries of "MOM! I need school pants!"  "MOM! I need socks!" "MOM! We're out of milk again!"  The Toad is running around crazy trying to coach too many different basketball teams. 

I spent my "free" afternoon with the oldest Kiddo in Urgent Care.  He now has a splint cast on his wrist and a follow up appointment with the ortho doc on Monday.

On Friday, while rummaging through all the unfolded clothes that have come to make the bench in my room their home, I saw it.

Cobwebs.

That's it.  I've hit my max. I'm tired of being a step behind in our daily lives.  I'm tired of trying to ignore the piles of 1/2 done laundry and the dust.  Soooo.  This family has been warned. We are ALL going to get this house somewhat on track this weekend. 

Which means that visiting blogs and actually having fun creating ANYTHING are going to be put on hiatus for a few days on my end. 

Minus the time spent playing in the snow (again).  Guess since we rarely get snow, I should let the kids enjoy that moment. 

Enjoy your weekend.  'Till then............. 

Tuesday, February 22, 2011

One Week Later

It would seem as if Life has put Creating on the back burner.  Since my mojo was tired after two long days of work, I decided to  play around with some photos I took on Sunday after a rare accumulation of snow at our house.  Remember my First Signs of Spring?  Here is Spring one week later.

This was taken when it was still cloudy and spitting snow

Then the sun came out and made the snow just glisten on the flowering buds

I actually got brave and played around with the brush tool in Photoshop Elements 9 on these photos. 

Baby steps.  That's all I've got is baby steps on this photo editing.

I actually took quite a few pictures of the youngest kiddo playing in the snow.  I think he would have stayed outside until it melted (unlike his older brother who rolled out of bed late in the morning and then did a lot of groaning and moaning when I finally told him I was kicking him outside for a while!). I really need to go through those photos and see if I got any worth posting.  But that will have to wait until another day.  It would seem that the cries of "MOM! I don't have any uniform pants for school tomorrow!" are going to demand that I face that dreaded task of laundry once again.  

'Till then...................remember to take a moment or two just for yourself!


Friday, February 18, 2011

Distressed!


Well, actually the  E-Team got distressed! The Team was challenged to create with their version of Distressed.  

You'll want to visit all the other team members to see their version of being Distressed. Of course, Daisy has some great blog candy to give away!! Leaving a comment on each team member's blog enters you in the drawing for two(2) $25 eP gift certificates. Just in time for all the new goodies coming in!

All you have to do is visit and leave a comment on each participating blog. You have all President's weekend to leave comments(Fri-Mon) and  two winners will be picked on Tues. Winners will be announced on eP blog Tuesday, Feb 22nd

and


I decided not only to get stressed Distressed, but I went steampunk too!!


While I love my Distress Inks (instant aging!), I thought I would share an easy faux painting technique for my distressing.  I began with a paper mache box with a lid that had been given a base coat of white some time ago.  I wanted a warmer under tone, so I repainted the box with some craft paint in Antique White.  I then dabbed my brush in more paint and then dabbed some of Claudine Hellmuth's matte multi medium onto the brush too.  I scrunched up some tissue paper (just good ol' gift wrap tissue paper!) flattened it out somewhat and tore pieces and "glued" them to the box using the paint/medium mixture.  I didn't worry about any wrinkles that appeared in the tissue. It adds to the distressed texture!

And from here on out, I got so wrapped up in the actual creating process, I forgot to take pictures! LOL!  I promise I'll try to get better at the step by step in the future!

 I let that layer dry and then painted the box with Claudine's Sable Brown acrylic paint (wonderful, creamy paints, btw!)  I let the paint sit for maybe 15-20 seconds and dabbed with a paper towel to remove some of the Sable Brown color, slightly revealing the Vintage White layer. 

After the box had dried, I spritzed lightly with Tattered Angel's Glimmer Mist in Tattered Leather.  I then spritzed more heavily with Antique Brass Glimmer Mist. The box has a very slight shimmer that gives the impression of a rusted treasure box. 

My inspiration for the decorative elements came from Graphic 45's Steampunk Debutante.  I lined the inside of the box with a couple of different sheets of the dp (oops! I really need to fire the photographer! No pics of the inside either!). The diamonds along the sides were die cut using Spellbinders Classic Diamonds. I embossed the roses with TenSecond Studios Kabuka #4 Roses on Peacock metal and ran a decorative wheel along the edges.  After lightly sanding the raised edges with a burnishing block,  I adhered the triangles with Hummungo TapeHindsight says that next time I'll consider how the the lid sits on the box before I decide how my decorative elements should be placed on the sides of the box!! geeesh..............Different idea-ology doodads were adhered on each center triangle. 

The flower on the lid is made from a sandwich of a sheet of dp from Graphic 45's Steampunk Debutante and more Peacock metal. This double layering gives more heft to the metal.  I used the Tattered Floral die to cut my layers and a combination of Glossy Accents and E6000 to hold it all together. After it was completely dry and solid,  I spritzed with Perfect Pearls in Turquoise. 

The gears were out of TSS Chocolate metal using the Gadget Gears die and embossed with the texture fade embossing folder Patchwork.  Again, I lightly sanded  the raised metal with a burnishing block to remove the finish.

The clock face and butterfly are actually stickers that I've had in my collection for quite a while.  The butterfly was colored with copics and adhered to a stack of circles  punched out of transparency to add some height and dimension.  Once again, various idea-ology doodads were used to finish off the decorative elements. 

Some close ups:


I hope that you find some inspiration in all the different versions of Distressing!  Distressing should not be stressful!! There is no right or wrong way of doing it!! Just pull out your supplies and have fun with the aging process! On your project....I will admit the aging process on your body won't be as fun!! snicker.  To help you in your Distressing times, Daisy has put some distressing goodies on sale!! All Distress Inks and Reinkers are 10% off and there are some Tim Holtz and Wendy Vecchi goodies on sale too!!  Make sure to check it out!

'Till next time.............................

Wednesday, February 16, 2011

One Love

How in the world did we get to Wednesday already?! I think I'm stuck somewhere in Thursday of last week!!

Anyhoos! 

I needed to make a wedding card for a "celebrate our marriage" open house that is this weekend.  The invitation was fairly simple, the information is typed on white, with a vellum " triangle "gate" fold that is held together by a simple embossed seal.  I knew I wanted to include the vellum element somehow.  While rummaging through my embossing folders, I happened to look up on the top of the shelving where I "store" cards and other projects that I have not found a home for yet.

Bingo!! 

I decided to CASE (copy and share everything) myself.  Hehe.

Yes, I used the dreaded PINK color again!!  I'm thinking that I might be running a fever!

The original card was made waaaaay back in July, '09, as a "Dare to Get Dirty" challenge on SCS. This would be special challenges brought to Fan Club members by current and past Dirty Dozen members.  I even considered just trying to change the original sentiment to a more "newlywed" sentiment and giving that card.  But there was a couple of problems with that idea.  A) The base of the original card was rather flimsy, in my opinion.  I am TOTALLY in love with the thickness of the Pure Luxury card stock for my bases of cards.  Especially cards that have some extra elements and layers to it!  B) I wanted a softer color of roses that fit the theme of the couple's invitation better.  C)  I totally tore the card up trying to remove the flowers to replace the sentiment!

The layout came from a challenge sketch by Cindy Hafner.  The base is a 5 1/2" square of Pure Luxury.  The background squares use SU's Pink Pirouette and Basic Black as a mat for the Cuttlebug embossed squares.  The sentiment was computer generated and printed out on more Pure Luxury.  For once, my printer accepted this thick paper!! But, I will admit to printing it out several times on printer paper and even Georgia Pacific before trying the Pure Luxury.  The Pure Luxury also has a beautiful, true WHITE to it! I used my Spellbinders classic and scalloped circle dies to cut the sentiment layers.  Light sponging with Pink Pirouette was done along the classic circle border. 

Now for the roses.  Ahhhhh!  Can I just say that these turned out sooo much better than I had thought?!  I initially tried to make the rolled roses, like the original ones, out of vellum from SU.  Insert a heavy sigh here________.  Vellum tears.  And it does not hold the rolled shape like paper does.  After several frustrating attempts I gave up.  I decided to try another idea.  First, I inked up some vellum with Distress Ink in Worn Lipstick.  Then I used my Grunge Flowers #2 and #3 from PaperArtsy and cut out several flowers, some from the pink and some from the plain vellum, using the smaller of the two dies.  I then made the roses using a tutorial from Leandra (The YouTube link is on her side bar).  The smaller roses were made with the same die.  I just did not make as many layers!  All the layers were adhered using Glossy Accents. After all the flowers were dried, I spritzed them with Tattered Angels Glimmer Mist in Pearl.


OOOO!! Just the perfect shimmer!!

The roses and leaves were adhered using more Glossy Accents.  The pearls and gems were recycled from the original card, as that one is now a gonner!

In all honesty, I think I like this one better than the original! Even if it does use PINK! haha  The vellum roses just add that something "extra". 

I've already got my desk area cleaned up and have started on the next project!! Yep....you'll want to tune in on Friday, February 18, for the next E-Team adventure!!  

'Till then.......................create something new, or better yet, recreate something that you enjoyed before.  You just might like the second round even better! 


Monday, February 14, 2011

First Signs of Spring

My good intentions of practicing my photography skills have already been pushed aside.  Not for the lack of desire.  But for the lack of time to figure out the photo editing portion. 

But yesterday, I noticed the first signs of spring are starting to bloom. And it was just too perfect of a day not to take advantage of the gorgeous weather, the bright blue sky and the blooming plum trees in our yard.


This little guy kept turning his butt to the camera every time I pushed the shutter.  Maybe he was trying to tell me something?!


I would really like to figure out how to add layered textures to my pictures. I think it would help cover the lack of skill I have with my point and shoot photography. 

Maybe I should just focus on getting the actual editing down to a reasonable time, without my cheat sheets first!  

'Till then...............I hope you have a wonderful, bloomin' day!

Saturday, February 12, 2011

In the Pink

Today my computer decided to FINALLY recognize my camera cards!! YEAH! 

Of course, it is now throwing little snits in other areas.  But I'm just going to ignore those for the time being and get this card posted before the stupid thing decides it is going to cut me off of blogging!!

I know I'm always making excuses for my poor photography skills.  Obviously, I need to increase the practice in that area.  But! In my defense on this photo, may I just remind you that my computer REFUSED to download my pictures yesterday?  Therefore, I was  unable to see if I needed to have a repeat photo session.  I did.  But the card has been given to the birthday gal already.  There are no "do overs".  So, we must all do with what we have!!


Yes, I used the dreaded pink on this!! For those of you new to my blog, pink is NOT a color a I gravitate too!  It is just a TAD too girly for me! haha!  Once again, I pulled out the Bugaboo digi's for my fun, somewhat snarky card.  After resizing and printing out on GP 110# (my printer REFUSES to accept my preferred Pure Luxury), I colored the image with copics.  I matted the image on a piece of SU pink ( I have NO idea which pink this is...perhaps Pixie Pink?  Regal Rose?).I used the scallop punch from SU to trim the bottom portion and sponged all the edges with Pixie Pink.  The dp is from S-E-I's Black Orchid. The paper obviously has some embossing on it, as it glaringly shows! Again, that was layered on the pink and adhered to a Pure Luxury 5 1/2" square base.


The sentiment comes with the image and was again re sized and printed out on the GP paper.  I used the classic and scalloped oval dies from Spellbinders to frame it.  Sponging was done on the scalloped edges with Pixie Pink.

I actually decorated the inside too!!  Those pictures were in no shape or form presentable! I edged the bottom with another strip of the dp on the pink.  I then used my computer in a matching font (as close as I could find) to print out May your bank account be overflowing on your birthday!  This was also cut out with the classic and scalloped ovals.  I had even colored some self adhesive gems pink and used them above and below the sentiment.  Too cute.  You'll have to take my word on that!

My desk is already cleaned up and ready to start the next project!  Now, if I could only say the same about my kitchen! snort! 

'Till then.....................make some creative time in your weekend!

p.s.....like the wonderful white highlighting?  OMG......tried to fix it.....it's still there.  I'm leaving it.  Time to walk away before I do something I may regret!

Friday, February 11, 2011

My Love/Hate Relationship

I'm in a Love/Hate relationship. 

I find that I'm somewhat (ok, possibly overly) needy of my time in this relationship.  I find myself  feeling I have to connect several times a day. 

Maybe that is a sign that I need to step back and just let things flow in a more natural way.

But yet, I find myself incredibly frustrated with certain aspects of this relationship.  Communication tends to break down frequently, causing angry thoughts on my part.  Justified?  I'm not sure.  In truth, the lack of communication is probably my fault.

Yes, once again, me and my computer are on the outs.  While I can post my frustrated thoughts here, my computer refuses to acknowledge that it recognizes various cameras/cards that it recognized two days ago.  Of course, this happens after said computer decided to upgrade itself yesterday.

So.  You will all have to wait to see the latest card creation. Brace yourselves~~~I even used the dreaded PINK on it!  I'm calling in to my "relationship" expert this afternoon.  Yep.  Time for the big guns.

I'm going to have the Toad download a new spyware program. 

It's time for my computer to commit to this relationship.  In all aspects.  Including one of the most important~DOWNLOADING MY PICTURES!!!

I'm going to go prepare myself for the confrontation now.  Till then..................


Wednesday, February 9, 2011

A WOYWW Tour

Eeeeeaaaakkk! It's Wednesday already and that means that Ms. Julia Dunnit is hosting another WOYWW. 

Can I just say that looking at crafting areas is almost as addicting as crafting itself?!  It took me a few days, but I managed to look at all the links last week.  I love seeing what others are working on, and their crafting spaces too!  I won't guarantee that I will make everyone's desk each week, but I'll give it my best!

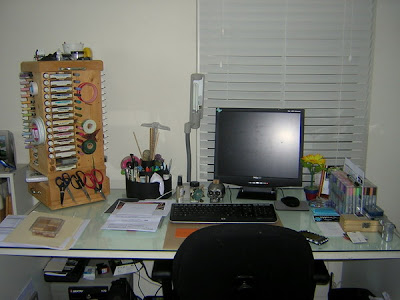
I have gotten into the (?) good habit of trying to clean up the aftermath of the disasters that are created after  finishing up my projects before I move onto the next one.  Believe it or not, I even completed some more of the "mass production" school staff birthday cards after my last post on Monday, that are needed for this month.  And I cleaned up my area so that is it fairly presentable.  So I thought that I would share some pics of what my space looks like since I don't have anything in progress today.

My crafting area is in the spare bedroom.  It was to be the Toad's "man cave".  But somehow, I, uhhh, kind of took over (I have offered to clear out a space by the window for him to put a table so that he can work on his models while I create.  So far, all I've gotten is glares and mutterings about "this was MY space" as he leaves the room.)  It is not TOTALLY my space as it does have some "junk" that I/we have just not dealt with since moving in (uhhh....about 10 years ago!), but for the most part, yeah.  It's my area! LOL!


The first picture is from the angle of me standing in the doorway, looking to my right, which is where my desk is.  The wooden unit was a gift from the Toad several years ago (shhhhh.....don't tell anyone, but he really does spoil me by buying "stuff" that makes my space easier to create in!  He likes to complain, but in reality, he is my biggest fan! ).  The unit houses most of my SU inks and markers from days gone by.  I really should move my Distress inks to this as I use them more, but I'm just too lazy! Different pens, pencils, my tape dispenser, rulers and such are kept in the Pampered Chef tool caddy. My copics are kept on my desk with my color chart.

 The far left pile of paper is a mix of recipes I've printed off and the list of staff members birthdays.   The other pile is the "Here Mom" pile.  Which covers my Bamboo tablet. 


Next is looking straight forward from the door.  The shelves hold family books and alterable items.  The b/w folders hold my unmounted stamps.  The chest above it holds various embellishments.  The shelf below has some metal pails that hold different glues, paint brushes, large sponges and such. 

The little rocking chair belonged to the Toad as a child.
And of course, there is the "junk pile".  Stuff that needs to be dealt with that I just stack neatly and try to ignore.


Next is the wall behind my desk.  I store my ribbons and more embellishments in the clear containers.  The black storage containers hold my Sizzix dies and embossing folders. My Big Shot and Cuttlebug are also kept here. The metal containers hold small sponge daubers, my alcohol inks, some crackle paints and glue dots/dimensionals. The baskets hold envies, electronic cords, tools that are not used as much as well as miscellaneous embellishment and alterable items.  The big green storage unit holds scrapbooking supplies from days gone by! You can see a peek of the wrapping paper container (and not seen~ rolls of wrapping paper) that is kept behind the door. I store SU In Colors and my Distress Inks in these ink cubbies. Obviously, my punches are stored here too.  Projects that I haven't given away yet are displayed on the top. Peeking behind them is another embellshment holder that keeps buttons, brads, and eyelets organized.


The sliding door closet is to the right of my desk. Obviously, this is only half of it! LOL! This is where I store all my SU sets as well as my papers (kept in Cropper Hopper paper storage units).  The containers on the floor would be all my photos and memorabilia.  Storing them this way, makes them easy to grab and load in the truck during fire season!  And of course there is the "junk"  that again, I try to ignore!

The paper shredder (with my Three Faces of Suzi that still needs to be hung up!) sits on top of clear storage drawers that hold my small tubes of acrylic paints.


This last shot is under my desk.  The black storage container holds all my SU paper scraps in vanilla folders, sorted by color.  The Cropper Hopper paper holder is filled with papers that I'm using for works in progress.  Behind that is another file storage unit that holds paper scraps from various companies, sorted by color.  The black bag holds frequently used tools, such as my stampamajig, my acrylic blocks and cropadile. 
The house file and printer is also kept there.  

So! That is my space! Not as lavish as some, but it works for me!  Someday I'll get motivated and give the walls some color, but that chore is not high on the "improvement" list! LOL!

Thanks for dropping by again today!  I'll try to have a more "exciting" desk next week!
'Till then...................

Monday, February 7, 2011

Learning to Pause

Well, it would appear that Monday is half over!! I spent my morning forcing unwilling children out of bed and to school after a busy weekend.  Wore out the dog (temporarily) with an hour long walk, started on the mounds of laundry that procreated while in the Toad's and oldest kiddo's duffel bags for a weekend retreat.  Maybe I should just start a blog on the prolific life that laundry has.....

Oh yeah.  And I almost, kind of sort of, ruined a project that I have been working on all weekend. 


Sigh.  I'm just going to chalk this one up to the ever needed practice and skill building that I so obviously need with metal. 


While cruising on SCS on Saturday I followed the inspiration challenge link to Uncommon Goods.  I was immediately inspired by these hummingbird feeders and went to work on my own metal version.

I was over all pleased with this  project until the blotch that is now the sentiment area came to be.  Initially, I traced around a Heidi Swapp mask onto a piece of TenSecond Studios Peacock metal for the flowers.  I then found a couple of pictures of hummingbirds online and modified the drawings to fit my needs.  After embossing, refining, embossing and finalizing all the metal work, I filled the puffed out areas on the back of the sheet with light weight Spackle. 


I think this is when I "ruined" my piece. 

After letting the Spackle dry (while on my walk with the pooch), I lightly sanded the Spackle to decrease any weird bumps I might get when I adhered the final piece.  Either I brushed off a large chunk of Spackle onto my craft mat or had unwittingly left a chunk there from my application and didn't realize it.  I then carefully applied Hummungo tape onto the back and carefully adhered the metal to a 9 x 12" flat canvas.

 THEN....THEN it happened 

When I flipped over my piece, there was a slight area that was scratched with a little blob of Spackle.  So I carefully scrapped the Spackle off.  Not too bad of a scratch.  But some of the Spackle was still present.  So I took a damp corner of my clean up rag and wiped the Spackle off.  Leaving a rather larger "spot" where the color was removed.  ACCCCKKKK!! I couldn't have removed the color better if I had deliberately tried!

OKAAAAYYYY.  I decided not to panic and sand the rest of the embossed areas, hoping that the "spot" wouldn't be so obvious.

Nope.  It became even MORE obvious. 

I considered cutting out and embossing more flowers and adhering it to the area, but I felt that the extra flowers would mess up my design flow (whatever THAT is).  I spent far too long online looking for "hummingbird quotes" to fit that area.  I tried cutting out a metal frame to stamp a sentiment on.  But the area became too crowded. 

Finally, I grabbed my wire brush tool and removed the color from the area and stamped the sentiment from Tim Holtz's Just Thoughts with Black StazOn

Still not completely thrilled with the result and may still work on a more dimensional type frame for the sentiment. Of course, now that frame would have to be even bigger to cover up the area that I brushed.

Do you ever feel like you are in a Three Stooges movie with trying to fix a tiny mistake and making a HUGE mess of the whole deal?!

No?.....oh.  Maybe it's just me. 

There are those in blog land who don't share their creative mistakes.  But I will.  for a couple of reasons:

 If I didn't share my mistakes, I would rarely post. And who knows, maybe we'll both learn something from my mistakes.  Hopefully, you'll learn quicker than me!

I've read that being creative is to make mistakes.  ART comes in knowing which ones to keep. See above.

I'm going to walk away from this for a while.  Maybe it will grow more on me.....
Till then..............have some fun. Take a risk and make some mistakes.  Maybe you'll make some ART!

Saturday, February 5, 2011

Simple Thoughts

Happy Weekend Peoples!  I'm still trying to get back into the groove of things after CHA.  It is amazing how life continues to move on without "mom" when she takes a day or so away, but how quickly she is expected to get back into the groove of reality!!

Played around some yesterday and this morning with one of the new molds that were just released from TenSecond Studios.  I also tried my first attempt at writing on metal.

Let's just say, that I cannot write in a straight line to save my life.  Kiss me a gonner if I'm ever asked to do so!!

I also learned a few important things on this project. 

1)  Always make sure that the surface you are working with the metal on is fairly smooth.  In other words, don't be lazy and use your dinged up glass table top instead of your acrylic mat.  The table top dings may add extra "texture" to your piece. 

Or maybe that is just "home made" character!

2)  When one pieces the Humungo Sticky tape only the back of the metal, one should NEVER then try to smooth out the metal.  The Tape will act as a cushion, giving a edge that is not wanted, right down the middle of your image.

3)  One should also make sure that all the bumps and such are removed from the metal BEFORE one adheres it to the front of a card.  The camera doesn't lie.

And after all that jibber jabber, here is the piece.


The base is a 5 1/2" square piece of SU's Chocolate Chip.  Very Vanilla is the next layer with the edges rounded.  The metal is Dark Chocolate that was traced from a decorative chip board piece that I had originally thought to cover with the metal for another project.  I used the new Kabuka mold for the flower. I used one of my decorative wheels for my border and flattened the inside to make a frame. After sanding all the raised edges,  I filled in the flat areas of the flower with Glossy Accents and sprinkled with Doodle Bug glitter. 

To be perfectly honest, all the bumps and grooves rather annoy me.  I'm thinking this one may get filed in Folder 13. 

I'm now off to clean up the mess from this so that the youngest kiddo and I can start his California History project.  It would seem there is NO room on this desk for the kid to work. 

Thanks for dropping by again today!!  I've got the other side of this mold staring at me as I type and the wheels are turning.....'Till then..........................remember that exploring something new might not render the results you were hoping for, but there is always a lesson to be learned from it!

Wednesday, February 2, 2011

Just a Mess...............


edited to add:  I am a total dork.  Seriously, I never looked at my post after I wrote it up and never realized that I forgot to post the picture!!  A couple of comments finally clued me in to the fact!! DOI!
Sooo, here is the long awaited picture! LOL
..................that is all that is on my desk for WOYWW87.  I still haven't cleaned up the mess from last week as I was finishing up my my frame up until the time I needed to pack for CHA.  In the meantime, youngest kiddo has done the beginning research for a paper on California history and there is my googled map directions to the LA convention center.

Gloves would be from being thrown on the desk after this morning's walk with the dog.  The invitation is for a newly married couple's open house that I need to RSVP too.

No fun projects in the works.  Sigh.

 Can someone explain to me how it is that I did all the laundry before leaving on Friday and upon my return on Sunday, there is MOUNDS of the stuff?  Not to mention the disaster area aka the kitchen (ok.  I will take some responsibility for SOME of that mess.  I actually made homemade roasted tomato soup on Monday for dinner. Then I got hit with the "I need help with my homework" wall.  Still need to finish cleaning up that mess)

So, I'm off to get some cleaning done.  And to do some visiting of other desks.  I like snooping into spaces and see what others have in the works, not to mention, I like looking at the work spaces!

Till then....................